Basic Bun Recipe - Hearty Food Ideas
Let’s chat about the art of bun-making. While store-bought versions serve their purpose, there’s something extra special about biting into a soft, homemade bun. They are versatile, comforting, and surprisingly easy to whip up.
Servings 8
Calories 200kcal
Ingredients
- Let’s gather our pantry staples that will come together to make these delightful buns. Here’s what you’ll need:
- 1 - .25 ounce
- 1 - pound all-purpose flour or more, as needed
- 1 - cup warm water 105°F / 41°C
- 2 - large eggs, divided
- 3 - tablespoons melted butter
- 3 - tablespoons granulated sugar
- 1 - teaspoon salt
- 1 - tablespoon olive oil
- 1 - tablespoon milk to wash the buns
- 1 - teaspoon sesame seeds for garnish
- 1 - teaspoon garlic powder optional for flavor
Instructions
Step 1: Activate the Yeast
- Start by placing the active dry yeast in the bowl of your stand mixer. Add half a cup of flour along with the warm water. Use a whisk to blend these ingredients together until the mixture is smooth. Allow this to sit quietly for about 10 to 15 minutes until it’s foamy. This means the yeast is alive and well, eager to create the fluffy buns we crave.
Step 2: Mix in the Other Ingredients
- Once your yeast is happily bubbling away, add one beaten egg, melted butter, sugar, and salt to the mixture. Whisk again until these ingredients are thoroughly combined. Now it’s time to add the remaining flour, about three more cups.
Step 3: Knead the Dough
- Now, attach the dough hook to your stand mixer. Knead the dough on low speed until it becomes soft and just a bit sticky, which should take about 5 to 6 minutes. You might need to scrape down the sides with a silicone spatula if the dough sticks a bit too much. If large pieces stick to the spatula, add just a bit more flour until the dough comes together nicely.
Step 4: Shape the Dough
- Flour a clean surface and transfer the dough onto it. It should be slightly sticky but elastic enough not to cling to your fingers. Shape the dough into a smooth, round ball. Make sure you tuck the loose ends underneath to create a neat finish.
Step 5: Let the Dough Rise
- Clean out your stand mixer bowl and drizzle some olive oil inside. Place your dough ball in the bowl and turn it a few times to coat it in oil. Cover the bowl with aluminum foil and set it in a warm spot to rise until doubled in size for about 2 hours.
Step 6: Shape the Buns
- After waiting patiently, line a baking sheet with parchment paper or a silicone mat. Grab your dough and gently flatten it on a floured surface to ensure any bubbles burst. Aim to form it into a rectangle that's about 5x10 inches and half an inch thick. If necessary, dust lightly with flour before cutting it into eight equal pieces.
Step 7: Form the Buns
- Take each piece and form it into a round bun by gently tucking the ends beneath. Lay them on your prepared baking sheet, spacing them about half an inch apart.
Step 8: Let the Buns Rise Again
- Use your hands to gently press and flatten each round into a disc, about half an inch thick. Lightly dust the tops with flour and drape a piece of plastic wrap over the baking sheet. Allow the buns to rise again until they’ve doubled in size, taking about an hour.
Step 9: Preheat the Oven
- While the dough is rising for the second time, preheat your oven to 375°F (190°C).
Step 10: Egg Wash and Garnish
- In a small bowl, whisk together the remaining egg and milk until well combined. Use a fork or a pastry brush to gently coat the top of each bun with the egg wash. Be careful not to deflate your dough—be gentle! Sprinkle sesame seeds over the top for a little extra flair.
Step 11: Bake the Buns
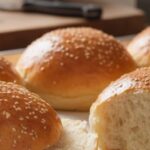
- Slide your baking sheet into the preheated oven. Bake until the buns are lightly golden brown on top, which will take about 15 to 17 minutes. They may touch slightly where they meet, which is perfectly fine.
Step 12: Cool and Serve
- Once done, allow the buns to cool completely on the rack. You can then tear them apart and slice them in half crosswise for serving. Enjoy the fruits of your labor!
Notes
- Room Temperature Ingredients: Make sure your eggs are at room temperature for the best result.
- Sticky Dough: If dough is too sticky, add small amounts of flour until it reaches the desired consistency.
- Proper Mixing: Ensure the yeast is properly activated; this step is crucial for fluffy buns.
- Don’t Rush the Rising: Be patient with the rising times; both are needed for the best texture.
- Experiment: Feel free to add spices or herbs to the dough for extra flavor.