Butter Tart Recipe
Getting kids to eat homemade treats feels impossible when store-bought options are so convenient—until you try making butter tarts together as a family. I've watched countless children who claim they don't like "homemade desserts" become completely mesmerized by the buttery aroma and gooey filling of warm butter tarts. There's something about creating these little golden pockets of sweetness that turns skeptical eaters into enthusiastic helpers. Today, I'm sharing my tested approach to butter tarts that wins over even the pickiest palates in your kitchen.
Servings 12 2
Calories 363kcal
Ingredients
For the Pastry Shells
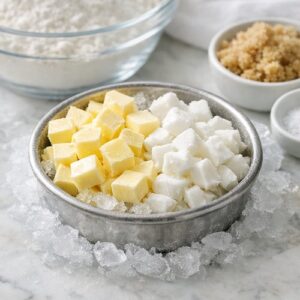
- ½ cup unsalted butter (very cold, cut into small cubes
- 1 tablespoon brown sugar adds subtle sweetness and helps create golden color
- 6 tablespoon ice water (approximately
- 2¼ cup all-purpose flour (or use pastry flour for extra-tender crusts
- ½ teaspoon salt enhances all other flavors without tasting salty
- ½ cup vegetable shortening (very cold, cut into small cubes
For the Filling
- 1 large egg (room temperature for even mixing
- ¼ teaspoon salt balances sweetness and brings out depth
- ½ cup corn syrup creates that signature caramel-like consistency and shine
- ½ cup lightly packed brown sugar (the packed measurement matters
- 1 teaspoon pure vanilla extract (not imitation
- ¼ cup unsalted butter melted and slightly cooled before adding to egg
- ½ cup raisins or substitute with ½ cup chopped pecans, walnuts, or chocolate chips based on family preference
Instructions
Step 1: Prepare the Pastry Dough
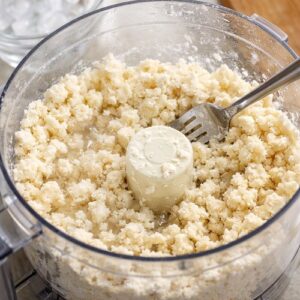
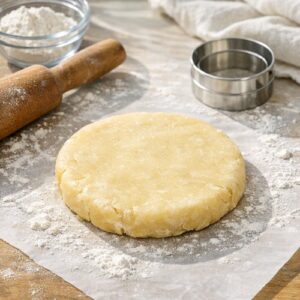
- Start by gathering your cold butter and shortening in small cubes and placing them in the freezer while you measure your flour, salt, and brown sugar. Cold fat is essential for flaky pastry—this is the most important step, and I want you to understand why. When cold fat pieces melt in the oven, they create steam pockets that make the pastry light and crispy. If your fat is warm, it blends smoothly into the flour and you get tough, dense pastry instead. Add your flour, salt, and brown sugar to a food processor. If you have children helping, this is a great moment for them to pour the flour in and watch the processor mix things—but keep hands far away from the blade. Pulse the flour mixture a few times just to combine. Now add your cold butter and shortening cubes and pulse until the mixture looks like coarse breadcrumbs or peas. This should take about 10-15 pulses. You want to still see small pieces of fat—you're not trying to create a smooth dough yet.
Step 2: Add Water and Bring the Dough Together
- Sprinkle 6 tablespoons of ice water over the flour mixture and pulse gently—just 3-4 pulses. Open the processor and toss the mixture with a fork. If it looks crumbly and won't hold together when you squeeze it, add 1 more tablespoon of water and toss again. Your goal is dough that just barely holds together when pressed, not dough that forms a ball. This is critical: do not overwork the dough by over-pulsing or handling it too much, or your pastry will become tough instead of tender. Kids love this step because they get to use the fork like they're really helping. Let them toss and check if the dough is ready. It teaches them to recognize texture, which is a crucial cooking skill.
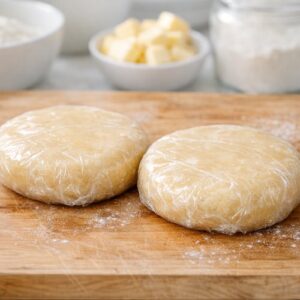
Step 3: Chill the Dough
- Divide your dough into two equal portions and shape each into a disk about 1 inch thick. Wrap each disk tightly in plastic wrap and refrigerate for at least 30 minutes. This is actually a perfect pause point if your family wants to take a break before continuing. You can make the filling during this time, or you can chill the dough for up to 48 hours if you want to bake the tarts another day. Pro tip: I often prepare the dough on Saturday morning and bake tarts on Sunday afternoon. This makes the whole process feel less rushed and more like what it actually is—a leisurely family activity.
Step 4: Roll and Cut the Pastry
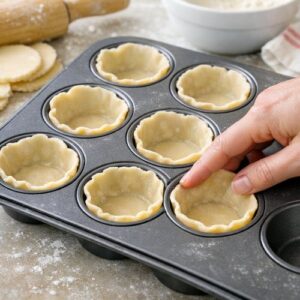
- When you're ready to continue, flour your work surface lightly and remove one disk of dough from the fridge. Let it sit at room temperature for about 5 minutes—this makes it easier to roll without cracking. Using a rolling pin, gently roll the dough to about ⅛-inch thickness. If you have children rolling, supervise closely and make sure they understand that the dough should be rolled gently, not aggressively, to keep it flaky. Using a 4-inch round cutter (or a drinking glass works in a pinch), cut circles from the dough. Gather scraps, gently re-roll them, and cut more circles. You should get about 12 circles per disk, giving you 24 tarts total.
Step 5: Line Your Muffin Cups
- Fit each pastry circle gently into a muffin cup, pressing it to the bottom and sides. Older children can do this independently, but younger children need help to avoid tearing the dough. The dough doesn't need to come all the way to the top of the cup—it should sit about halfway up the sides. Place the lined muffin tins in the freezer for at least 15 minutes while you prepare the filling. Cold pastry going into a hot oven is the secret to maximum flakiness. This is not a step to skip.
Step 6: Make the Filling
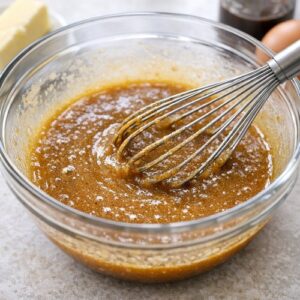
- In a medium bowl, whisk together your brown sugar, corn syrup, melted butter, egg, vanilla extract, and salt until completely smooth and well combined. This should take about 1-2 minutes of whisking. Let kids do the whisking—it's safe, it's satisfying, and they get to watch the ingredients transform into something that looks completely different from what went in. Take a moment here to talk with your kids about what's happening. The egg is helping bind everything together. The corn syrup is what creates that glossy, caramel-like look and texture. The vanilla adds a depth of flavor you can't quite identify but definitely improves everything. These little moments of explanation turn cooking into learning.
Step 7: Add Mix-Ins and Customize
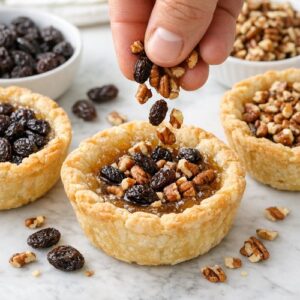
- This is where customization happens and where picky eaters suddenly become willing participants. Sprinkle raisins (or your chosen substitute—pecans, walnuts, or chocolate chips) into a single layer at the bottom of each cold pastry shell. This prevents mix-ins from sinking to the bottom during baking and gives every bite something interesting. If you have multiple children with different preferences, divide the prepared muffin tins now. Half can have raisins, a quarter can have pecans, and a quarter can have chocolate chips. Each child gets to see their preference going into their tarts. This ownership transforms the entire experience.
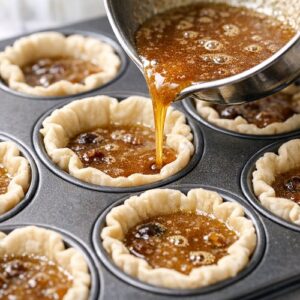
Step 8: Fill and Bake
- Pour the syrup mixture into each pastry cup until it comes about two-thirds of the way up the sides. Warn older children that this liquid is hot (from the melted butter) and be extremely careful around younger kids during this step. You can use a small measuring spoon or a ladle to make pouring easier and less messy. Don't overfill—if the mixture reaches the rim of the cup, it will bubble over during baking and make a mess in your oven. Place the filled muffin tins on the lower shelf of a preheated 425°F oven. Bake for 12-15 minutes, until the pastry is golden brown and the filling has puffed up and set slightly. You'll see the filling bubble gently—that's exactly what you want. The filling will firm up more as it cools. If your oven runs hot, check at 12 minutes. If it runs cool, you might need the full 15 minutes.
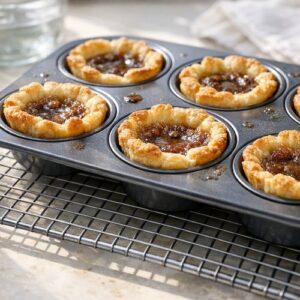
Step 9: Cool and Remove
- This is the hardest part for kids—waiting. Let the tarts cool completely on a wire rack before attempting to remove them from the muffin tin. I know this feels eternal when they smell this good, but warm tarts are still soft inside and will stick to the pan if you try to remove them too early. Completely cooled tarts slip out of the cups easily and have set to the proper texture inside—still slightly gooey but stable enough to hold its shape. Once cooled, run a thin knife around the edge of each tart and gently pop it out of the muffin cup. If you have a stubborn tart, place the entire muffin tin back in the oven at 350°F for 2-3 minutes to slightly warm the pan, which helps release the pastry.