Before you throw those leftovers away, turn them into something even better. This Beef Barley Soup Slow Cooker Recipe was born from exactly that moment—the one where I opened my refrigerator and found a half-eaten roast staring back at me. I could toss it. Or I could transform it. That afternoon, I created a soup so warming and nourishing that my family asked for it by name all winter long. Just like my mother taught me in her kitchen, the most memorable meals often come from resourcefulness and love blended together. Whether you’re starting with leftover beef or building from scratch, I’m going to show you how to make magic in your slow cooker.
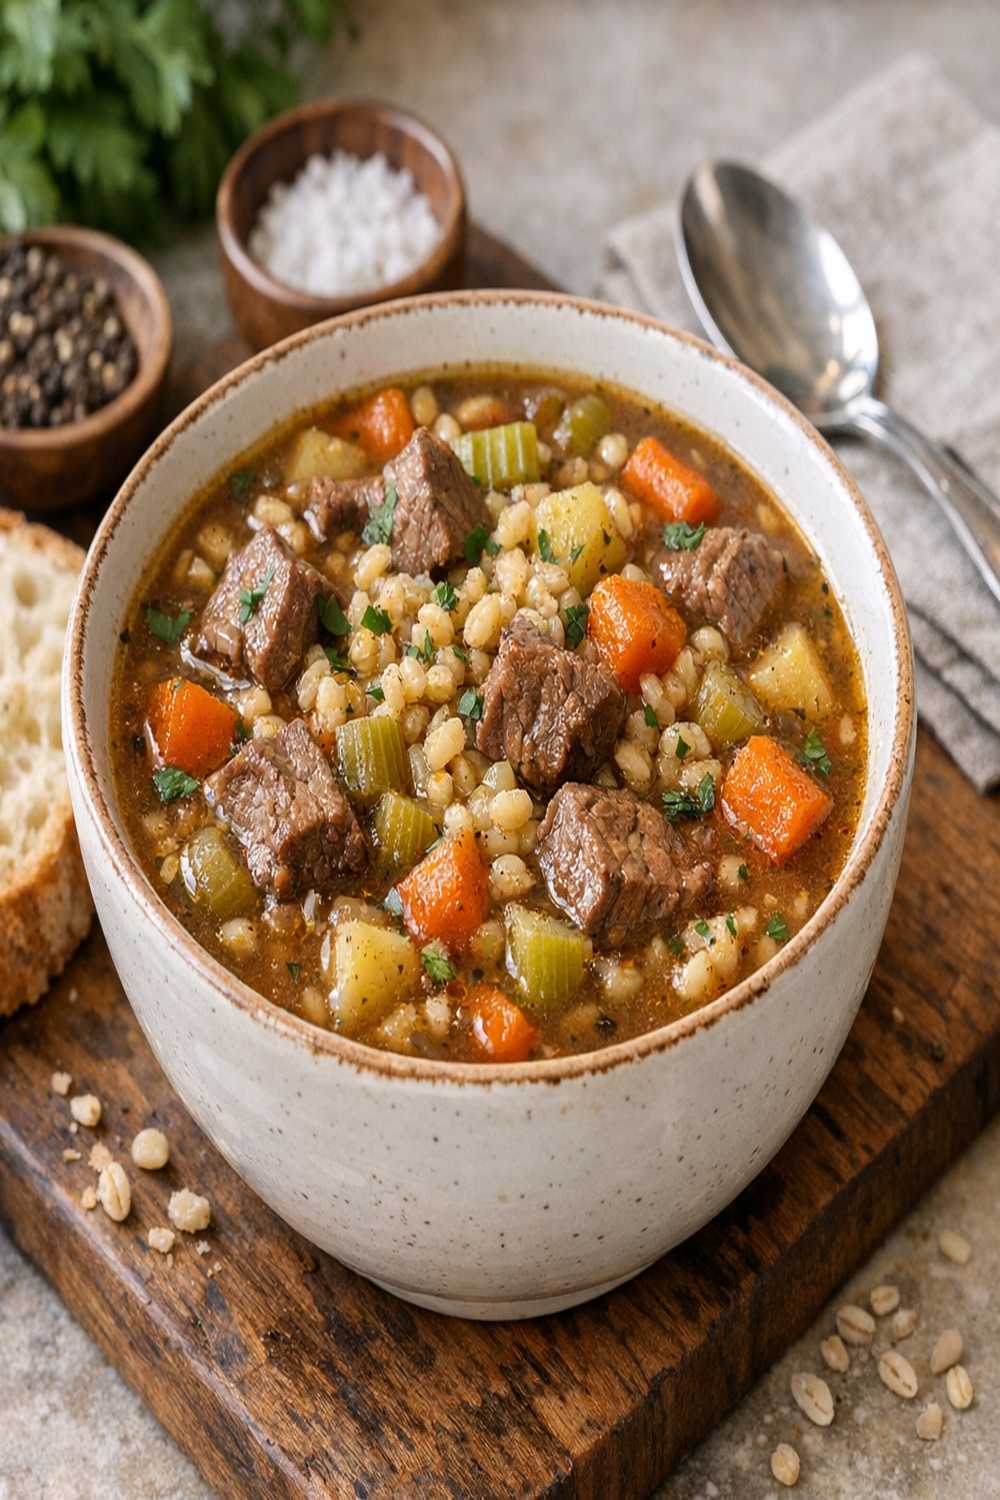
How to Turn Last Night’s Roast Into Beef Barley Soup Slow Cooker Recipe (Better Than the Original)
I remember the exact day this recipe found me. My mother had roasted beef for Sunday dinner—the kind that fills your whole house with warmth and promise. By Monday evening, we had about half of it left, some caramelized edges still clinging to the meat. My first instinct was the usual: make a sandwich, then surrender the rest to the back of the freezer. But something whispered differently that day.
I pulled out my slow cooker, grabbed what I had on hand, and decided to see what would happen. Four hours later, my kitchen smelled like a cozy bistro. The leftover roast had surrendered its richness into a deep, golden broth. The barley had softened into something almost creamy. My children came home from school and asked, “What is this?” with genuine wonder. That’s when I knew: this wasn’t leftover soup. This was something entirely new.
The truth is, transformation cooking isn’t about settling. It’s about understanding that some of the best flavors come from ingredients that have already developed character. A roast that’s been cooked once has concentrated flavor. Bones and trimmings make richer broth. Even the fond stuck to your roasting pan becomes liquid gold when you add it to your slow cooker.
What Leftovers Work Best
Not all leftovers belong in soup, and I’m going to be honest with you about which ones shine and which ones shouldn’t make the journey. As a registered dietitian, I think about both safety and nutrition when I’m repurposing food. The best candidates for this transformation are ingredients that actually improve when they’ve had time to develop deeper flavor.
- Cooked beef (roasts, brisket, or stew meat) – This is ideal because the meat is already tender and its flavors have concentrated. The slower cooking will only deepen them further, and the meat will absorb the broth beautifully.
- Beef bones or marrow bones from a previous meal – These are gold for soup-making. The collagen converts to gelatin, creating that silky mouthfeel that makes people say, “There’s something special about this.”
- Pan drippings and fond from roasting beef – Deglaze your roasting pan with a little water and add every bit of this to your slow cooker. This is concentrated umami and flavor in its purest form.
- Fresh vegetables on their last day – Carrots, celery, and onions that are softening are actually perfect for soup. They’ll cook down completely, releasing their sweetness into the broth.
- Beef broth you made yourself (or canned with no preservatives) – If you’ve made broth from bones, even better. If you’re using store-bought, choose one with fewer than five ingredients listed.
- Leftover cooked barley – If you’ve cooked barley separately, you can add it near the end so it doesn’t turn mushy. This saves cooking time if you’re short on it.
- Herbs from your garden or dried herbs nearing their expiration – Thyme, bay leaves, and parsley actually intensify their flavor in slow cooking. Use them before they lose their potency.
What to avoid: Processed beef products like deli roast beef or pre-made sandwich meat contain preservatives that won’t improve with slow cooking. Leftover seasoning blends with added salt can make your soup unpalatably salty. And beef that’s been sitting in your refrigerator longer than four days should go to your dog or the compost, not your slow cooker.
The Transformation Pantry: What to Keep on Hand
Here’s what I’ve learned from years of turning ordinary ingredients into extraordinary meals: the magic isn’t in having fancy things. It’s in having the right bridge ingredients—the pantry staples that take yesterday’s roast and turn it into something entirely new. These are the ingredients I keep stocked year-round because they make transformation cooking effortless.
Worcestershire sauce might seem small, but it’s essential. It adds depth and umami complexity without tasting “saucy.” Tomato paste concentrates sweetness and acidity in a way that brightens the whole pot. Pearl barley is the star player here—it’s not just filler. It adds texture, fiber, and transforms from grain to creamy comfort as it cooks.
I also keep good olive oil on hand for searing the meat, both beef and vegetable broths (homemade if possible, but quality store-bought works), fresh garlic because nothing else tastes quite the same, and dried herbs that I’ve learned to replace annually. A bay leaf and fresh thyme cost almost nothing but change the entire character of your soup from “I had leftovers” to “I made this intentionally.”
The secret is this: bridge ingredients aren’t expensive. They’re just intentional. They’re the difference between reheating food and creating something your family will remember.
The Ingredients
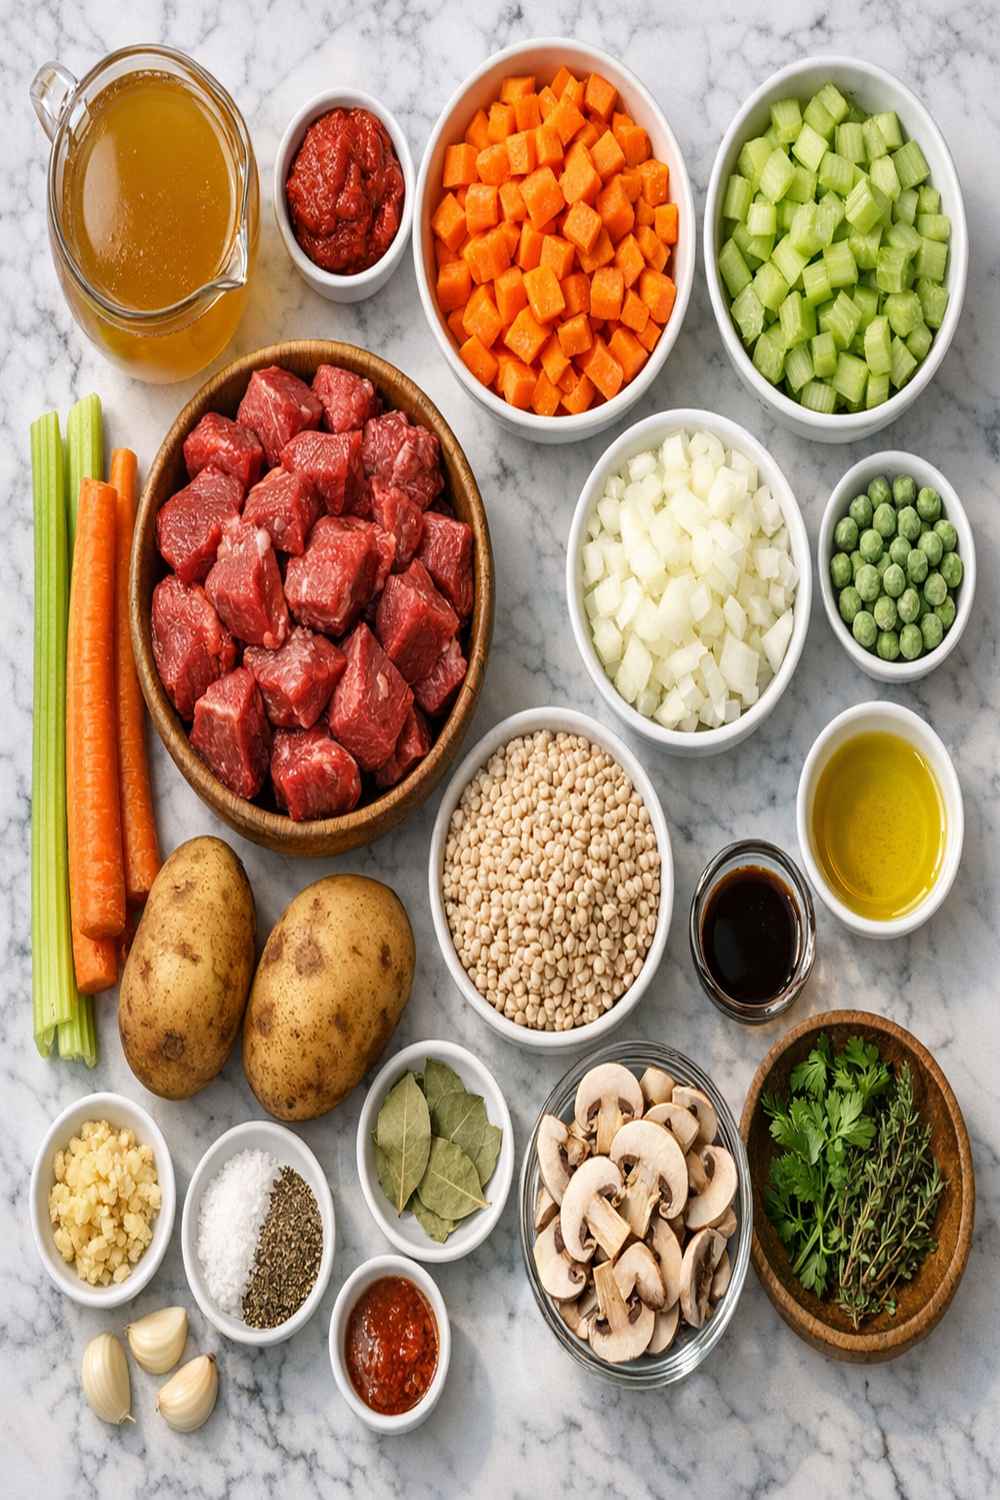
I’m going to frame these ingredients exactly as I think about them: some are the stars (your leftover beef and bones), and some are the supporting cast that makes those stars shine brighter. This is creative resourcefulness, not desperation cooking. You’re being a steward of good food, and that’s something to feel proud of.
- 2 tablespoons olive oil (for searing the meat and building flavor)
- 4 cloves fresh garlic (minced finely—this makes a difference)
- 6 cups beef broth or a combination of beef broth and water (homemade is always superior)
- 2 teaspoons balsamic vinegar (optional, but it rounds out flavors beautifully)
- 2 pounds beef chuck roast or leftover cooked beef (trimmed of excess fat, cut into 1-inch pieces)
- ½ teaspoon freshly ground black pepper (grind it fresh, it tastes entirely different)
- 3 medium carrots (peeled and diced to match the onion size)
- 2 sprigs fresh thyme (or 1 teaspoon dried thyme if fresh isn’t available)
- ¼ cup fresh parsley (minced, added at the very end to preserve its bright flavor)
- 1 bay leaf (remove before serving—always)
- 1 cup pearl barley (rinsed thoroughly to remove surface starch)
- 2 stalks celery (diced, including any pale inner leaves)
- 2 tablespoons tomato paste (adds complexity and natural sweetness)
- 1 teaspoon kosher salt (plus more for seasoning at the end)
- 1 tablespoon Worcestershire sauce (the foundation of deep flavor)
- 1 medium yellow onion (diced into ¼-inch pieces for even cooking)
Yield: This recipe makes 8 to 10 generous servings, depending on whether you serve it as a main course or a first course.
The Transformation: How to Make Beef Barley Soup Slow Cooker Recipe From Leftovers
This is where leftover cooking becomes alchemy. I want you to understand that each step isn’t just following directions—it’s intentionally coaxing deeper flavor from ingredients that have already given so much. This is the part where your slow cooker becomes your greatest ally.
Step 1: Revive Your Beef With a Quick Sear
If your beef is cold from the refrigerator, let it sit at room temperature for 15 minutes. This ensures even browning and better flavor development. Trim any excess fat—you want flavorful fat, not greasy fat. Cut the beef into 1-inch pieces so each one has maximum surface area for browning.
Season your meat generously with salt and black pepper on all sides. Don’t be shy here. This is your only chance to season the meat before it goes into liquid. Heat 2 tablespoons of olive oil in a large cast-iron skillet over medium-high heat until you see it shimmer and smell its nutty aroma. Working in batches so you never overcrowd the pan, sear the beef for 1 to 2 minutes per side until a golden crust forms. You’re not cooking the meat through—you’re building flavor.
If you have the pan drippings from your original roast, add those to your slow cooker now. If you have bones from that roast, add them too. They’ll release collagen that makes this soup silky.

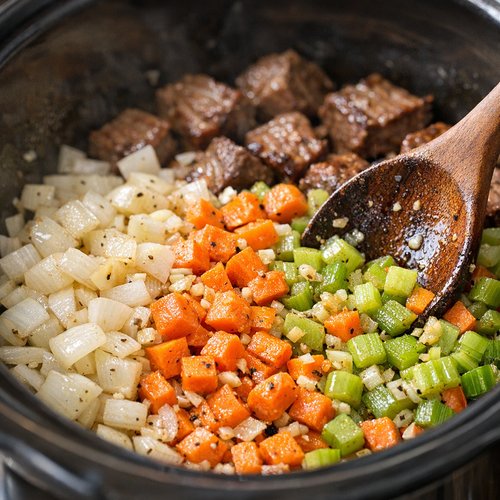
Step 2: Build Your Flavor Base With Vegetables
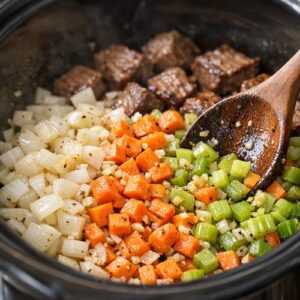
Transfer your seared beef to your slow cooker. Now comes the aromatic layer that makes people say, “Something smells amazing.” Dice your onion, carrots, and celery into even ¼-inch pieces. This isn’t about perfection—it’s about even cooking so everything finishes tender at the same time.
Add all three vegetables and your minced garlic directly to the slow cooker with the beef. Stir everything together so the vegetables are distributed evenly. At this point, you’re not cooking anything yet—you’re assembling. But I promise you, when you lift that lid in a few hours, the transformation will astound you.
Step 3: Create Your Broth Foundation
Pour in 6 cups of beef broth. If you don’t have quite enough broth, you can make up the difference with water, but I prefer all broth when possible. Now add 1 tablespoon of Worcestershire sauce and 2 tablespoons of tomato paste. Stir thoroughly until the tomato paste is completely dissolved. This is important because tomato paste that clumps will create pockets of intense flavor rather than even seasoning throughout.
The Worcestershire brings savory depth without tasting “saucy.” The tomato paste adds natural sweetness and acidity that balances the richness of the beef. Together, they create a foundation that tastes like someone spent all day building this soup.
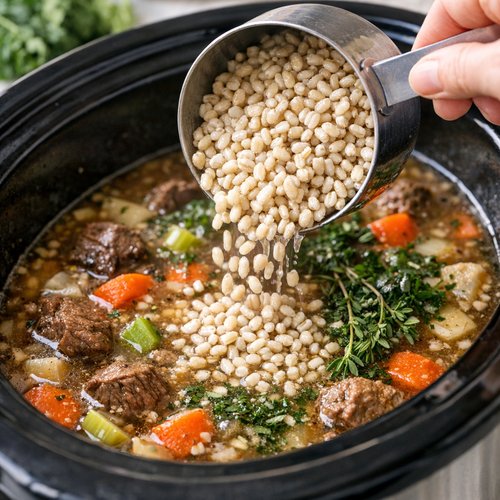
Step 4: Add the Grain and Herbs
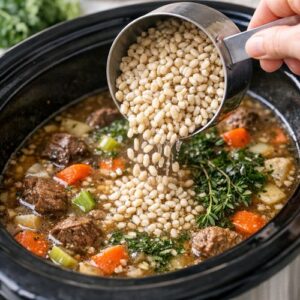
Rinse your pearl barley under cool water for 30 seconds. This removes surface starch that could make your soup cloudy. Add the rinsed barley directly to the slow cooker. Now add your 2 sprigs of fresh thyme (or 1 teaspoon dried) and 1 bay leaf. Add 1 teaspoon of kosher salt.
Stir everything one final time, making sure the barley is submerged and nothing is stuck to the bottom. This is your last chance to check that everything is evenly distributed. Close the lid and set your slow cooker accordingly.
Step 5: Cook Low and Slow (The Actual Magic)
Here’s where patience becomes your secret ingredient. Cover your slow cooker and cook on high for 3½ to 4 hours, or on low for 7½ to 8 hours. I prefer low and slow because it allows flavors to develop more gently and completely. The meat will become increasingly tender. The barley will soften from grain to something almost creamy. The broth will deepen in color and richness.
You don’t need to stir. You don’t need to check. This is the beauty of slow cooking—you can set it in the morning before work and come home to a house that smells like a warm embrace.
If you’re cooking on high, check at the 3-hour mark. If the barley is tender and the beef is easily shredded with a spoon, you’re done. If it needs more time, give it another 30 minutes.
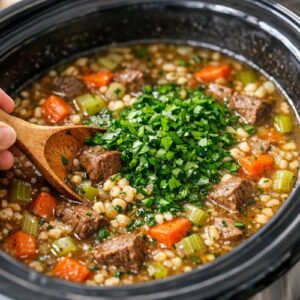
Step 6: Finish With Fresh Herbs and Final Seasoning
When your timer goes off, carefully remove the bay leaf and thyme sprigs. Discard them. Stir in your ¼ cup of fresh minced parsley. Fresh herbs added at the end keep their bright flavor and color—this is the finishing touch that says “I care about this meal.”
Taste your soup. Really taste it. Now is when you adjust the seasoning with additional salt and black pepper. You might need ¼ teaspoon more salt, or you might need a pinch of sugar if the tomato is too acidic. Some people add ½ teaspoon of balsamic vinegar here—it rounds out flavors in a way that’s hard to describe but impossible to miss once you taste it.
Ladle into bowls and serve immediately. Watch people’s faces as they taste this. They’ll taste the care. They’ll taste the transformation. That’s what this is really about.

Expert’s Nutritional Insight
As a registered dietitian, I want you to understand what’s happening nutritionally in this soup. Pearl barley is often overlooked, but it’s a nutritional powerhouse. It contains beta-glucan, a soluble fiber that supports heart health and helps maintain stable blood sugar. The beef provides high-quality protein and iron—especially important if you’re using meat that’s already been cooked, because you’re incorporating all those flavors into your body’s building blocks.
The carrots add beta-carotene and natural sweetness. The onions and garlic contain compounds with anti-inflammatory properties that actually increase when cooked slowly. This isn’t just comfort food—it’s medicinal comfort food. Your grandmother knew something when she made soup for sick people. Modern science is finally catching up to her wisdom.
Make-Ahead Guide: Meal Prep Like a Professional
I structure my week around slow cooker meals because they fit real life. Here’s how I prepare this soup on my terms, not my schedule’s.
Two Days Before: If you have beef leftovers, measure them out and store them in an airtight container. Prep your vegetables (onion, carrots, celery) and store them in separate containers or a divided prep container. Keep your garlic minced and stored separately—it will brown if stored with the vegetables.
The Night Before: Combine everything except the beef in your slow cooker insert if it’s removable. Cover and refrigerate overnight. In the morning, add your cold beef directly to the cold ingredients, set on low, and leave for work. Everything starts cold, which actually helps flavors meld even more evenly.
Alternative (No Refrigerator Space): Assemble everything in the morning. Set your slow cooker on delay start if it has that function. This is a lifesaver on busy mornings.
Freezing Ahead: You can freeze your seared beef in an airtight container for up to one month. Thaw it in the refrigerator overnight, then proceed as normal. You can also freeze prepped vegetables for up to three weeks, though they’ll release more water as they thaw, so you might need to reduce your liquid by ¼ cup.
Common Mistakes to Avoid
I’ve made all of these so you don’t have to. Learning from mistakes is how we become better cooks.
- Not searing the beef: I know it adds a step, but those two minutes create the difference between soup and soup. The Maillard reaction—the browning process—creates flavors you simply cannot get any other way. It’s worth the extra time.
- Adding the parsley too early: If you stir in fresh parsley at the beginning, it will turn dark and lose its bright flavor. It’s there for color, aroma, and freshness at the end. Respect that role.
- Skipping the tomato paste: People sometimes think tomato paste will make it taste “tomatoey.” It won’t. It adds depth and natural sweetness that balances the savory beef. Trust this step.
- Not rinsing the barley: Barley naturally has surface starch. Rinsing it prevents a cloudy broth and improves texture. This takes 30 seconds and makes a noticeable difference.
How to Adapt Based on What You Have
- If you have leftover vegetables (peas, green beans, corn): Add them in the last 30 minutes of cooking. This keeps them from turning to mush and preserves their color and nutritional value.
- If you don’t have fresh thyme: Use 1 teaspoon of dried thyme, or substitute with dried oregano or Italian seasoning. The flavor will shift slightly but remain delicious.
- If you don’t have Worcestershire sauce: Use 1 tablespoon of soy sauce or tamari, or add 2 teaspoons of balsamic vinegar plus ½ teaspoon of molasses. You’re looking for umami and depth.
- If your leftovers are drier than expected: Add an extra ½ to 1 cup of broth. The soup should be brothier than a stew. You can always simmer it uncovered for 15 minutes at the end to reduce if it’s too thin.
- If you’re out of pearl barley: Use farro (nutty, slightly chewier), or substitute with small pasta added in the last 20 minutes. Wild rice also works beautifully but takes longer to cook, so you’ll want to add it with the initial liquid.
- If you need it faster: Use the high setting and plan for 3½ to 4 hours instead of the low and slow method. The results won’t be quite as deeply flavored, but they’ll still be delicious.
Seasonal Variations
This recipe is perfect as written, but I love adapting it through the seasons because what we need changes.
Spring: Add fresh peas and asparagus in the last 20 minutes. Use fresh chives instead of parsley for a lighter finish. The soup becomes fresher, less heavy.
Summer: If you somehow have leftover beef when it’s warm outside, make this soup but serve it at room temperature or slightly chilled. Add fresh dill and lemon juice at the end. It becomes almost like a hearty gazpacho.
Fall: Add diced mushrooms with your initial vegetables—they add earthiness that feels season-appropriate. Use aged beef or brisket if available. The soup naturally becomes richer as you need more warmth.
Winter: This is the season for this soup exactly as written. Add root vegetables like parsnips or turnips if you have them. Consider serving with crusty bread or basic buns for maximum coziness.
Zero Waste: Using Every Last Bit
This is close to my heart because I grew up watching my mother use everything. In her kitchen, nothing was waste.
If you have beef bones, roast them at 400°F for 30 minutes before adding to the slow cooker. This develops flavor. Any gelatin-rich bones should stay in the pot for the full cooking time, then be removed and set aside. Pick any remaining meat from the bones and return it to the soup. Give the bones to your dog or compost—they’ve given their all.
Vegetable scraps that are clean (carrot peels, celery leaves, onion layers) can go directly into the slow cooker. They add flavor and break down completely, becoming part of the broth. This is not “less nice” than using whole vegetables—this is practical resourcefulness.
Any fat that rises to the top can be skimmed and saved. Beef fat is called tallow and is wonderful for cooking. It stores in the refrigerator for weeks. Don’t waste it.
If you make more than you can eat, the soup freezes beautifully. Cool it completely, portion it into containers, label it with the date, and freeze for up to three months. You’ve just created ready-made meals for nights when cooking feels impossible.
Can I Store Beef Barley Soup Slow Cooker Recipe?
Yes, and this is actually day-two-and-beyond food at its finest. Because of how slow cooking works, the flavors actually improve as they sit. The barley continues to soften slightly. The broth becomes richer.
Refrigerator storage: Cool your soup to room temperature (about 30 minutes), then transfer to airtight containers. It will keep safely for up to five days in the refrigerator. I usually portion mine into individual containers so I can grab one for lunch without opening the whole batch.
Freezer storage: This soup freezes beautifully for up to three months. I recommend leaving ½ inch of headspace in containers because the soup will expand slightly as it freezes. Thaw in the refrigerator overnight, then reheat gently on the stovetop or in the microwave.
Reheating: On the stovetop, warm over medium heat, stirring occasionally, for about 10 minutes. In the microwave, heat in 2-minute intervals, stirring between each, until warmed through. Never let it boil—gentle reheating preserves texture.
If the soup seems too thick when you reheat it, add ¼ to ½ cup of broth and stir well. The barley continues to absorb liquid even in storage.
Nutrition Information
Per serving (based on 8 servings): approximately 340 calories, 28 grams of protein, 8 grams of fat, 32 grams of carbohydrates, 6 grams of fiber, and 850 milligrams of sodium. According to USDA nutritional data, one serving provides 12 percent of your daily value of iron (especially important if you’re vegetarian, though this clearly isn’t), 8 percent of your daily value of magnesium, and excellent amounts of B vitamins from the barley.
The protein in this soup is complete because the beef provides all essential amino acids. The fiber from the barley supports digestive health. The vegetables contribute micronutrients—vitamins A and K, folate, and potassium. This is literally a meal in a bowl that nourishes every system in your body.
If you’re watching sodium, remember that much of it comes from broth. Using homemade broth (which you control) or low-sodium store-bought broth reduces this to about 600 milligrams per serving.
What to Serve With Beef Barley Soup Slow Cooker Recipe?
Here’s the beautiful part: this soup stands completely on its own as a meal. But if you want to create a full dinner, you need contrast—something bright and fresh that plays against the rich, earthy soup.
A simple green salad with lemon vinaigrette brightens the palate. Sharp lettuce (arugula, frisée, endive) cuts through the richness beautifully. Add fresh herbs to your salad—cilantro, dill, or basil—to continue the fresh theme.
Warm, crusty buns are perfect for soaking up the last bits of broth. I also love serving this with buttered toast for crunch and richness.
A sharp cheese like aged cheddar or gruyère, served on the side or melted on bread, pairs beautifully. Some people add a dollop of sour cream or Greek yogurt to each bowl—it cools the soup slightly and adds tanginess.
- Green salad with lemon vinaigrette – The bright acidity contrasts the deep, earthy soup perfectly
- Warm crusty bread – Essential for soaking up the broth and making a complete meal
- Sharp aged cheese – Gruyère, aged cheddar, or Emmental add richness and complexity
- Pickled vegetables – Pickled beets, pickled onions, or cornichons add acidity and crunch
- Fresh fruit – Apple slices with a little honey, or pear slices, provide natural sweetness and cleanse the palate
Beef Barley Soup Slow Cooker Recipe
Ingredients
Method
- If your beef is cold from the refrigerator, let it sit at room temperature for 15 minutes. This ensures even browning and better flavor development. Trim any excess fat—you want flavorful fat, not greasy fat. Cut the beef into 1-inch pieces so each one has maximum surface area for browning. Season your meat generously with salt and black pepper on all sides. Don't be shy here. This is your only chance to season the meat before it goes into liquid. Heat 2 tablespoons of olive oil in a large cast-iron skillet over medium-high heat until you see it shimmer and smell its nutty aroma. Working in batches so you never overcrowd the pan, sear the beef for 1 to 2 minutes per side until a golden crust forms. You're not cooking the meat through—you're building flavor. If you have the pan drippings from your original roast, add those to your slow cooker now. If you have bones from that roast, add them too. They'll release collagen that makes this soup silky.

- Transfer your seared beef to your slow cooker. Now comes the aromatic layer that makes people say, "Something smells amazing." Dice your onion, carrots, and celery into even ¼-inch pieces. This isn't about perfection—it's about even cooking so everything finishes tender at the same time. Add all three vegetables and your minced garlic directly to the slow cooker with the beef. Stir everything together so the vegetables are distributed evenly. At this point, you're not cooking anything yet—you're assembling. But I promise you, when you lift that lid in a few hours, the transformation will astound you.
- Pour in 6 cups of beef broth. If you don't have quite enough broth, you can make up the difference with water, but I prefer all broth when possible. Now add 1 tablespoon of Worcestershire sauce and 2 tablespoons of tomato paste. Stir thoroughly until the tomato paste is completely dissolved. This is important because tomato paste that clumps will create pockets of intense flavor rather than even seasoning throughout. The Worcestershire brings savory depth without tasting "saucy." The tomato paste adds natural sweetness and acidity that balances the richness of the beef. Together, they create a foundation that tastes like someone spent all day building this soup.
- Rinse your pearl barley under cool water for 30 seconds. This removes surface starch that could make your soup cloudy. Add the rinsed barley directly to the slow cooker. Now add your 2 sprigs of fresh thyme (or 1 teaspoon dried) and 1 bay leaf. Add 1 teaspoon of kosher salt. Stir everything one final time, making sure the barley is submerged and nothing is stuck to the bottom. This is your last chance to check that everything is evenly distributed. Close the lid and set your slow cooker accordingly.
- Here's where patience becomes your secret ingredient. Cover your slow cooker and cook on high for 3½ to 4 hours, or on low for 7½ to 8 hours. I prefer low and slow because it allows flavors to develop more gently and completely. The meat will become increasingly tender. The barley will soften from grain to something almost creamy. The broth will deepen in color and richness. You don't need to stir. You don't need to check. This is the beauty of slow cooking—you can set it in the morning before work and come home to a house that smells like a warm embrace. If you're cooking on high, check at the 3-hour mark. If the barley is tender and the beef is easily shredded with a spoon, you're done. If it needs more time, give it another 30 minutes.
- When your timer goes off, carefully remove the bay leaf and thyme sprigs. Discard them. Stir in your ¼ cup of fresh minced parsley. Fresh herbs added at the end keep their bright flavor and color—this is the finishing touch that says "I care about this meal." Taste your soup. Really taste it. Now is when you adjust the seasoning with additional salt and black pepper. You might need ¼ teaspoon more salt, or you might need a pinch of sugar if the tomato is too acidic. Some people add ½ teaspoon of balsamic vinegar here—it rounds out flavors in a way that's hard to describe but impossible to miss once you taste it. Ladle into bowls and serve immediately. Watch people's faces as they taste this. They'll taste the care. They'll taste the transformation. That's what this is really about.
FAQs
Can I make this soup if my beef isn’t already cooked?
Absolutely. Raw beef works beautifully—in fact, many traditional recipes use raw meat. Simply sear it exactly as directed, then proceed. The cook time remains the same. The advantage to using leftover cooked beef is speed and texture—it becomes melt-in-your-mouth tender in the slow cooker.
Is it safe to use beef that’s been in my refrigerator for three days?
Yes, as long as it was stored properly in an airtight container or tightly wrapped. The USDA guidelines recommend cooking leftover beef within three to four days for safety. Any meat approaching that four-day mark should be cooked immediately, which makes it perfect for this slow cooker recipe. If it’s been longer, trust your instincts—if it smells off, discard it.
What if I don’t have a slow cooker?
You can make this on the stovetop or in the oven. After searing the beef, transfer everything to a large pot and bring to a boil, then reduce heat and simmer for 1½ to 2 hours until the barley is tender and the beef is melt-in-your-mouth soft. Or use a Dutch oven in a 325°F oven for the same time. The flavor development will be slightly different (faster), but the soup will be delicious.
Can I use a different type of meat?
Yes. Lamb creates a more aromatic soup with deeper spices. Pork tenderloin creates a lighter, slightly sweet version. Chicken breast makes it more delicate. Each meat transforms differently, but the method remains the same. Just adjust your expectations about flavor intensity—beef creates the deepest, most savory version.
How do I prevent my soup from being too salty?
Most of the sodium comes from broth, so choose lower-sodium broth (300 to 500 milligrams per cup) rather than regular (800+ milligrams per cup). Add salt gradually at the end rather than all at once. Remember that you can always add more salt, but you cannot remove it. Taste constantly, especially when heating leftovers, because salt intensifies as liquid reduces.
What if the barley isn’t tender after the cooking time?
Pearl barley usually becomes tender in the stated time, but older barley can take longer. If yours isn’t soft, simply cook for another 30 minutes to 1 hour on high. You can also soak barley for one hour before adding it to reduce cooking time. Some people even cook barley separately and add it in the last 15 minutes if they’re short on time.
Can I add dairy to this soup?
You can add a splash of cream or sour cream at the end (after cooking is finished), but I don’t recommend cooking with dairy for the full time. It can curdle or separate. If you want a creamier texture, blend a portion of the cooked soup and stir it back in, or add a tablespoon of potato starch mixed with cold water to thicken it naturally.
More Leftover Transformation Recipes
- this cozy soup – Transform leftover poultry into nourishing comfort using the same slow cooker method
- this cozy soup – Turn leftover bacon and potatoes into creamy, savory goodness
- this cozy soup – Reimagine leftover chicken with bold flavors and satisfying texture
- BBQ Ribs Recipe For Slow Cooker – Create tender, fall-apart ribs from scratch when you’re ready for your next slow cooker adventure
There’s something profound about taking what remains and making it extraordinary. That’s not just cooking—that’s understanding abundance. When you transform a leftover roast into this soup, you’re not being thrifty in a desperate way. You’re being wise. You’re honoring the animal that became your meal. You’re teaching yourself and your family that resourcefulness is a form of love.
My mother taught me this in her kitchen, surrounded by the steam of simmering pots and the smell of possibility. Every leftover was a story waiting to be told differently. Every ingredient was a conversation between what was and what could be. This soup carries that conversation forward—from her hands to mine, and now to yours.
Make this when you have leftovers. Make it when you need comfort. Make it when you want to prove to yourself that you can take simple things and turn them into something people will talk about. That’s what cooking really is.
Happy Cooking!