When you’re ready to dive into the delightful world of homemade goldfish, consider what you’ll serve alongside this scrumptious treat. These cheesy, crispy snacks are perfect for a variety of pairings. Think classic accompaniments like fresh fruit, such as strawberries, grapes, or citrus slices for a refreshing contrast.
You can also opt for creamy dips, like a zesty ranch or tangy hummus, adding extra flavor and texture. For the adults, a chilled glass of sparkling lemonade or a light white wine can elevate the experience. With these pairings, you’ll keep everyone coming back for more.

What is Homemade Goldfish?
Homemade goldfish are baked snacks shaped like the iconic fish crackers we all know and love. The beauty of making them at home lies in using fresh, quality ingredients tailored to your taste.
Unlike their store-bought counterparts, which may contain preservatives and artificial flavors, these crackers are crafted from pantry staples like flour, cheese, spices, and butter. The final result? A crispy, cheesy treat that’s bursting with flavor.
What is the Flavor Profile of This Dish?
Imagine the combination of sharp cheddar cheese blending with a hint of smokiness from the paprika and the warmth of garlic—all nestled in a crunchy cracker. The flavor is savory yet satisfying.
There’s a nostalgic tang that echoes the beloved store-bought versions, but with a fresh twist that only homemade can provide. Each bite is crisp, cheesy, and delightfully addictive.
Why You’ll Love This
Why spend money on store-bought snacks when you can create a healthier and more flavorful version at home? Homemade goldfish not only taste better, but you can also control the ingredients. They’re kids-approved, and let’s not forget how fun they are to make. Shape them into fish for a fun presentation, or experiment with various seasonings for a unique twist.
Try making them in batches for parties or as lunchbox treats. Your kids will think you’re a superhero, and honestly, who doesn’t want that kind of recognition? Plus, you know what they say: the way to a child’s heart is through their stomach.
Ingredients
Here’s a quick run-through of what you’ll need to get started with your homemade goldfish:
- 1 cup plain all-purpose flour
- 1/4 teaspoon fine sea salt
- 1/2 teaspoon smoked paprika
- 1/4 teaspoon dried onion flakes
- 1/4 teaspoon garlic granules
- 1/4 teaspoon Dijon mustard powder
- 6 tablespoons chilled salted butter, cut into 1/2-inch cubes
- 3 cups coarsely shredded sharp cheddar (about 8 ounces)
- 1-2 tablespoons ice-cold water
- Flaky finishing sea salt, for sprinkling (optional)
With these ingredients ready, you’re all set to create your own homemade goldfish crackers.

Step by Step Instructions
Step 1: Prepare Your Dough
In a large mixing bowl, combine the flour, fine sea salt, smoked paprika, dried onion flakes, garlic granules, and Dijon mustard powder. Use a fork or a whisk to mix the dry ingredients thoroughly. This step is crucial—allow your flavor components to mix evenly.
Step 2: Incorporate the Butter
Next, add the chilled butter cubes to your dry mixture. This is where you get your hands a bit dirty. Use your fingertips to rub the butter into the flour mixture until it resembles coarse crumbs. The key here is to work quickly, keeping the mixture cold. This will help create that desired flaky texture in your goldfish.
Step 3: Add the Cheese
Now comes the star of the show: the cheese. Fold in the coarsely shredded cheddar, ensuring it’s well combined with your dough. The cheese will add both flavor and richness, so don’t skimp on this step.
Step 4: Form the Dough
Slowly add in the ice-cold water, one tablespoon at a time, mixing until the dough holds together. You want it to be pliable without becoming sticky. Once you achieve the right consistency, form the dough into a ball, wrap it in plastic wrap, and refrigerate for about 30 minutes. This resting period allows the flavors to meld and the dough to firm up.
Step 5: Roll and Cut
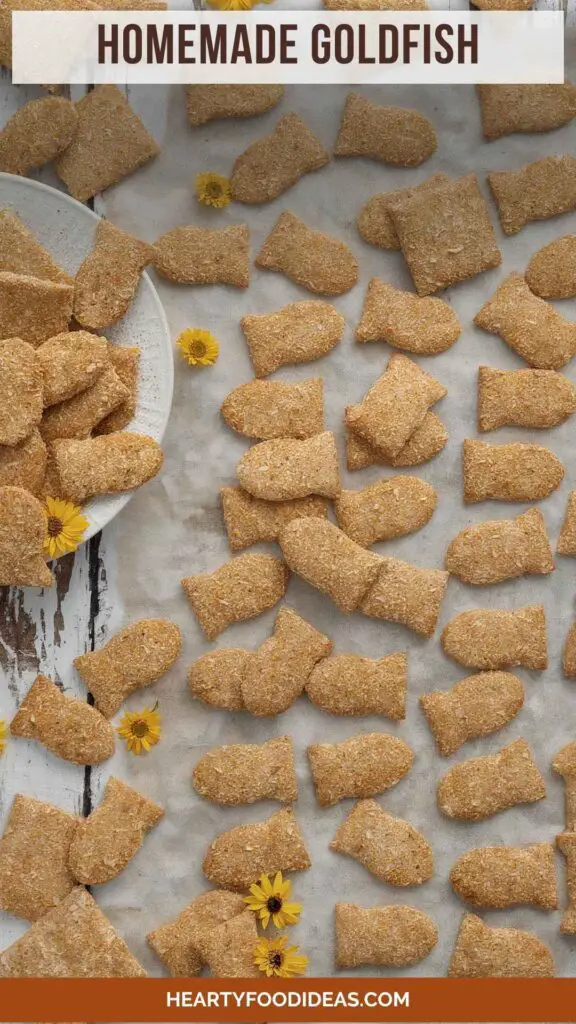
After chilling, preheat your oven to 350°F (175°C). Once your oven reaches temperature, take the dough out and let it sit for a few minutes. On a floured surface, roll out the dough to about 1/8 inch thick. Grab a fish-shaped cutter or a simple knife to cut out your goldfish shapes. Place them on a parchment-lined baking sheet, leaving some space in between.
Step 6: Bake
Sprinkle a little flaky sea salt over the top of your goldfish before placing them in the oven. Bake for 10-12 minutes or until they are golden brown. Keep an eye on them, as baking times can vary depending on your oven. You want them to be crunchy but not burnt.
Step 7: Cool and Enjoy
Once they’re baked, remove them from the oven and let them cool on a wire rack. After they’ve cooled, they’re ready to devour!
Tips & Tricks
Keep It Cold: Make sure to keep your butter cold throughout the process. It’s crucial for that crispy texture.
Experiment with Flavors: Feel free to substitute or add spices according to your preference—try adding a pinch of cayenne for spice or some Italian herbs for an herbaceous twist.
Use Different Cheeses: While cheddar is a classic choice, mixing in Gruyère or Parmesan can add another layer of flavor.
Shape Variations: If fish aren’t your thing, you can cut them into other shapes. Stars, hearts—get creative!
Batch Cooking: Make a large batch and store in an airtight container. They stay fresh for weeks, making them the ultimate snack.
Nutrition Information
For those keeping an eye on nutrition, here’s a quick breakdown for one serving (about 10 goldfish):
- Calories: 100
- Total Fat: 6g
- Saturated Fat: 4g
- Cholesterol: 15mg
- Sodium: 170mg
- Carbohydrates: 8g
- Fiber: 0g
- Sugars: 0g
- Protein: 4g
These values are approximate and will vary based on specific ingredient brands used.
How Can You Store This Homemade Goldfish?
Once you’ve baked your goldfish, it’s essential to store them correctly to maintain their delightful crispiness. Place them in an airtight container, ideally at room temperature. They will stay fresh for about a week if stored this way. For longer storage, consider placing them in the freezer. Just layer them with parchment paper to prevent sticking, and they’ll be good for a few months. When you’re ready to enjoy them, just pop them in the oven for a few minutes to regain their crunch.
Ingredient Alternatives
If you find yourself short on some ingredients, fear not! Here are some substitutes you can consider:
- Flour: Use whole wheat flour for a nuttier flavor and added fiber. It may change the texture slightly, but it’s a solid choice.
- Cheese: If you don’t have sharp cheddar, try Monterey Jack or even a blend of your favorites. Each will impart a different flavor.
- Butter: For a dairy-free alternative, use coconut oil or a vegan butter substitute. It may alter the taste a bit, but the crunchiness will remain.

Conclusion
Making homemade goldfish is not just about the deliciousness; it’s a nostalgic trip that rekindles memories while creating new ones. The process is simple, engaging, and provides a rewarding end result. They serve as a fun snack for kids and adults alike, perfect for any occasion.
So next time you find yourself craving a quick bite, remember: the best snacks are those made with love—like these homemade goldfish. Try this recipe, and I guarantee you’ll wonder why you ever bought them from the store. Dive in, get creative, and enjoy every crispy morsel!
You’ll also like the following Recipes!

Homemade Goldfish – Hearty Food Ideas
Description
If you're anything like me, the very mention of goldfish conjures up fond memories of childhood. Those small, crunchy snacks were a snack-time staple—an ocean of joy in every bite. But let’s be honest: store-bought versions can be a bit...well, bland. That's where homemade goldfish take center stage. They’re not just a nostalgic snack. They’re a blank canvas for flavors and textures.
Let me take you on a journey through the art of crafting your own goldfish crackers right in your kitchen. You’ll be amazed at how simple ingredients can come together to create something absolutely delicious. Whether you’re preparing for a party, a family movie night, or simply wanting to indulge, these homemade goodies will not disappoint.
Ingredients
Instructions
Step 1: Prepare Your Dough
-
In a large mixing bowl, combine the flour, fine sea salt, smoked paprika, dried onion flakes, garlic granules, and Dijon mustard powder. Use a fork or a whisk to mix the dry ingredients thoroughly. This step is crucial—allow your flavor components to mix evenly.
Step 2: Incorporate the Butter
-
Next, add the chilled butter cubes to your dry mixture. This is where you get your hands a bit dirty. Use your fingertips to rub the butter into the flour mixture until it resembles coarse crumbs. The key here is to work quickly, keeping the mixture cold. This will help create that desired flaky texture in your goldfish.
Step 3: Add the Cheese
-
Now comes the star of the show: the cheese. Fold in the coarsely shredded cheddar, ensuring it’s well combined with your dough. The cheese will add both flavor and richness, so don’t skimp on this step.
Step 4: Form the Dough
-
Slowly add in the ice-cold water, one tablespoon at a time, mixing until the dough holds together. You want it to be pliable without becoming sticky. Once you achieve the right consistency, form the dough into a ball, wrap it in plastic wrap, and refrigerate for about 30 minutes. This resting period allows the flavors to meld and the dough to firm up.
Step 5: Roll and Cut
-
After chilling, preheat your oven to 350°F (175°C). Once your oven reaches temperature, take the dough out and let it sit for a few minutes. On a floured surface, roll out the dough to about 1/8 inch thick. Grab a fish-shaped cutter or a simple knife to cut out your goldfish shapes. Place them on a parchment-lined baking sheet, leaving some space in between.
Step 6: Bake
-
Sprinkle a little flaky sea salt over the top of your goldfish before placing them in the oven. Bake for 10-12 minutes or until they are golden brown. Keep an eye on them, as baking times can vary depending on your oven. You want them to be crunchy but not burnt.
Step 7: Cool and Enjoy
-
Once they’re baked, remove them from the oven and let them cool on a wire rack. After they’ve cooled, they’re ready to devour!
Nutrition Facts
Servings 70
- Amount Per Serving
- Calories 100kcal
- % Daily Value *
- Total Fat 6g10%
- Saturated Fat 4g20%
- Cholesterol 15mg5%
- Sodium 170mg8%
- Total Carbohydrate 8g3%
- Protein 4g8%
* Percent Daily Values are based on a 2,000 calorie diet. Your daily value may be higher or lower depending on your calorie needs.
Note
- Keep It Cold: Make sure to keep your butter cold throughout the process. It’s crucial for that crispy texture.
- Experiment with Flavors: Feel free to substitute or add spices according to your preference—try adding a pinch of cayenne for spice or some Italian herbs for an herbaceous twist.
- Use Different Cheeses: While cheddar is a classic choice, mixing in Gruyère or Parmesan can add another layer of flavor.
- Shape Variations: If fish aren’t your thing, you can cut them into other shapes. Stars, hearts—get creative!
- Batch Cooking: Make a large batch and store in an airtight container. They stay fresh for weeks, making them the ultimate snack.