The first thing that comes to my mind when I think of strawberry ice cream cake is how seamlessly it pairs with summer sunshine and laughter. Picture this: a warm afternoon, the sun casting golden rays, and friends gathered at a picnic table adorned with vibrant plates.
Each bite of the strawberry-infused cake and ice cream transports you back to simpler times—those moments that make you feel alive. It’s not just dessert; it’s a celebration on a plate.

What is Strawberry Ice Cream Cake?
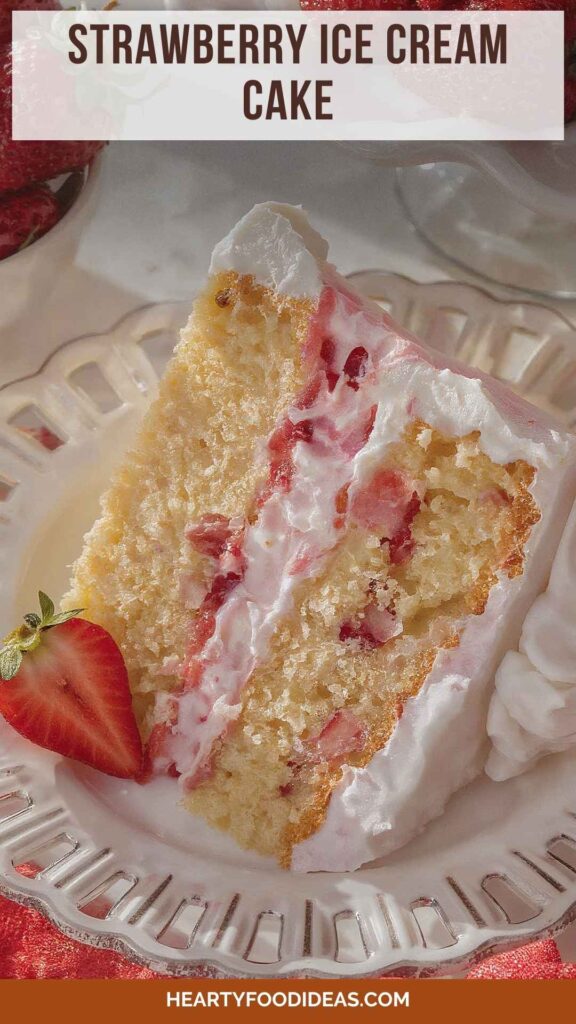
Strawberry ice cream cake isn’t just any ordinary cake. It’s a delightful fusion of flavors and textures. Imagine layers of soft vanilla cake intertwined with luscious strawberry filling, topped with rich strawberry ice cream, and then finished off with fluffy whipped cream.
Each slice is a veritable delight, a testament to the joy of combining fresh flavors into one glorious creation. Trust me, this cake has the power to evoke smiles and satisfied nods from anyone who takes a bite.
The Ingredients
To craft this masterpiece, here’s what you’ll need:
Vanilla Cake Layer:
- 6 tablespoons (84g) unsalted butter, softened to room temperature
- 1¼ cups (163g) plain all-purpose flour
- ¾ cup (155g) granulated sugar
- 2 large eggs
- 1½ teaspoons pure vanilla extract
- ½ cup + 2 tablespoons (150ml) whole milk
- 1¼ teaspoons baking powder
- 1 teaspoon lemon zest (adds a subtle brightness to the cake)
- ¼ teaspoon fine sea salt
Strawberry Filling:
- ¼ cup (52g) granulated sugar
- 3 cups (376g) fresh chopped strawberries (about 1lb of fresh strawberries)
- 1 tablespoon fresh lemon juice (for a slight tang that enhances strawberry flavor)
- ¼ cup (60ml) heavy cream
- 1½ teaspoons cornstarch
Whipped Cream:
- 1½ teaspoons vanilla extract
- 1 cup (115g) powdered sugar
- 2 cups (480ml) cold heavy whipping cream
Ice Cream:
- 1.5 quart or half-gallon container of strawberry ice cream (or no-churn strawberry ice cream)
Optional Garnishes:
- Pink or red gel food coloring (for decorating)
- Sliced fresh strawberries

How to Make Strawberry Ice Cream Cake?
Creating this strawberry ice cream cake requires love, a bit of patience, and the joy of cooking. Here’s a quick glance at the process: we’re going to bake a cake, create a filling, whip up some cream, and layer everything together. Sounds fun, right? Let’s dive into the details.
Step 1: Baking the Vanilla Cake
Start by preheating your oven to 350°F (175°C). Line an 8-inch round cake pan with parchment paper and grease the sides. This will help the cake release without a fuss.
In a mixing bowl, cream the softened butter and granulated sugar together until it’s light and fluffy. This can take about 3-5 minutes. Add the eggs one at a time, ensuring each is well incorporated. You want that airy texture.
Next, stir in the vanilla extract and milk, blending these ingredients smoothly. In a separate bowl, whisk together the flour, baking powder, lemon zest, and salt. Gradually mix the dry ingredients into the wet ingredients until just combined. Don’t overmix. You’re looking for a blend that feels light and fluffy.
Pour the batter into the prepared cake pan and spread it evenly. Bake for 25-30 minutes, or until a toothpick comes out clean from the center. The aroma wafting through your kitchen during this time will be heavenly.
Let the cake cool in the pan for about 10 minutes before transferring it to a wire rack. Allow it to cool completely.
Step 2: Preparing the Strawberry Filling
While the cake cools, let’s work on the strawberry filling. In a medium saucepan, combine the chopped strawberries and granulated sugar. Cook them over medium heat for about 5 minutes until the strawberries start to release their juices.
Add the fresh lemon juice and stir it in. This tanginess takes the strawberry flavor up a notch. In a small bowl, whisk together the cornstarch with a couple of tablespoons of the strawberry mixture. Once it’s smooth, add it back into the saucepan.
Cook the mixture until it thickens slightly, about 2-3 minutes. Remove it from the heat and let it cool.
Step 3: Whipping the Cream
Take a large mixing bowl and add the cold heavy whipping cream. Using an electric mixer, whip it on medium speed until soft peaks form. Gradually add the powdered sugar and vanilla extract, and continue whisking until stiff peaks form. You want that cream to hold its shape beautifully.
Step 4: Assembling Your Masterpiece
Once the cake is cool, slice it in half horizontally. Place one layer on a serving platter. Spread the strawberry filling evenly over that layer, and then carefully add a nice layer of strawberry ice cream on top. Gently place the second layer of cake on top.
Now, it’s time for that lovely whipped cream to shine. Spread it generously over the top and sides of the cake. For an extra touch, decorate with pink food coloring or sliced strawberries. Your cake should now look like a decadent treat, ready to impress!
Notes
Before diving in, here are some tips to keep in mind:
- Use fresh strawberries for better flavor. Frozen strawberries tend to release too much water, which can affect the filling’s consistency.
- Let the cake cool completely before filling. A warm cake will melt your ice cream. We don’t want a melty mishap.
- Be gentle when spreading the fillings. You want to keep the layers intact, so take your time.
- Use a serrated knife to slice the cake. This will make cutting through layers, especially when they’re filled with ice cream, much smoother.
- Chill between layers. If your kitchen is warm, consider chilling the cake briefly after each layer to help it hold shape better.
Storage Tips
This cake is best enjoyed fresh. However, if you have leftovers, cover it tightly and store it in the freezer for up to a week. Loosely wrap in plastic wrap first, followed by aluminum foil for better protection against freezer burn.
Nutrition Information
This strawberry ice cream cake serves about 12 generous slices. Each slice (calculated roughly) contains about:
- Calories: 320
- Total Fat: 18g
- Saturated Fat: 10g
- Sugar: 30g
- Protein: 3g
Nutrition values can vary greatly based on specific ingredients used.
Serving Suggestions
- Serve with Fresh Mint: The freshness of mint complements strawberries beautifully. Garnish each slice with a sprig of mint for that pop of color and flavor.
- Pair with Chocolate Sauce: Drizzle high-quality chocolate sauce on the plate before placing the slice on top. It adds a rich, indulgent experience.
- Top with Toasted Almonds: A handful of toasted almonds on top gives a delightful crunch with each bite. Plus, that nutty flavor pairs perfectly with the strawberries.
- Include a Side of Fresh Fruit: A small bowl of mixed berries can be a refreshing addition. Strawberries, blueberries, and raspberries offer a colorful contrast.
- Beverage Pairing: Serve with a glass of sweet white wine or sparkling lemonade. Both options elevate the experience, making each sip as enjoyable as every forkful.
What Other Substitutes Can I Use in Strawberry Ice Cream Cake?
- Cake Layer Substitute: Use a chocolate cake base instead of vanilla for a rich contrast. Chocolate and strawberry are a classic partnership.
- Alternative Ice Cream: Try a different flavor such as vanilla or coconut. Vanilla lets the strawberry shine, while coconut adds a tropical twist.
- Filling Substitute: Use a berry blend for the filling. Mix in blueberries or raspberries for a unique flavor explosion.
- Gluten-Free Option: Substitute all-purpose flour with almond flour or a gluten-free baking mix for a gluten-free version.
- Dairy-Free Ice Cream: Coconut milk ice cream can work well for a nondairy alternative. This allows everyone to join in on the delightful experience.

Conclusion
Creating a strawberry ice cream cake is more than just baking; it’s about crafting memories with every slice. Each element, from the vanilla cake to the fresh strawberry filling and the delightful whipped cream, comes together in a way that celebrates flavor and love.
Share it at gatherings or enjoy it on a quiet evening; it never fails to brighten the mood. As you dig into your creation, remember the joy not just in the taste but also in the process. So gather your ingredients, invite some friends, and let the sweet adventure begin!
You’ll also like the following recipes!
- Chocolate Chunk Greek Yogurt Banana Bread
- Dirty Horchata
- Crockpot Creamy Coconut Chicken Tikka Masala

Strawberry Ice Cream Cake – Hearty Food Ideas
Description
The first thing that comes to my mind when I think of strawberry ice cream cake is how seamlessly it pairs with summer sunshine and laughter. Picture this: a warm afternoon, the sun casting golden rays, and friends gathered at a picnic table adorned with vibrant plates.
Ingredients
Vanilla Cake Layer
Strawberry Filling
Whipped Cream
Ice Cream
Optional Garnishes
Instructions
Step 1: Baking the Vanilla Cake
-
Start by preheating your oven to 350°F (175°C). Line an 8-inch round cake pan with parchment paper and grease the sides. This will help the cake release without a fuss.
In a mixing bowl, cream the softened butter and granulated sugar together until it's light and fluffy. This can take about 3-5 minutes. Add the eggs one at a time, ensuring each is well incorporated. You want that airy texture.
Next, stir in the vanilla extract and milk, blending these ingredients smoothly. In a separate bowl, whisk together the flour, baking powder, lemon zest, and salt. Gradually mix the dry ingredients into the wet ingredients until just combined. Don’t overmix. You’re looking for a blend that feels light and fluffy.
Pour the batter into the prepared cake pan and spread it evenly. Bake for 25-30 minutes, or until a toothpick comes out clean from the center. The aroma wafting through your kitchen during this time will be heavenly.
Let the cake cool in the pan for about 10 minutes before transferring it to a wire rack. Allow it to cool completely.
Step 2: Preparing the Strawberry Filling
-
While the cake cools, let’s work on the strawberry filling. In a medium saucepan, combine the chopped strawberries and granulated sugar. Cook them over medium heat for about 5 minutes until the strawberries start to release their juices.
Add the fresh lemon juice and stir it in. This tanginess takes the strawberry flavor up a notch. In a small bowl, whisk together the cornstarch with a couple of tablespoons of the strawberry mixture. Once it's smooth, add it back into the saucepan.
Cook the mixture until it thickens slightly, about 2-3 minutes. Remove it from the heat and let it cool.
Step 3: Whipping the Cream
-
Take a large mixing bowl and add the cold heavy whipping cream. Using an electric mixer, whip it on medium speed until soft peaks form. Gradually add the powdered sugar and vanilla extract, and continue whisking until stiff peaks form. You want that cream to hold its shape beautifully.
Step 4: Assembling Your Masterpiece
-
Once the cake is cool, slice it in half horizontally. Place one layer on a serving platter. Spread the strawberry filling evenly over that layer, and then carefully add a nice layer of strawberry ice cream on top. Gently place the second layer of cake on top.
Now, it’s time for that lovely whipped cream to shine. Spread it generously over the top and sides of the cake. For an extra touch, decorate with pink food coloring or sliced strawberries. Your cake should now look like a decadent treat, ready to impress!
Nutrition Facts
Servings 14
- Amount Per Serving
- Calories 320kcal
- % Daily Value *
- Total Fat 18g28%
- Saturated Fat 10g50%
- Protein 3g6%
* Percent Daily Values are based on a 2,000 calorie diet. Your daily value may be higher or lower depending on your calorie needs.
Note
- Use fresh strawberries for better flavor. Frozen strawberries tend to release too much water, which can affect the filling's consistency.
- Let the cake cool completely before filling. A warm cake will melt your ice cream. We don’t want a melty mishap.
- Be gentle when spreading the fillings. You want to keep the layers intact, so take your time.
- Use a serrated knife to slice the cake. This will make cutting through layers, especially when they’re filled with ice cream, much smoother.
- Chill between layers. If your kitchen is warm, consider chilling the cake briefly after each layer to help it hold shape better.