
Bacon Wrapped Smokies Recipe
Learning to make bacon wrapped smokies isn't just about creating one beloved appetizer—it's about mastering a foundational cooking technique that unlocks dozens of other recipes. When you understand how to wrap, secure, and bake proteins with flavorful coverings, you'll find yourself confidently preparing everything from BBQ ribs to slow cooker creations to more elaborate meat preparations. This simple dish teaches you precision, timing, and how to coax deep, caramelized flavors from humble ingredients.
Servings 40
Calories 92kcal
Ingredients
- ¼ teaspoon chili powder optional, but teaches you how small spice additions layer flavor without overwhelming the dish
- 40 round wooden toothpicks, soaked in water for 15 minutes water-soaking prevents them from burning and teaches you about ingredient preparation details that matter
- ½ cup packed brown sugar the moisture content in packed brown sugar helps it adhere and caramelize evenly
- 1 teaspoon freshly cracked black pepper freshly cracked pepper releases oils that intensify flavor more than pre-ground
- 1 pound cocktail smokies or small link sausages, about 40 pieces total these mild, uniform pieces give you the perfect canvas for learning wrapping technique
- 1 pound regular-cut bacon, approximately 15 to 16 slices not thick-cut, which won't wrap properly around the smokies
Instructions
Step 1: Prepare Your Oven and Pan with Intention
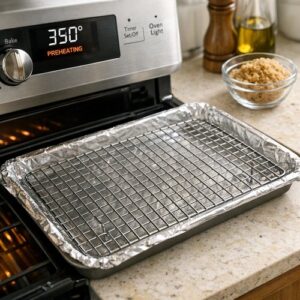
- Start by preheating your oven to 350 degrees Fahrenheit. This temperature is specific—it's hot enough to render the bacon fat and develop caramelization, but not so hot that it burns the brown sugar before the bacon crisps. Give your oven at least 15 minutes to reach full temperature. An oven thermometer is worth its weight in gold here. Trust me on this. While your oven heats, line a standard 10-by-15-inch sheet pan with parchment paper or aluminum foil. This step teaches you something I use in my nutrition practice constantly: setting up your workspace before you need it eliminates stress. You won't be fumbling for paper when your hands are full of wrapped smokies.
Step 2: Soak Your Toothpicks (The Detail That Separates Good From Great)
- Place 40 wooden toothpicks in a shallow bowl of water. Let them soak for at least 15 minutes. This is the kind of detail that separates casual cooks from intentional ones. Soaked toothpicks won't ignite in your hot oven, and they won't impart a burnt flavor to your finished dish. This tiny step teaches you that cooking mastery lives in the details.
Step 3: Prepare Your Bacon With Precision Cuts
- Remove your bacon from its package. Now comes the cutting technique that's crucial to this recipe. You're aiming for pieces that are 3 to 4 inches long—not smaller, not larger. Here's why: bacon shrinks as it cooks, both in length and width. A 3-to-4-inch piece will wrap around your smokie just slightly more than once, creating overlapping bacon that crisps beautifully without leaving gaps. Use a sharp chef's knife and cut with confidence in one smooth motion for each cut. Don't saw back and forth—that damages the bacon's structure. One clean cut teaches your knife skills while honoring the ingredient. If you find yourself with extra bacon after wrapping all your smokies, that's perfect. Pop it in the freezer for future use. Waste nothing.

Step 4: Master the Wrapping Technique
- Now we get to the heart of the technique. Pick up one piece of bacon and one smokie. Wrap the bacon around the smokie in one smooth motion, overlapping the ends slightly. The overlap is important—it prevents the bacon from unraveling during cooking. Immediately secure it with one of your soaked toothpicks, piercing through the overlapped bacon edge and slightly into the smokie. The toothpick should go straight through—not at an angle, not too deep. Straight through teaches your hand precision and consistency. Every smokie wrapped the same way cooks the same way. Place the wrapped smokie, seam-side up, on your prepared pan. The seam-side up positioning is intentional—it allows you to see whether the bacon is cooking evenly and crisping properly. Repeat this wrapping motion with all remaining smokies and bacon pieces. You're teaching your hands muscle memory with every single one.

Step 5: Apply Your Flavor Layer With Even Distribution
- In a small bowl, combine your ½ cup of packed brown sugar with the ¼ teaspoon of chili powder, if using. The chili powder is optional, but it teaches you an important lesson: how to layer savory notes alongside sweet ones. Skip it if you prefer pure smoky-sweet. Add the cracked black pepper. Sprinkle this mixture evenly over all the wrapped smokies. This even distribution is crucial. If one smokie gets more sugar than another, it will brown faster and potentially burn while others are still developing color. Use your fingertips to sprinkle gently, making sure every single wrapped smokie gets its share. This teaches you portion control and visual consistency.

Step 6: Roast With Confidence and Patience
- Place your pan in the preheated 350-degree oven. Roast for 35 to 45 minutes. The time varies slightly based on how evenly your oven heats and how tightly you wrapped each piece. You're not looking for a timer—you're looking for visual doneness. At the 30-minute mark, open your oven and take a look. You should see the bacon beginning to brown and the brown sugar starting to caramelize around the edges. The bacon should not be fully crisp yet—that's coming. If your bacon edges are already very dark brown, you're close. If they're still pale, you have more time ahead.

Step 7: Recognize Perfect Doneness and Cool Properly
- Perfect doneness looks like this: the bacon is crispy and deeply browned, with some darker caramelized edges. The brown sugar has melted and turned into a glossy caramel coating that may have some slightly darker spots. The bacon should be crispy enough that a piece breaks cleanly between your fingers, not bend and fold. Remove the pan from the oven and set it on a heat-safe surface. This is crucial: let the smokies cool for at least 10 minutes before serving. During this resting period, residual heat continues cooking the interior while the exterior sets up. The caramel also hardens slightly, making the whole piece more structurally sound. Resist the urge to rush. I know they smell incredible and you want to eat them immediately. But that 10-minute rest teaches you patience—something every great cook needs. It also prevents burnt mouths, which is practical wisdom.