
Cheese Quesadilla Recipe
Learning to make a cheese quesadilla isn't just about this one dish—it's about mastering a fundamental cooking technique that unlocks dozens of other recipes. I'm talking about the art of controlled heat melting and the perfect golden sear. Once you understand how to coax cheese into creamy perfection while achieving that crispy, golden exterior, you'll find yourself making everything from baked mac and cheese to pressed panini sandwiches with confidence. This is the technique that separates home cooks from people who consistently create restaurant-quality meals in their own kitchens.
Servings 2
Calories 365kcal
Ingredients
- ½ cup shredded cheddar cheese (sharp or mild
- 2 10- inch flour tortillas room temperature, because cold tortillas take longer to warm and can result in overcooked cheese
- 2 teaspoon unsalted butter or extra virgin olive oil (chosen because both conduct heat differently
- Fresh cilantro or green onions for optional topping teaches you how fresh herbs add brightness to rich cheese dishes
- ¼ teaspoon fine sea salt brings out the cheese flavor and helps you taste the difference in your technique
- Pinch of freshly ground black pepper adds complexity and teaches you how seasonings complement dairy
Instructions
Step 1: Prepare Your Station and Choose Your Fat
- Before any heat touches your skillet, take a moment to set yourself up for success. Place your tortillas on a clean cutting board within arm's reach. Have your cheese measured and ready. This is called mise en place, and it prevents the dreaded scramble when your pan is hot and ready. Now, decide on your fat: butter or oil? If you choose butter, you're committing to a richer, more flavorful crust with those beautiful brown milk solids. If you choose oil, you're prioritizing even heat distribution and a crisper texture. Neither is wrong—they teach you different lessons about fat's role in cooking. For this masterclass, I recommend starting with butter. It's more forgiving, and the visual cues are clearer.

Step 2: Warm Your Skillet and Melt Your Fat Slowly
- Place a large non-stick skillet over medium-high heat. This is where patience enters the equation. Don't add your butter immediately. Let the empty pan warm for about 30-45 seconds. You'll notice the surface begin to shimmer slightly. Now add your 2 teaspoons of butter. Watch what happens: it will melt, foam slightly, and the foam will eventually subside. This foaming is the water in the butter evaporating. Once the foam subsides and you smell a nutty aroma, your pan is ready—that's the milk solids beginning to brown, and it signals that your temperature is perfect for tortilla-to-pan contact. This is a crucial teaching moment: the smell is your first indicator that you've reached the right temperature. Your nose will always tell you the truth about what's happening in your pan.
Step 3: Add Your First Tortilla and Create an Even Cheese Layer
- Gently place your first tortilla into the warm butter. You should hear a soft sizzle—not an aggressive hiss, just a gentle sound of contact. If it's completely silent, your pan isn't hot enough yet. If it's violently loud, your heat is too high. Let this tortilla warm for about 20-30 seconds. You're not trying to brown it yet; you're just warming it through so it becomes pliable and its starches begin to soften. This warming makes it easier to fold later and prevents cracks. Now comes the critical part: scatter your cheese in an even, single layer across the entire surface of the tortilla. Don't pile it in the center. Don't create thick spots. Your eye is your best tool here. Imagine you're tiling a floor—each piece should cover roughly the same amount of surface area. This even distribution ensures that when you flip, the cheese has melted uniformly.
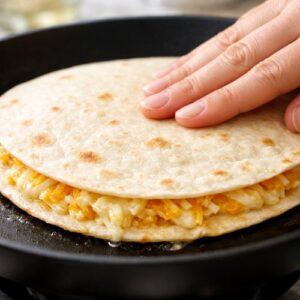
Step 4: Cover With Your Second Tortilla and Begin the Melt
- Carefully place your second tortilla on top of the cheese. Press down very gently—you're not making a sandwich, you're just seating the tortilla into the cheese so they make good contact. This gentle pressure helps the cheese begin adhering to both tortillas. Now you wait. This is the hardest part for impatient cooks. Set a timer for 2 to 2½ minutes and resist the urge to peek constantly. However, at around the 1-minute mark, carefully lift the edge of the quesadilla with a thin spatula and peek underneath. You're looking for a light golden color, not brown. The bottom should feel firm enough to move, but not brittle. What's happening underneath while you wait? The heat is moving upward through the bottom tortilla, creating steam that rises and softens the top tortilla from above, while the cheese between them is slowly transitioning from solid to creamy. This two-directional heat approach is why this technique works so beautifully.
Step 5: Execute the Perfect Flip
- This is where technique really shows itself. Your spatula should be thin and sturdy—not flimsy. Slide it underneath the entire quesadilla, supporting as much of the surface as possible. If you're nervous, use two spatulas: one underneath supporting, one on top gently guiding. Flip in one confident motion, not hesitantly. Hesitation causes quesadillas to fold or stick. You want decisive movement. The quesadilla should land flat in the butter with a soft sizzle. If it folded or broke, don't panic. You haven't failed—you've learned something about your spatula size or timing. Mental note for next time.
Step 6: Cook the Second Side With Awareness
- Now you're cooking the second side. This side usually takes 1½ to 2 minutes—slightly less than the first side, because the cheese is already melted and the tortilla is already warmed. You're just looking for that light golden color. About halfway through (around 45 seconds), carefully lift an edge and check your progress. You should see a light golden-brown crust forming. If you see dark brown, your heat is too high. If you see pale yellow, you need a bit more time or slightly higher heat. This second side teaches you about heat's cumulative effect. The first side built warmth; the second side just needs to finish the job.
Step 7: Remove and Rest
- When both sides achieve that light golden color, transfer your quesadilla to a clean cutting board using your spatula. Let it rest for 30 seconds—this allows the cheese to set up slightly and prevents it from running out when you cut. This rest period is professional kitchen wisdom. It seems small, but it makes a real difference in the eating experience.
Step 8: Cut and Serve
- Using a sharp knife or pizza cutter, cut your quesadilla into 6 triangles. A pizza cutter is actually the professional choice here—it glides through the warm tortilla and melted cheese without dragging or tearing. Arrange your triangles on a plate with the points facing outward—this is how restaurants do it, and it actually helps cool them slightly while looking intentional and beautiful. Serve immediately with guacamole, salsa, sour cream, or cilantro-lime crema. The cheese will be hot enough to still be flowing, but cool enough to eat safely.
Notes
- Cheese separates and becomes greasy - Your heat was too high or you cooked it too long. Solution: Lower your heat to medium (not medium-high) next time, and reduce cooking time on the second side to 1-1½ minutes. Watch for the color cue instead of timing.
- Tortillas brown too dark while cheese inside is barely melted - Your heat is too high but you're not giving the cheese enough time to warm. Solution: Lower your heat slightly and add 30 seconds to your first-side cooking time. The cheese needs heat from both directions.
- Quesadilla feels heavy and dense, cheese didn't melt evenly - You either piled the cheese too thickly in spots or didn't distribute it evenly. Solution: Next time, spread cheese more carefully, and consider grating your own cheese if pre-shredded isn't giving you the distribution you want.
- Can't flip it without it falling apart or folding - You're using a spatula that's too small or flexible, or you're flipping before the bottom has set enough. Solution: Use a wide, sturdy spatula (at least 4 inches across), and wait until that golden color is clearly visible before flipping.
- Top tortilla is still doughy while bottom is golden - The two-directional heat isn't working because your second tortilla isn't making good contact with the melted cheese. Solution: Press down slightly more firmly when you place the second tortilla, and ensure your first tortilla's surface is relatively smooth before adding cheese.