
Cheesecake Cupcakes Recipe
Whether you're following keto, eating plant-based, avoiding gluten, or ditching dairy, you don't have to miss out on these creamy, dreamy cheesecake cupcakes. I've spent years in my kitchen learning how to adapt my mother's favorite desserts for every dietary need, and this recipe has become my go-to when someone says they can't have "regular" cheesecake. You absolutely can—just with a few smart swaps. These little bites pack all the soul-deep comfort of classic cheesecake without the complexity, and they work beautifully for other cheesecake variations too.
Servings 20
Calories 176kcal
Ingredients
For the Crust
- 1½ cup graham cracker crumbs or gluten-free equivalent, about 210 grams
- ¼ cup unsalted butter melted and slightly cooled
For the Cheesecake Filling
- ½ cup sour cream or plain Greek yogurt full-fat for best results
- 2 large eggs room temperature, or aquafaba for vegan versions
- 2 teaspoon fresh lemon juice brightens the filling beautifully
- 1 cup granulated sugar 200 grams, or your chosen sweetener based on diet
- 1 teaspoon pure vanilla extract (never imitation
- 16 ounce cream cheese (room temperature, about 450 grams
- pinch of sea salt balances sweetness and deepens flavor
Instructions
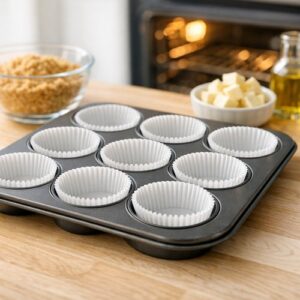
Step 1: Prepare Your Pan and Preheat the Oven
- Start by setting your oven to 325°F—this lower temperature is important because it prevents the tops from cracking. For vegan versions, this temperature is even more critical since plant-based fillings are slightly more delicate. Line 20 muffin cups with paper liners. I like to use unbleached liners because they feel a little more wholesome, but use whatever you have on hand.
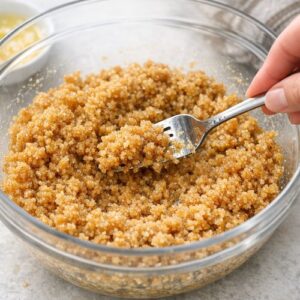
Step 2: Create the Crust Base
- In a medium mixing bowl, combine your cracker crumbs with melted butter. Mix with a fork until the texture resembles wet sand—every bit should be evenly coated. For keto versions, use almond flour mixture instead and add an extra tablespoon of butter since almond flour needs a little more binding. Divide this mixture evenly among your muffin cups, pressing firmly into the bottom of each. Use the bottom of a measuring cup to press down—this creates an even, sturdy base. Pop these into your preheated 325°F oven for about 10 minutes, until the centers feel dry to the touch. You're not looking for browning here, just setting the texture so it stays crisp underneath the filling. Remove and let cool while you make the filling.
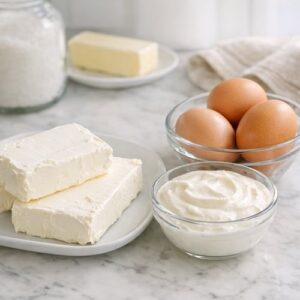
Step 3: Bring Everything to Room Temperature
- This is one of those professional tips that makes an enormous difference. Your cream cheese, eggs, and yogurt should all be at room temperature before you start mixing. Cold ingredients create lumps and incorporate air unevenly, which can lead to cracks on top. Take them out of the refrigerator about 30 minutes before you begin. I know it feels like an extra step, but it's the difference between silky filling and grainy filling.
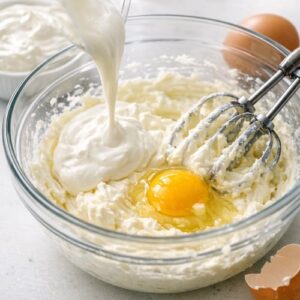
Step 4: Mix the Filling Until Smooth
- In a large bowl, beat your room-temperature cream cheese with an electric mixer on medium speed until it's completely smooth, about 2 minutes. Scrape down the sides frequently—those little hidden pockets of unmixed cheese will ruin the texture. For vegan versions using aquafaba, whip it separately for 2-3 minutes until foamy before adding to the cream cheese. Once the cream cheese is smooth, add your sugar and beat for another minute until combined. This is where you're building a creamy base—don't skip this step or rush it.
Step 5: Add the Wet Ingredients
- Pour in your sour cream (or dairy-free alternative), then add the eggs one at a time, beating on medium-high speed between additions. This gradual approach means everything incorporates evenly. Add your lemon juice, vanilla extract, and salt. Beat the entire mixture for 2 to 3 minutes on medium-high until absolutely smooth. For dairy-free versions, watch carefully during this step—don't overmix once the eggs are in, as too much air can cause the tops to puff and crack. The filling should look glossy and thick, like the most luxurious pudding you've ever seen.
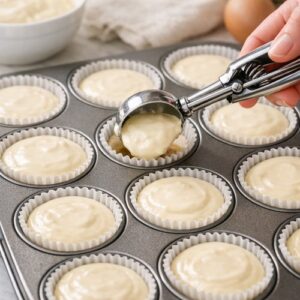
Step 6: Fill the Cups and Reduce Temperature
- Reduce your oven temperature to 300°F. Divide the filling evenly among your muffin cups, filling each almost to the top. I use a small ice cream scoop to keep portions consistent. For keto versions, fill slightly less full since some sweeteners can make the filling rise a bit more. The lower temperature at this stage keeps the cheesecake creamy and prevents overcooking.
Step 7: Bake with Patience
- Bake for 20 to 22 minutes. You're looking for the edges to be set but the very center to have just a tiny bit of jiggle when you gently shake the pan. Don't overbake—this is the most common mistake beginners make. The filling will continue to cook slightly as it cools, and overcooked cheesecake becomes dry and crumbly.
Step 8: Cool Slowly in the Pan
- This step is non-negotiable for creamy results. Turn off your oven and crack the door open about 2 inches. Let the cupcakes sit in the warm oven for 20 to 30 minutes. This gradual cooling prevents the dramatic temperature shock that causes cracks. Think of it like letting someone adjust to cold water gradually instead of jumping in.
Step 9: Move to a Wire Rack and Chill Completely
- Remove the pan from the oven and let the cupcakes cool on a wire rack until they're completely room temperature, about 1 to 2 hours. Then transfer them to the refrigerator for at least 3 to 4 hours—overnight is even better. For vegan versions, chill for at least 5 to 6 hours since plant-based cream cheese needs extra time to set firmly. This chill time is where the magic really happens. The filling firms up, flavors deepen, and everything becomes absolutely creamy.
Notes
- Overmixing after the eggs are added: This introduces too much air, and when the cupcakes bake and cool, those air pockets collapse, creating cracks. After you add the eggs, mix just until combined.
- Skipping the slow cool-down: I know it's tempting to just pop them in the fridge, but that temperature shock causes cracks every single time. Those 20-30 minutes in the turned-off oven are non-negotiable.
- Not using room-temperature ingredients: Cold cream cheese and eggs won't incorporate smoothly, resulting in grainy texture and lumpy filling. I set everything out 30 minutes before I start.
- Baking too long: Just because the top looks set doesn't mean it's done. That tiny jiggle in the center is your friend. Trust it. Overcooked cheesecake is dry and chalky.