
Chicken Parm Air Fryer Recipe
I still remember standing in my mother's kitchen on a Wednesday evening, watching her pound chicken breasts thin and dip them in egg and breadcrumbs. The smell of tomato sauce simmering on the stove and melting cheese in the oven filled our home with warmth that had nothing to do with the temperature. She'd serve it over pasta, and somehow that simple meal said everything she couldn't find words for. Years later, as a registered dietitian, I realized she was teaching me that nourishment isn't just about nutrition facts—it's about love made edible. Today, I'm bringing that same soul-deep comfort into your kitchen with an easier method. My air fryer version captures that exact magic my mother created, but without the stress or the splatter. This is chicken parm the way it should be: simple, delicious, and ready when life gets busy.
Servings 2
Calories 466kcal
Ingredients
- ¼ teaspoon freshly ground black pepper grind just before using for maximum flavor
- ½ cup shredded mozzarella cheese whole milk mozzarella melts better than part-skim
- ¼ cup plus 1 tablespoon grated Parmesan cheese freshly grated from a wedge, or high-quality pre-shredded without cellulose
- ½ teaspoon Italian seasoning blend or equal parts dried oregano, basil, and thyme
- ¼ cup tomato sauce or marinara (choose brands with 5 ingredients or fewer
- ¾ cup panko-style breadcrumbs these stay crispier than standard breadcrumbs due to their larger, airier structure
- ¾ teaspoon kosher salt sea salt or kosher salt dissolves evenly, unlike table salt which can create bitter spots
- ¼ teaspoon paprika adds warmth and color to the coating
- 1 large boneless, skinless chicken breast or 2 small ones look for meat that's pale pink, never gray, and avoid packages with excess liquid
- 2 teaspoon olive oil spray for the air fryer basket and chicken
- Fresh basil leaves for garnish (optional but traditional
- 2 large eggs room temperature helps them coat the chicken more evenly
Instructions
Step 1: Prepare Your Workspace and Chicken
- Start by setting up a clean workspace. Pat your chicken breast dry with paper towels—this is critical because moisture prevents browning and proper coating adhesion. Place the dried chicken on a cutting board. Now comes the butterflying technique my mother taught me: place your hand flat on top of the chicken breast and use a sharp knife to slice horizontally through the middle, being careful to leave about half an inch uncut on one side so it opens like a book. This creates two thinner, more uniform pieces that cook evenly. Pat the inside surfaces dry as well. The drier your chicken, the better your coating will adhere and the crispier your finished dish will be. This single step prevents the rubbery, peeling-off coating that disappoints so many home cooks.
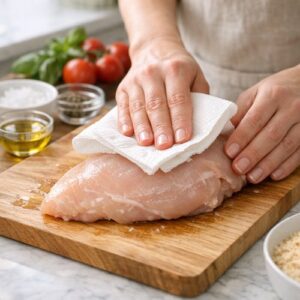
Step 2: Set Up Your Dredging Station
- Prepare three shallow dishes or plates in a row. In the first, whisk your eggs together with a fork until completely combined. In the second, mix your panko breadcrumbs, ¼ cup Parmesan, Italian seasoning, salt, paprika, and black pepper. Stir this mixture well so the seasonings and cheese distribute evenly. The third dish stays empty—this is where you'll place your finished, coated pieces before air frying. Organization matters here. The dredging process goes faster and cleaner when you're not hunting for bowls mid-stream. I learned this in my clinical nutrition training where we emphasized efficiency without sacrificing quality—the same principle applies to home cooking.
Step 3: Coat with Egg and Breadcrumb Mixture
- Take your first chicken piece and place it in the egg mixture. Turn it to coat both sides completely, allowing excess egg to drip back into the bowl. The egg is your adhesive—it's what makes the breadcrumb coating stick through the cooking process. Don't rush this step. Now place the egg-coated chicken into the breadcrumb mixture. Press firmly with your fingers, working the breadcrumbs into the egg coating. Flip and repeat on the other side. This pressing action is what creates that satisfying crunch in every bite. Gently shake off excess crumbs and place on your empty dish. Repeat with the second piece.
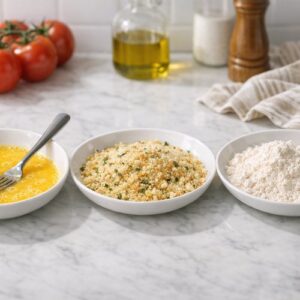
Step 4: Preheat Your Air Fryer and Prepare the Basket
- Set your air fryer to 400 degrees Fahrenheit and let it preheat for about 3 minutes. While it's heating, spray your air fryer basket lightly with olive oil spray. This prevents sticking and helps the chicken brown evenly. Don't oversaturate—you want a light coating, not a puddle. Why 400 degrees? This temperature is hot enough to crisp the coating and cook the chicken through without burning the outside before the inside reaches food safety temperature. It's the sweet spot I've learned through countless batches and refined through my dietitian's understanding of how proteins respond to heat.
Step 5: Cook the First Side
- Place your breaded chicken pieces in the preheated basket in a single layer. Spray the top surface of each piece lightly with olive oil spray. This helps them brown and crisp beautifully. Cook for 5 minutes at 400 degrees without moving them. Resist the urge to peek—the air circulation does its work best when the basket stays closed.
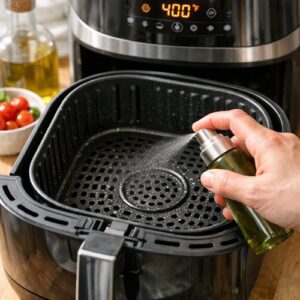
Step 6: Flip and Cook the Second Side
- After 5 minutes, carefully flip your chicken pieces using tongs. Spray the newly exposed surface with a light coating of oil spray. Cook for another 5 minutes. At this point, your chicken should be golden brown on both sides and the internal temperature should be approaching 165 degrees Fahrenheit (the safe temperature for poultry according to USDA guidelines). The coating should sound crispy when you touch it, and it should have that beautiful golden color that tells you the Maillard reaction—the chemical transformation that creates flavor and texture—has happened properly.
Step 7: Add Sauce and Cheese
- Now comes the final assembly. Divide your tomato sauce between the two chicken pieces, spreading it evenly over the top surface of each. Top each piece with ¼ cup of shredded mozzarella cheese, then finish with half of the remaining 1 tablespoon of Parmesan. The Parmesan on top creates pockets of extra umami flavor. The reason we add sauce and cheese at the end rather than the beginning is that they need just enough time to meld together and melt without drying out your perfectly cooked chicken. Timing is everything here.
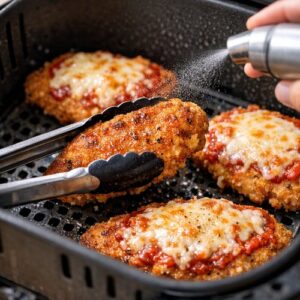
Step 8: Final Cook and Temperature Check
- Return your assembled chicken to the air fryer at 400 degrees for 2 minutes. This gives the cheese time to melt completely and the sauce to warm through without overcooking the chicken. After 2 minutes, carefully remove your chicken and check the internal temperature with a meat thermometer—it must reach a minimum of 165 degrees Fahrenheit. If it hasn't reached temperature, return it to the air fryer for another minute and check again. This is non-negotiable for food safety. Once you hit 165 degrees, you're done. If you have a meat thermometer, use it every single time—it removes guesswork and guarantees perfectly cooked chicken. Let your finished chicken parm rest for 2 minutes before serving. This allows the juices to redistribute, keeping your chicken moist and tender.
Notes
- Not patting chicken dry before breading - Moisture is the enemy of crispy coating. Dry chicken every single time, even if you think it looks dry enough. Your results depend on this step.
- Overcrowding the air fryer basket - Air circulation is what makes air frying work. If pieces touch or overlap, they'll steam rather than crisp. Work in batches if needed. One batch of perfectly crispy chicken beats two batches of mediocre results.
- Skipping the oil spray - Light coating of oil is essential for browning and crispness. Don't skip this thinking you're being healthier—the tiny amount of oil creates the texture that makes this dish satisfying.
- Not checking internal temperature - This is food safety, not suggestion. Invest in a simple meat thermometer and use it every time. No guessing, no hoping, just certainty.