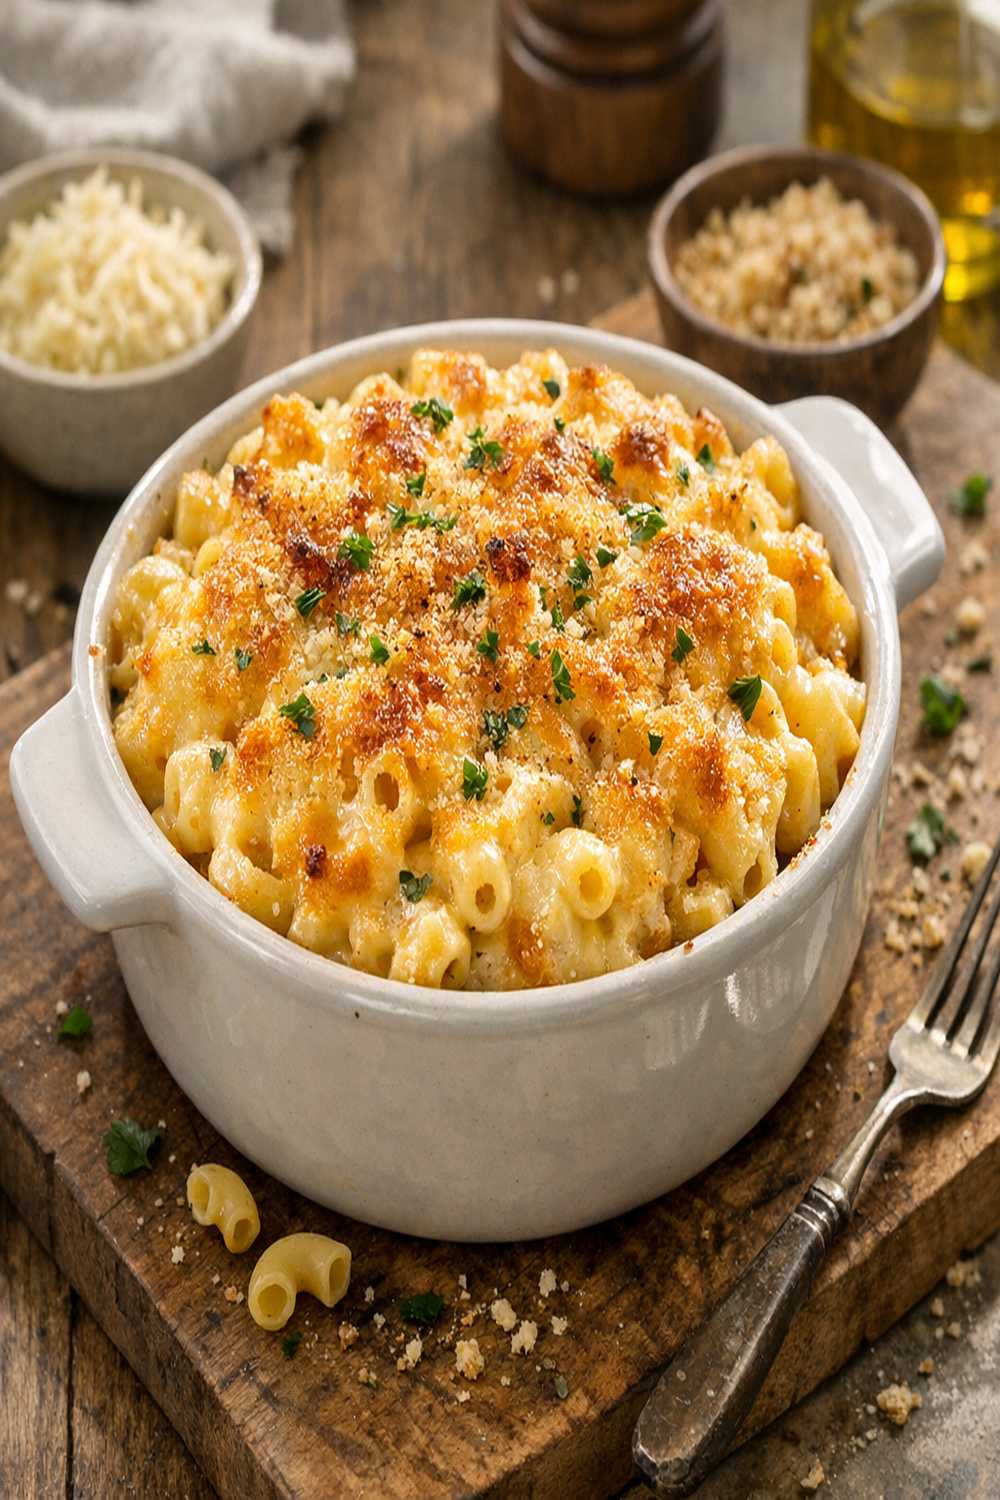
The Ultimate Baked Mac N Cheese Recipe for Every Diet (Keto, Vegan, Gluten-Free)
Whether you’re following keto, vegan, or gluten-free eating patterns, you don’t have to miss out on this soul-warming baked mac n cheese. I’ve spent years in my kitchen adapting the recipes my mother taught me, and I’m thrilled to share how you can enjoy this classic comfort food no matter your dietary needs. Let me walk you through each version so you can make memories around the table just like I do.
I remember standing beside my mom at her stove, watching her whisk that creamy sauce with such care. She’d say, “This is how we show people they matter.” That lesson has shaped everything I do as a registered dietitian—making sure that dietary choices never mean saying goodbye to the foods that feel like home.
This recipe works beautifully for standard diets, and I’ve created easy swaps so everyone at your table can enjoy the same dish. You might also love pairing this with my oven-baked chicken for a complete meal, or starting with Sheet Pan Greek Meatballs as a protein-rich appetizer.
Which Version Is Right for You?
Each dietary approach requires different ingredients, but the heart of this dish stays the same—creamy, cheesy comfort that nourishes both body and soul. I’ve broken down each version so you can choose what fits your life right now.
- Standard Version – The classic I grew up with, made with whole milk, real butter, and sharp cheddar cheese. Rich, creamy, and ready in under an hour.
- Keto Version – Lower carb pasta alternatives keep the carbohydrate count down while maintaining that signature creamy texture. You’ll use cauliflower-based noodles or shirataki pasta.
- Vegan Version – Cashew cream and nutritional yeast create that cheesy depth without any animal products. The flavor is surprisingly complex and deeply satisfying.
- Gluten-Free Version – Gluten-free pasta and a cornstarch-based thickener replace traditional flour. The texture is identical to the original.
- Dairy-Free Version – Oat milk and dairy-free butter work beautifully here. I use cashew-based cheese for the richest results.
The Base Ingredients (Works for All Versions)
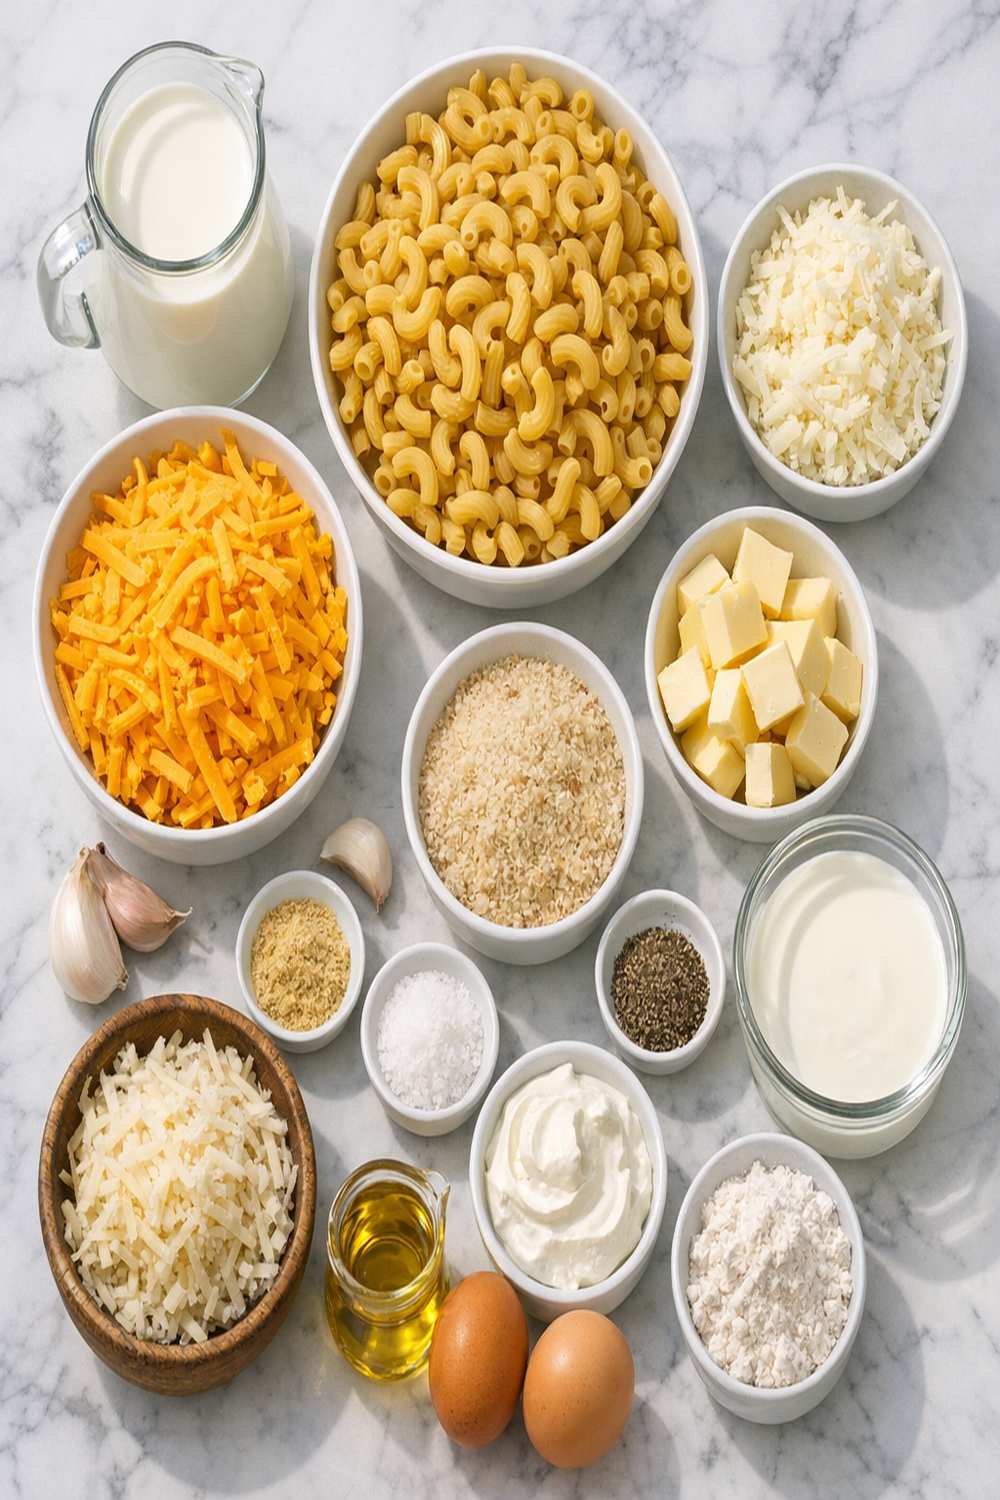
These core ingredients form the foundation of every version. I’ve listed the standard recipe here, and then we’ll walk through specific swaps for your dietary needs. This recipe makes about 6 generous servings as a main dish or 8 as a side.
- 3 tablespoons all-purpose flour or thickening agent (see substitutions below)
- 1 cup sharp cheddar cheese, finely shredded (the sharper the cheese, the bolder the flavor)
- 1½ cups elbow macaroni or small pasta shells (choose your dietary-appropriate version below)
- ½ teaspoon sea salt (adjust to taste, as cheeses vary in saltiness)
- ½ teaspoon smoked paprika (optional but adds wonderful depth)
- 1 cup Swiss cheese, finely shredded (adds nutty depth and helps the sauce stay silky)
- ¼ teaspoon freshly ground black pepper (freshly ground tastes brighter than pre-ground)
- 3 tablespoons butter or butter alternative (unsalted works best for controlling salt)
- ¼ teaspoon ground mustard powder (enhances the cheese flavor without tasting like mustard)
- 2 cups whole milk or milk alternative (full-fat creates the creamiest sauce)
Dietary Substitution Chart
I’ve created this chart so you can see exactly what changes for your dietary approach. The method stays the same—only the ingredients shift. This is where my nutrition training helps you feel confident making swaps that actually work.
- Pasta -> Keto: Cauliflower-based or shirataki noodles | Vegan: Standard pasta (most are accidentally vegan) | Gluten-Free: Certified gluten-free pasta | Dairy-Free: Standard pasta
- Cheeses -> Keto: Full-fat cheddar and Swiss (same as standard) | Vegan: Cashew-based cheese and nutritional yeast (½ cup total) | Gluten-Free: Standard cheddar and Swiss | Dairy-Free: Cashew-based cheddar and Swiss alternatives
- Milk -> Keto: Heavy cream mixed with chicken broth | Vegan: Cashew cream or oat milk | Gluten-Free: Standard whole milk | Dairy-Free: Oat milk or unsweetened cashew milk
- Flour -> Keto: Almond flour (use 2 tablespoons) or skip thickener | Vegan: Standard all-purpose flour | Gluten-Free: Rice flour or cornstarch (use 2½ tablespoons) | Dairy-Free: Standard all-purpose flour
- Butter -> Keto: Grass-fed butter or ghee | Vegan: Refined coconut oil or vegan butter | Gluten-Free: Standard butter | Dairy-Free: Vegan butter or coconut oil
How to Make Baked Mac N Cheese Recipe Your Way
I’m walking you through each step with the standard version as the base. I’ll note exactly where dietary changes happen so you can follow along no matter which version you’re making. The timing stays roughly the same across all versions—about 35 to 40 minutes total, including baking time.
Step 1: Preheat Your Oven and Start Your Pasta Water
Turn your oven to 350 degrees Fahrenheit. While it heats, fill a large pot with water—about 3 quarts—and add a generous pinch of salt. You want the water to taste like seawater. Bring it to a rolling boil over high heat.
For all dietary versions: The water and salt are the same. Salt in the cooking water seasons the pasta from the inside, which is how my mom taught me to build real flavor.
[STEP IMAGE PLACEHOLDER – pasta water boiling]
Step 2: Cook the Pasta Until Just Shy of Done
Once the water boils vigorously, add your pasta. For standard, vegan, and dairy-free versions, cook regular pasta about 1 minute less than the package directions—you want it al dente, still with just a hint of firmness when you bite it.
For keto versions: Cauliflower pasta cooks much faster than regular pasta—usually 4 to 5 minutes. Shirataki noodles need just 2 to 3 minutes. Read your package and subtract 1 minute.
For gluten-free versions: Most gluten-free pasta is more delicate. Cook it about 1 minute less than directed, as it continues softening in the oven.
Drain in a colander but do not rinse. The starch clinging to the pasta helps the sauce cling beautifully.
[STEP IMAGE PLACEHOLDER – draining pasta]
Step 3: Create Your Roux Base
While your pasta cooks, melt your butter in a large skillet or heavy-bottomed pot over medium heat. Once melted and foaming slightly, add your flour (or flour alternative based on your dietary needs).
Whisk constantly for 1 to 2 minutes until the mixture is light golden brown and smells toasty and pleasant. This cooking time is crucial—it removes the raw flour taste while creating the base that will thicken your sauce.
For keto versions using almond flour: Use only 2 tablespoons and watch carefully, as almond flour browns faster than wheat flour. Whisk for about 1 minute.
For gluten-free versions: Rice flour or cornstarch may brown slightly faster. The mixture should smell nutty, not burnt.
[STEP IMAGE PLACEHOLDER – making roux]
Step 4: Add Your Milk and Create the Sauce
Slowly pour in your milk or milk alternative while whisking constantly. This prevents lumps from forming. Keep whisking until the mixture is completely smooth—no floury bits hiding at the bottom of the pot.
For keto versions using heavy cream and broth: Use 1 cup heavy cream and 1 cup unsalted chicken or vegetable broth. Whisk the same way.
For vegan versions using cashew cream: If your cashew cream is very thick, add it slowly while whisking. Thin it slightly with the cooking water from your pasta if needed.
Add your salt and pepper now. Taste a small spoon of sauce—it should taste slightly salty, as the cheese will add more.
[STEP IMAGE PLACEHOLDER – whisking sauce]
Step 5: Bring the Sauce to a Gentle Bubble
Increase heat to medium-high and whisk frequently. After about 5 to 7 minutes, the sauce will begin to thicken and small bubbles will start breaking the surface. This is exactly when you know it’s ready for the cheese.
Expert’s Nutritional Tip: The starch in your flour or cornstarch swells as it heats, thickening the sauce. This is why proper whisking and heat are non-negotiable—you can’t rush this step. But you also don’t want to overcook it, as the sauce will become gluey. Watch for those first gentle bubbles and you’ll know you’re at the perfect moment.
Remove from heat immediately once bubbling begins.
[STEP IMAGE PLACEHOLDER – thickened sauce]
Step 6: Stir in Your Cheese Until Silky and Smooth
Add your shredded cheese to the hot sauce along with the paprika and mustard powder. Whisk constantly until every bit of cheese has melted and the sauce is completely smooth and glossy.
For vegan versions: Add ½ cup nutritional yeast along with your cashew-based cheese. The nutritional yeast adds a savory, umami depth that mimics the complexity of dairy cheese.
For dairy-free versions: Add your dairy-free cheese alternatives. These often melt more slowly, so be patient with your whisking. The sauce might look a bit grainy at first, but keep whisking and it will smooth out.
The sauce should be silky and coat the back of a spoon. If it seems too thin, you can whisk in 1 more tablespoon of cornstarch mixed with 2 tablespoons cold milk, but this rarely needs to happen if you’ve followed the steps.
[STEP IMAGE PLACEHOLDER – melted cheese sauce]
Step 7: Combine Pasta and Sauce
Pour your drained pasta into the cheese sauce and stir gently but thoroughly until every piece of pasta is coated. The mixture should look creamy and luscious, not dry.
If your sauce seems too thick after mixing (this can happen with gluten-free pasta especially), add milk a tablespoon at a time until it reaches that creamy consistency you’re after. Remember, the pasta will absorb some liquid as it bakes.
[STEP IMAGE PLACEHOLDER – combining pasta and sauce]
Step 8: Transfer to Your Baking Dish
Lightly grease a 2-quart baking dish (an 8×8-inch square dish works perfectly) with butter or oil. Pour in your mac and cheese mixture and spread it into an even layer.
You can cover the dish with foil and refrigerate at this point for up to 24 hours. If baking straight from the refrigerator, add 10 to 15 minutes to your baking time.
[STEP IMAGE PLACEHOLDER – baking dish preparation]
Step 9: Bake Until Golden and Bubbling
Place the dish in your preheated 350-degree oven. Bake uncovered for 20 to 25 minutes until the top is golden brown and the edges are bubbling vigorously. The bubbling at the edges tells you the entire dish is hot throughout.
For a quicker golden top: After 15 minutes of baking, turn your broiler on high. Watch closely—broilers can brown things very quickly. You want golden, not charred. This takes 2 to 4 minutes usually.
Alternatively, if you’d prefer to skip baking and want the creamiest possible result, simply transfer your completed mac and cheese to a serving dish. The cheese is already melted and the pasta is cooked, so this fully cooked version works beautifully and serves immediately.
Let the baked version rest for 5 minutes before serving. This allows the sauce to set slightly and makes serving cleaner.
[STEP IMAGE PLACEHOLDER – golden baked mac and cheese]
Nutrition Comparison Across Versions
As a registered dietitian, I believe in transparency about what you’re eating. Here’s how the nutritional profile shifts across dietary versions, based on USDA nutrition data. These figures are per serving (assuming 6 servings per recipe). Keep in mind that specific brands vary, so I’ve used average values.
Standard Version (per serving): 485 calories | 24g protein | 28g fat | 35g carbohydrates | 2g fiber | 18g saturated fat | 520mg sodium
Keto Version with cauliflower pasta (per serving): 380 calories | 26g protein | 25g fat | 12g carbohydrates | 3g fiber | 17g saturated fat | 545mg sodium
Vegan Version (per serving): 420 calories | 18g protein | 22g fat | 38g carbohydrates | 4g fiber | 8g saturated fat | 480mg sodium
Gluten-Free Version (per serving): 480 calories | 22g protein | 27g fat | 38g carbohydrates | 2g fiber | 17g saturated fat | 515mg sodium
Dairy-Free Version (per serving): 445 calories | 16g protein | 26g fat | 36g carbohydrates | 2g fiber | 12g saturated fat | 510mg sodium
The keto version offers the most dramatic carbohydrate reduction. The vegan version provides the most fiber and lowest saturated fat. The standard version offers the highest protein due to dairy cheese. Choose based on what your body needs right now.
How Each Version Tastes Different
I want to be honest with you about how these compare, because I believe you deserve to know exactly what to expect. Food is about joy, and managing expectations helps you enjoy what you’re eating.
The Standard Version is rich, deeply cheesy, and has that signature creamy-crunchy contrast when you bake it. The flavor is bright from the sharp cheddar and earthy-nutty from the Swiss. This is the baseline—the one my mother made.
The Keto Version tastes almost identical to the standard version in terms of flavor. The cheese sauce is exactly the same. The main difference is texture—cauliflower pasta has a slightly softer bite than wheat pasta, while shirataki noodles are almost translucent and very delicate. Some people love this; others miss the chew of traditional pasta. Both are genuinely delicious, just different.
The Vegan Version has a different but equally satisfying flavor profile. Cashew cream creates a luxurious richness, though it tastes distinctly creamy rather than cheesy. The nutritional yeast adds that umami, savory depth. It’s not trying to fool you into thinking it’s dairy—it’s its own beautiful thing. The flavor is complex and deeply satisfying in a different way.
The Gluten-Free Version tastes virtually identical to the standard version. Gluten-free pasta has come a long way, and modern blends are nearly indistinguishable. The sauce is the same regardless of whether you use wheat or rice flour as a thickener. This version offers peace of mind without any flavor sacrifice.
The Dairy-Free Version falls somewhere between standard and vegan. Oat milk creates a slightly different creaminess than whole milk—it’s a bit lighter. Dairy-free cheese varies tremendously by brand. Some are excellent; others have an off-flavor. I recommend trying a few brands to find your favorite. The best dairy-free cheeses now truly rival traditional cheese.
Can I Store Baked Mac N Cheese Recipe?
Yes, and it reheats beautifully. Here’s how to handle storage for each version.
Standard, Gluten-Free, and Dairy-Free Versions: Store in an airtight container in the refrigerator for up to 4 days. Reheat in a 325-degree oven for 15 to 20 minutes, covered with foil, until heated through. You can also reheat individual portions in the microwave for 1 to 2 minutes, though oven reheating keeps the texture better.
Vegan Version: The cashew sauce keeps well for up to 4 days in the refrigerator. The pasta and sauce may separate slightly as it sits—just stir well before reheating. Reheat the same way as above.
Keto Version: This keeps for up to 5 days in the refrigerator. The cauliflower pasta holds up slightly better in storage than shirataki noodles, which can become mushy. Reheat covered in a 325-degree oven for 15 to 20 minutes.
Freezing: All versions freeze well for up to 3 months in a freezer-safe container. Thaw overnight in the refrigerator and reheat as above. Add 5 to 10 minutes to reheating time since you’re starting from cold. The texture remains excellent.
Make-Ahead Guide: This recipe is wonderfully flexible for meal prep. You can prepare the entire dish up through step 7 (combining pasta and sauce), then transfer to your baking dish, cover tightly, and refrigerate for up to 24 hours before baking. This means you can prep on Sunday and bake fresh on weeknights. You can also assemble the complete dish, bake it fully, let it cool, and then store and reheat later in the week. This gives you options based on your schedule.
What to Serve With Baked Mac N Cheese Recipe?
Mac and cheese is comfort, but it loves company. Here are my favorite pairings that work across all dietary versions.
- Roasted Vegetables – A simple roasted broccoli, Brussels sprouts, or green bean side adds color, nutrition, and a fresh contrast to the richness. Works with all versions.
- Garden Salad with Bright Vinaigrette – The acidity cuts through the creaminess beautifully. Toss greens with a basic vinaigrette using lemon juice or red wine vinegar. Works with all versions.
- Protein-Focused Main Courses – Serve alongside my oven-baked chicken for a complete meal, or pair with Baked Breaded Tilapia Recipe for a lighter protein option. Standard, gluten-free, and dairy-free versions pair beautifully with any protein.
- Steamed or Roasted Broccoli – The classic pairing. Toss it with a bit of olive oil and garlic. Works beautifully with all versions.
- Simple Green Salad – Just greens, olive oil, and vinegar. Let the mac and cheese be the star.
- Sliced Tomatoes with Fresh Basil – When tomatoes are in season, this light summer pairing is perfect with all versions.
- Roasted or Mashed Cauliflower – Pairs especially well with keto versions, but works with any version if you enjoy it.
Common Mistakes to Avoid
After years in the kitchen—both my mother’s and my own professional one—I’ve seen these mistakes happen repeatedly. Learning from them means your first batch will be better than many people’s fifth batch.
Mistake 1: Using Pre-Shredded Cheese From a Bag – These contain anti-caking agents that prevent the cheese from melting smoothly. Your sauce will look grainy or separated. Always shred cheese from a block. It takes 2 minutes and makes a world of difference. This single change will transform your results.
Mistake 2: Cooking the Pasta All the Way Through – If your pasta is fully cooked before it goes into the oven, it will be mushy by the time the dish is done. Cook it 1 to 2 minutes less than the package directs. The pasta continues cooking as the dish bakes.
Mistake 3: Adding Cold Milk to Hot Roux Too Quickly – If you pour cold milk into your hot butter-flour mixture without whisking, you’ll get lumps. Whisk constantly as you pour, and go slowly. This creates an emulsion rather than lumpy soup. There are no shortcuts here.
Mistake 4: Not Seasoning Properly – Taste your sauce before adding the pasta. It should taste slightly salty—more than you might expect. This is because you’re about to add bland pasta and bake it, which mellows flavors. If your finished dish tastes bland, the problem usually started here. Season as you go, not at the end.
Seasonal Variations
While mac and cheese works year-round, I love adapting it to each season. Here are my favorite additions that work across all dietary versions.
Spring Version: Add ½ cup fresh peas (thawed if frozen) and 1 tablespoon fresh lemon zest to the sauce before mixing with pasta. You can also stir in 2 tablespoons fresh dill or chives. The bright flavors celebrate the season without overwhelming the cheese.
Summer Version: Top the completed dish with fresh breadcrumbs mixed with melted butter and fresh basil before baking. You can also add roasted tomatoes (from summer’s peak) mixed into the pasta before baking. For dairy-free versions, use vegan butter. For gluten-free versions, use gluten-free breadcrumbs.
Fall Version: Add 1 teaspoon smoked paprika and ½ teaspoon cayenne pepper to the cheese sauce for a slightly spiced, deeper warmth. You can also incorporate crispy bacon bits (or tempeh bacon for vegan versions) into the pasta mixture. Some people love adding roasted garlic or caramelized onions.
Winter Version: Add 1 tablespoon Dijon mustard and ½ teaspoon white pepper to the sauce for subtle sophistication. You can also mix in roasted mushrooms or kale for earthiness. This version feels extra warming and substantial.
Baked Mac N Cheese Recipe
Ingredients
Method
- Turn your oven to 350 degrees Fahrenheit. While it heats, fill a large pot with water—about 3 quarts—and add a generous pinch of salt. You want the water to taste like seawater. Bring it to a rolling boil over high heat. For all dietary versions: The water and salt are the same. Salt in the cooking water seasons the pasta from the inside, which is how my mom taught me to build real flavor.
- Once the water boils vigorously, add your pasta. For standard, vegan, and dairy-free versions, cook regular pasta about 1 minute less than the package directions—you want it al dente, still with just a hint of firmness when you bite it. For keto versions: Cauliflower pasta cooks much faster than regular pasta—usually 4 to 5 minutes. Shirataki noodles need just 2 to 3 minutes. Read your package and subtract 1 minute. For gluten-free versions: Most gluten-free pasta is more delicate. Cook it about 1 minute less than directed, as it continues softening in the oven. Drain in a colander but do not rinse. The starch clinging to the pasta helps the sauce cling beautifully.
- While your pasta cooks, melt your butter in a large skillet or heavy-bottomed pot over medium heat. Once melted and foaming slightly, add your flour (or flour alternative based on your dietary needs). Whisk constantly for 1 to 2 minutes until the mixture is light golden brown and smells toasty and pleasant. This cooking time is crucial—it removes the raw flour taste while creating the base that will thicken your sauce. For keto versions using almond flour: Use only 2 tablespoons and watch carefully, as almond flour browns faster than wheat flour. Whisk for about 1 minute. For gluten-free versions: Rice flour or cornstarch may brown slightly faster. The mixture should smell nutty, not burnt.
- Slowly pour in your milk or milk alternative while whisking constantly. This prevents lumps from forming. Keep whisking until the mixture is completely smooth—no floury bits hiding at the bottom of the pot. For keto versions using heavy cream and broth: Use 1 cup heavy cream and 1 cup unsalted chicken or vegetable broth. Whisk the same way. For vegan versions using cashew cream: If your cashew cream is very thick, add it slowly while whisking. Thin it slightly with the cooking water from your pasta if needed. Add your salt and pepper now. Taste a small spoon of sauce—it should taste slightly salty, as the cheese will add more.
- Increase heat to medium-high and whisk frequently. After about 5 to 7 minutes, the sauce will begin to thicken and small bubbles will start breaking the surface. This is exactly when you know it's ready for the cheese. Expert's Nutritional Tip: The starch in your flour or cornstarch swells as it heats, thickening the sauce. This is why proper whisking and heat are non-negotiable—you can't rush this step. But you also don't want to overcook it, as the sauce will become gluey. Watch for those first gentle bubbles and you'll know you're at the perfect moment. Remove from heat immediately once bubbling begins.
- Add your shredded cheese to the hot sauce along with the paprika and mustard powder. Whisk constantly until every bit of cheese has melted and the sauce is completely smooth and glossy. For vegan versions: Add ½ cup nutritional yeast along with your cashew-based cheese. The nutritional yeast adds a savory, umami depth that mimics the complexity of dairy cheese. For dairy-free versions: Add your dairy-free cheese alternatives. These often melt more slowly, so be patient with your whisking. The sauce might look a bit grainy at first, but keep whisking and it will smooth out. The sauce should be silky and coat the back of a spoon. If it seems too thin, you can whisk in 1 more tablespoon of cornstarch mixed with 2 tablespoons cold milk, but this rarely needs to happen if you've followed the steps.
- Pour your drained pasta into the cheese sauce and stir gently but thoroughly until every piece of pasta is coated. The mixture should look creamy and luscious, not dry. If your sauce seems too thick after mixing (this can happen with gluten-free pasta especially), add milk a tablespoon at a time until it reaches that creamy consistency you're after. Remember, the pasta will absorb some liquid as it bakes.
- Lightly grease a 2-quart baking dish (an 8x8-inch square dish works perfectly) with butter or oil. Pour in your mac and cheese mixture and spread it into an even layer. You can cover the dish with foil and refrigerate at this point for up to 24 hours. If baking straight from the refrigerator, add 10 to 15 minutes to your baking time.
- Place the dish in your preheated 350-degree oven. Bake uncovered for 20 to 25 minutes until the top is golden brown and the edges are bubbling vigorously. The bubbling at the edges tells you the entire dish is hot throughout. For a quicker golden top: After 15 minutes of baking, turn your broiler on high. Watch closely—broilers can brown things very quickly. You want golden, not charred. This takes 2 to 4 minutes usually. Alternatively, if you'd prefer to skip baking and want the creamiest possible result, simply transfer your completed mac and cheese to a serving dish. The cheese is already melted and the pasta is cooked, so this fully cooked version works beautifully and serves immediately. Let the baked version rest for 5 minutes before serving. This allows the sauce to set slightly and makes serving cleaner.
FAQs
Can I Make This Ahead and Freeze It Before Baking?
Absolutely. Prepare the dish completely through step 7 (combining pasta and sauce), then transfer to your baking dish. Cover tightly with plastic wrap and foil, and freeze for up to 3 months. When you’re ready to bake, remove it from the freezer and place directly in a preheated 350-degree oven. Add 15 to 20 minutes to the baking time since you’re starting from frozen. It will be just as delicious as if you’d baked it fresh. This is one of my favorite meal-prep strategies for busy families.
What’s the Best Cheese Combination?
I use equal parts sharp cheddar and Swiss cheese because they work together beautifully. The sharp cheddar provides bold, tangy flavor, while Swiss adds nutty depth and keeps the sauce silky. However, you can adjust based on what you love. Try aged Gruyère with sharp cheddar for a fancier version, or use all cheddar if Swiss isn’t available. The only rule is: buy quality cheese and shred it yourself. The cheese is the star of this dish.
Why Is My Sauce Too Thick or Too Thin?
If it’s too thick: Add milk a tablespoon at a time while stirring until you reach the right consistency. Remember, the pasta will absorb some liquid as it bakes, so aim for a sauce that’s creamy but pourable before baking.
If it’s too thin: The most common cause is not cooking the roux long enough or not letting the milk mixture thicken properly. For immediate help, whisk together 1 tablespoon cornstarch with 2 tablespoons cold milk, then whisk this into your sauce over medium heat for 1 to 2 minutes. This will thicken it. Going forward, make sure you see those first bubbles breaking the surface before adding cheese—that’s your sign the sauce is ready to thicken.
Can I Use Half-and-Half or Cream Instead of Milk?
You can, but I wouldn’t recommend it as your primary liquid. Half-and-half and heavy cream are wonderful for keto versions, but for standard versions, they make the sauce overly rich and heavy. I prefer whole milk because it creates a creamy sauce that’s rich without being overwhelming. If you want extra richness, use whole milk as directed, but add an extra tablespoon of butter. This gives you richness without the heaviness of all cream.
How Do I Adapt This for Dairy-Free Without Cashews (Nut Allergies)?
This is important. For vegan versions with nut allergies, use unsweetened oat milk for the cream component and purchase seed-based or soy-based cheese alternatives. Nutritional yeast remains your best friend for umami depth. The sauce will be slightly less rich than with cashew cream, but it will still be delicious. You might add 1 tablespoon of white miso to the sauce for extra umami and savory depth. Alternatively, you can create richness by using aquafaba (the liquid from canned chickpeas) mixed with oat milk—it creates a surprisingly luxurious base.
More Diet-Friendly Recipes
- Baked Lemon Donut Recipe – A lighter sweet treat that celebrates citrus, works beautifully for gluten-free and dairy-free variations.
- this simple cake – Creamy, fruity, and adaptable for dietary restrictions including vegan versions.
I hope you’ve found the perfect version of this recipe for your kitchen and your life right now. Remember, dietary needs don’t mean food restrictions—they mean finding the delicious ways to nourish yourself. Stand beside your stove like my mother taught me, whisk that sauce with care, and know that every version of this dish carries the same message: you matter, and the people you cook for matter.
Gather your family around the table. Make this recipe your own. Adapt it fearlessly. Create your own food memories. That’s where the real magic happens.
Happy Cooking!