This post contains affiliate links. As an Amazon Associate I earn from qualifying purchases.
I’m going to be honest with you—when life gets hectic, dessert is often the first thing we abandon. We tell ourselves we’ll eat well all week, then Wednesday hits and we’re reaching for whatever’s convenient. What if I told you that you could make one batch of fudgy brownies on Sunday and transform them into different sundae creations throughout the week? This brownie ice cream sundae recipe is my answer to stress-free indulgence. You’re going to bake once, portion smartly, and enjoy gourmet-tasting desserts without the daily effort. Make this once on Sunday and eat well all week—I promise your future self will thank you. If you’re looking for other make-ahead desserts, check out my these homemade cookies for another weekend baking project.
Brownie Ice Cream Sundae Recipe Meal Prep: Cook Once, Eat All Week
I discovered the power of dessert meal prep during my second year as a registered dietitian. I was working long clinic days, mentoring nutrition students, and absolutely exhausted by Friday. My mom called me one Sunday and said, “Glennis, you need to stop letting your sweet tooth control your evenings.” She was right. That week, I baked a double batch of brownies, portioned them into clear containers, and kept a premium ice cream on hand. Every single evening that week, I had a restaurant-quality dessert waiting for me—no guilt, no last-minute drive-thru runs, just wholesome satisfaction. That one Sunday changed how I approach meal planning forever.
Since then, I’ve helped dozens of busy professionals, parents, and students understand that meal prep isn’t just about lunch bowls and roasted vegetables. It’s about creating space for the things that bring us joy—even dessert. When you prep this recipe on Sunday, you’re not just saving time; you’re giving yourself permission to enjoy life’s small pleasures without stress.
Why This Recipe Is Perfect for Meal Prep
- Brownies hold beautifully for 5-7 days—bake once on Sunday and enjoy fresh-tasting chocolate cake through Friday evening without any decline in texture or moisture.
- Ice cream stays frozen solid in your freezer—portion it into individual cups and grab exactly what you need without opening the whole container repeatedly.
- Infinite sundae combinations from one base recipe—use the same brownies with different ice cream flavors, toppings, and sauces to create variety throughout the week without cooking multiple times.
Your Weekly Meal Plan With This Recipe
Here’s exactly how I structure my week around this single batch of brownies. The beauty is that you’re changing the presentation and toppings each time, so it never feels repetitive—even though you’re working from the same base. This is practical nutrition at its finest: one investment of time, maximum enjoyment across seven days.
- Monday dessert—Classic sundae with coffee-flavored ice cream, warm brownie (gently reheated), and a drizzle of thick chocolate sauce straight from the fridge.
- Wednesday treat—Brownie crumbles layered in a parfait glass with whipped cream and mini chocolate chips for added texture.
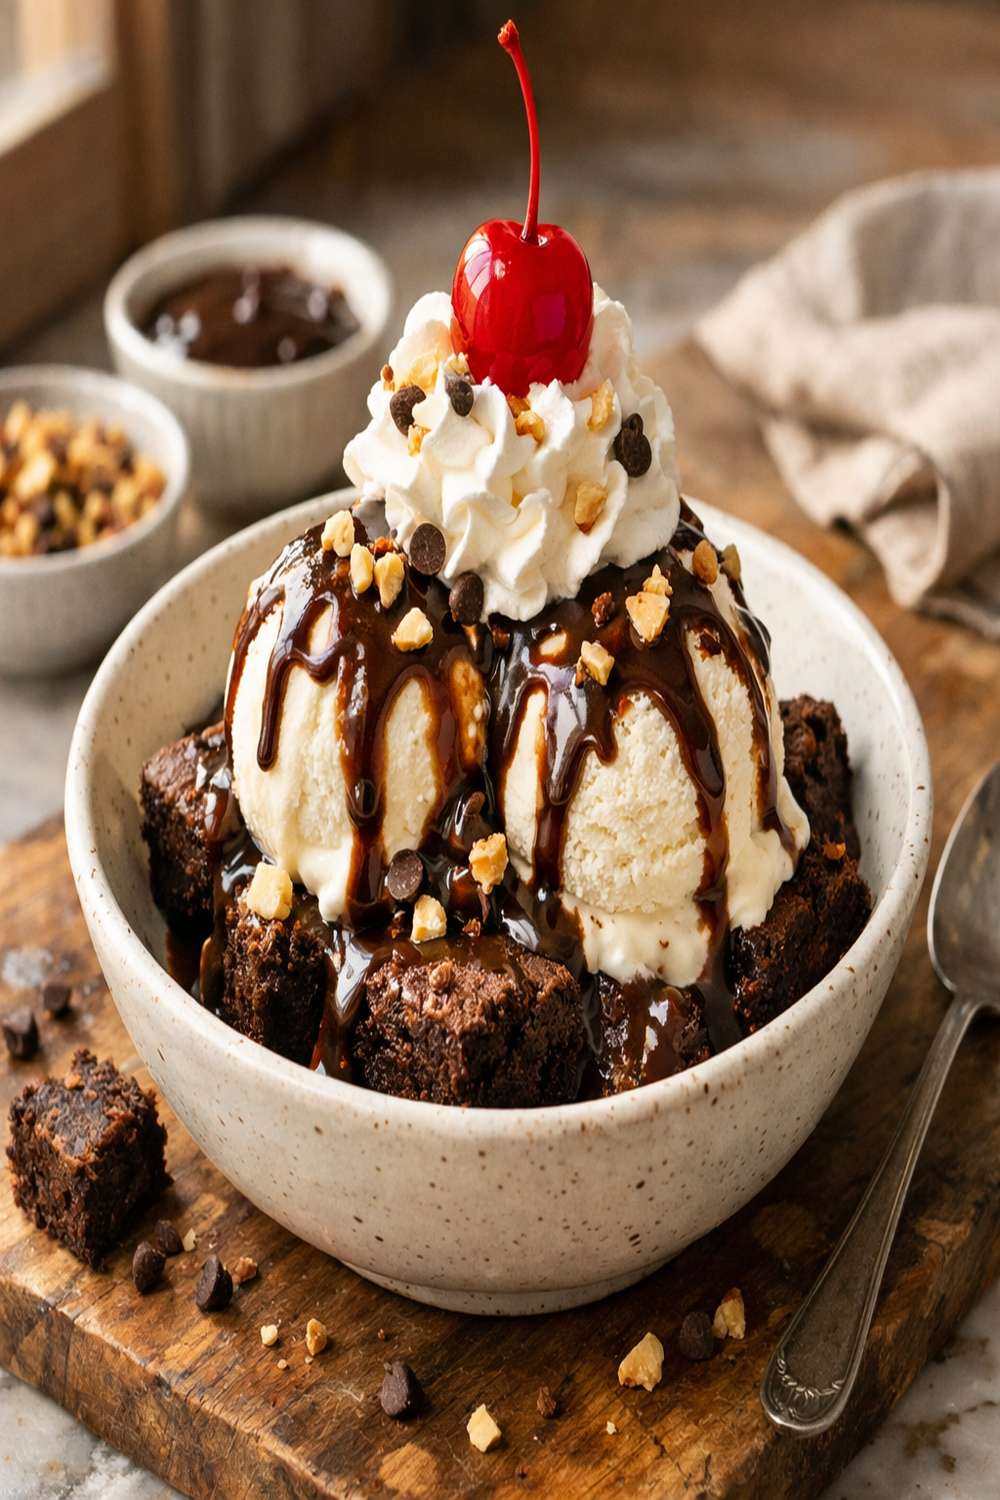
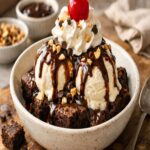
- Friday celebration—The final brownie transforms into a decadent brownie sundae with vanilla ice cream, extra chocolate sauce, maraschino cherries, and crushed peanuts for contrast.
- Weekend indulgence—If you have leftovers, serve chilled brownie pieces with a scoop of your favorite ice cream and any remaining toppings.
The Ingredients – Scaled for a Full Week
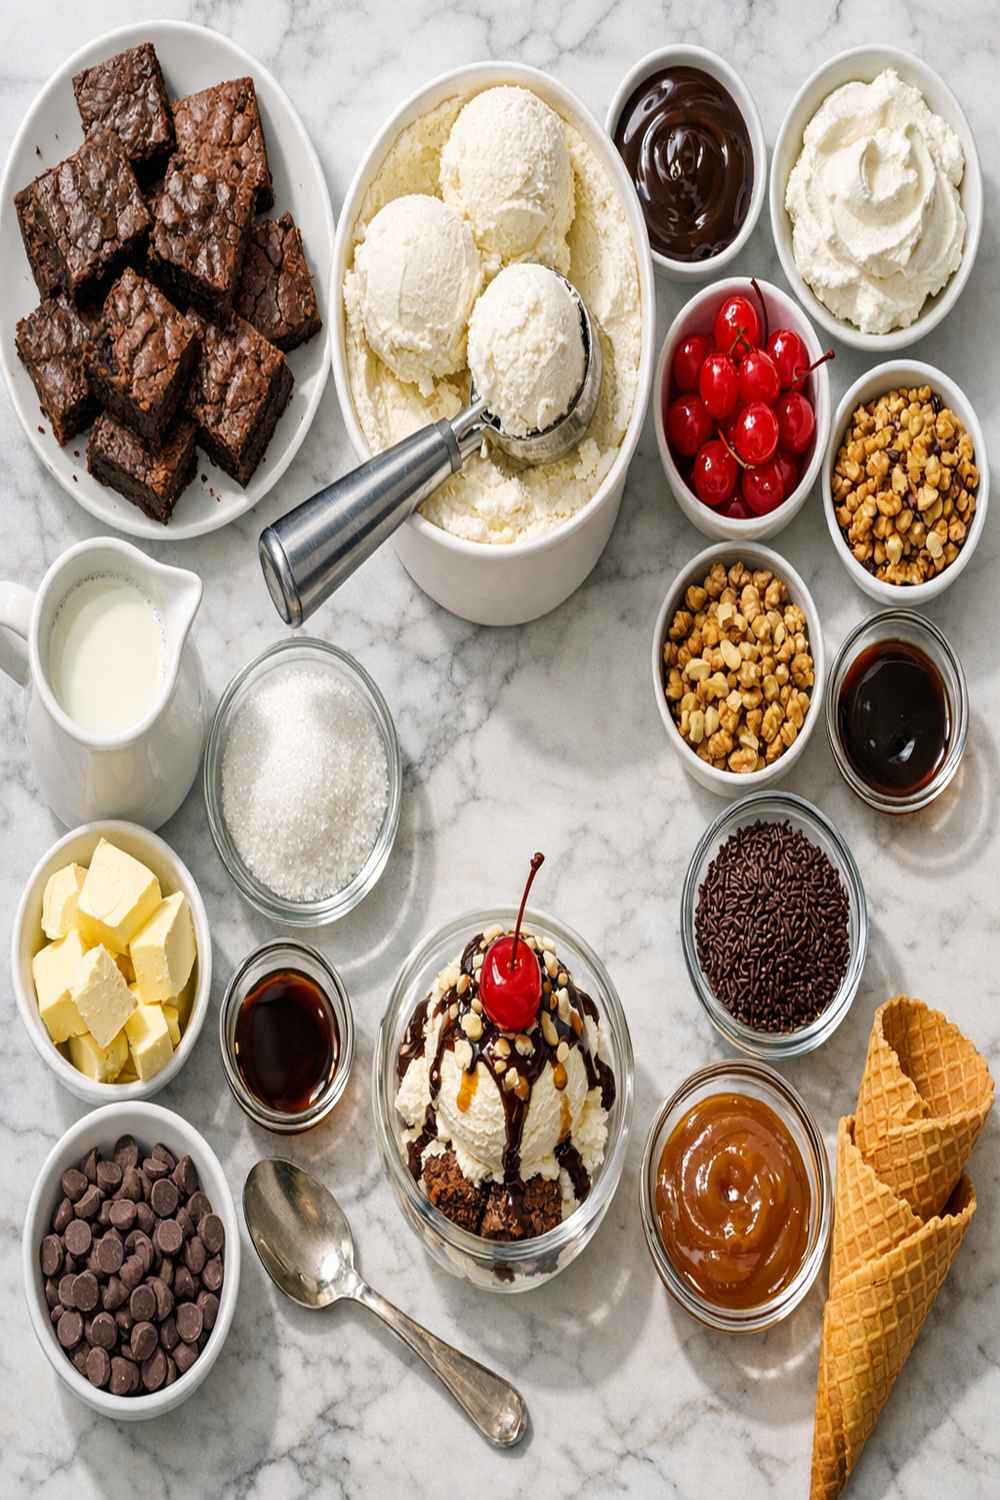
I’ve scaled this recipe to make 12 generous brownie pieces—enough for 5-7 sundaes depending on portion sizes. This is the sweet spot for meal prep: substantial enough that you’re not baking twice, small enough that everything stays fresh. All these ingredients store beautifully, and I’ve included practical tips for each so you’re set up for success.
For the Brownies
- 2½ cups granulated sugar (about 500 grams by weight for precision)
- ½ teaspoon fine sea salt (balances sweetness and brings out chocolate flavor)
- 1½ cups all-purpose flour (about 195 grams, spooned and leveled, not packed)
- ½ teaspoon baking powder (creates a subtle rise without making them cakey)
- 4 large eggs (room temperature helps them incorporate smoothly into the batter)
- 1 cup unsalted butter (melted and cooled slightly, easier to mix with eggs)
- 1 tablespoon pure vanilla extract (imitation won’t give you the depth you want)
- 1 cup unsweetened cocoa powder (about 80 grams, sifted to remove lumps)
For the Sundaes
- Optional toppings as desired: whipped cream (fresh, not canned, for better flavor), maraschino cherries (for nostalgic brightness), rainbow sprinkles (for visual joy), chopped roasted peanuts (adds protein and crunch), extra cocoa powder (for dusting)
- ½ cup premium coffee-flavored ice cream (Chapman’s Original or your favorite brand, portioned into individual cups for grab-and-go ease)
- 1 tablespoon mini chocolate chips (adds textural contrast without overwhelming)
- 2 tablespoons thick, quality chocolate sauce (room temperature for easier drizzling on warm brownies)
The Meal Prep Process: How to Make Brownie Ice Cream Sundae Recipe in Bulk
I’ve broken this into a system that keeps you efficient. Think of it like a production line: prep, mix, bake, cool, portion. That’s it. You’ll be done in about 45 minutes of actual hands-on time, then baking does the work for you while you meal prep other things. The key is not overthinking it—good brownies come from straightforward mixing, not complicated techniques.
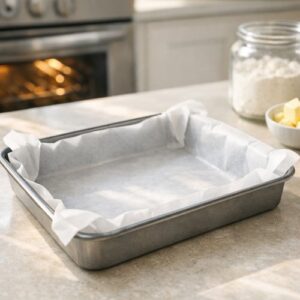
Step 1: Prepare Your Pan and Preheat Your Oven
Start by preheating your oven to 350°F (175°C). While it heats, line a 9×13-inch baking pan with parchment paper, letting the edges overlap slightly so you can lift the finished brownies out easily. This saves cleanup time and prevents any sticking that would ruin your beautiful brownies. Parchment paper is non-negotiable for meal prep—it lets you remove the entire brownie slab at once, cool it completely flat, and then cut perfect squares without fussing.

Step 2: Melt and Cool Your Butter
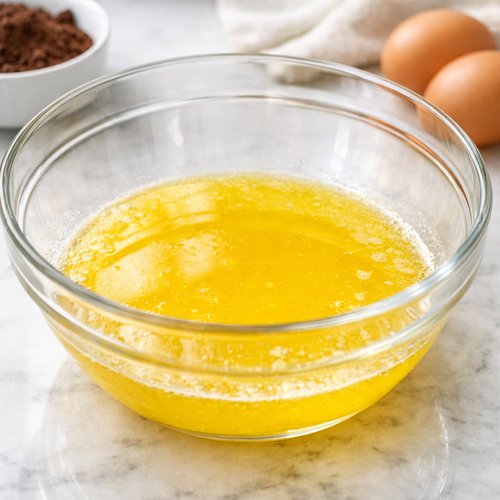
Pour 1 cup of melted unsalted butter into a large mixing bowl and let it cool for 3-5 minutes. You want it warm enough to combine easily with the other ingredients, but cool enough that it won’t scramble your eggs. This is a professional detail that makes a real difference in texture. If your butter is too hot, the eggs will cook slightly, and you’ll get a less fudgy crumb.
Step 3: Combine Wet Ingredients Efficiently
To the cooled butter, add 2½ cups of granulated sugar and whisk vigorously for about 2 minutes until the mixture is slightly pale and combined. This whisking step is where you’re incorporating air, which gives brownies their structure. Next, add 4 room-temperature eggs one at a time, whisking after each addition. Finish with 1 tablespoon of pure vanilla extract. The mixture should look rich and well-blended.
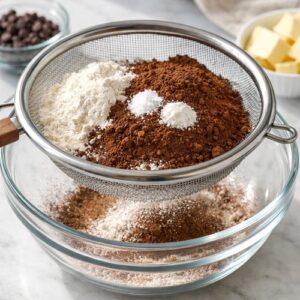
Step 4: Sift and Fold Dry Ingredients
In a separate bowl, sift together 1½ cups of all-purpose flour, 1 cup of unsweetened cocoa powder, ½ teaspoon of fine sea salt, and ½ teaspoon of baking powder. Sifting removes lumps in the cocoa and distributes the leavening evenly—you’re building structure here. Gently fold the dry mixture into your wet mixture using a rubber spatula, stirring just until you don’t see streaks of flour. Overmixing creates dense brownies—stop as soon as it’s combined.
Step 5: Pour, Smooth, and Bake
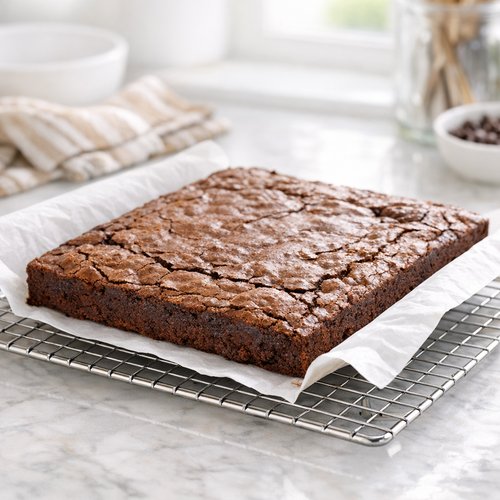
Pour your batter into the prepared pan and use an offset spatula to smooth the top evenly. This ensures even baking across the entire batch. Bake for 28-32 minutes—they should be set on top but still slightly soft in the center (a toothpick inserted in the middle should have a few moist crumbs, not come out clean). Underbaking slightly is intentional here; you want fudgy, not cake-like.

Step 6: Cool Completely Before Cutting
Let the brownies cool in the pan for 15 minutes, then use the parchment paper overhang to lift the entire slab onto a wire cooling rack. This prevents the bottom from steaming and becoming soggy. Let them cool completely—at least 2 hours at room temperature. Patience is critical for meal prep; cutting warm brownies creates crumbles and uneven pieces.
Step 7: Cut Into Uniform Squares and Portion
Using a sharp chef’s knife (wiped clean between cuts if the blade gets sticky), cut the cooled brownie slab into 12 equal squares. A 9×13 pan cuts beautifully into a 4×3 grid. Place each brownie in a parchment-lined storage container or wrap individually in plastic wrap for portioning throughout the week.
Storage and Organization System
- Airtight glass containers—Layer brownies between parchment paper squares in a glass container with a tight-sealing lid; this keeps them moist without condensation buildup, and you can see exactly how many are left at a glance.
- Individual portioning strategy—Wrap each brownie separately in plastic wrap or place each in a small mason jar; this prevents you from opening the whole container multiple times, which dries them out and disrupts the others.
- Labeling system—Use a masking tape label on the container stating “Brownies – Made [Sunday date]” and the expiration date five days out; this prevents guessing and ensures you use them in the right order if you’re meal prepping multiple batches.
How to Reheat Without Losing Quality
The beautiful thing about brownies is that you can serve them at any temperature—cold, room temperature, or warm—and they’re all delicious. Here’s my system for maximum enjoyment throughout the week:
Monday and Tuesday (first 48 hours): Serve cold directly from the refrigerator or at room temperature. The texture is perfect, and you skip reheating entirely. Simply unwrap, plate with your portioned ice cream scoop, and dress with toppings.
Wednesday and Thursday (days 3-4): If you want them warm, wrap an individual brownie in a damp paper towel and microwave for 12-15 seconds. This adds just enough warmth to soften the center without drying the edges. Test it—you’re going for warm, not hot.
Friday and beyond: Place brownies on a baking sheet and warm in a 300°F oven for 8-10 minutes, covered loosely with foil to prevent any surface drying. This is gentler than microwaving and restores the fudgy texture beautifully if brownies have firmed up slightly over the week.
Can I Freeze Brownie Ice Cream Sundae Recipe?
Absolutely. In fact, freezing brownies is one of my favorite meal prep hacks because it extends your enjoyment far beyond a week. Here’s exactly how I do it:
Freezing: Let brownies cool completely, then wrap each piece individually in plastic wrap, then place all wrapped pieces in a freezer-safe container or zip-top bag. Squeeze out as much air as possible before sealing. Properly wrapped brownies freeze beautifully for up to three months with zero decline in quality.
Thawing: Remove a brownie from the freezer and let it sit at room temperature for 30-45 minutes until completely thawed, or unwrap and microwave for 20-30 seconds. Serve immediately with cold ice cream—the contrast of warm brownie and cold ice cream is honestly incredible.
Pro tip: I often bake on a Sunday when I’m feeling ambitious, freeze half the batch, and rotate it in mid-week when I need a morale boost. It’s like having fresh brownies twice in one week without actually baking twice.
Nutrition Information
Per brownie (without ice cream or toppings): approximately 320 calories, 16 grams fat, 42 grams carbohydrates, 1 gram fiber, 38 grams sugar, and 4 grams protein. When you add a ½-cup scoop of ice cream (roughly 130 calories) and 1 tablespoon of chocolate sauce (about 50 calories), your complete sundae comes to approximately 500 calories—reasonable for a satisfying dessert that keeps you feeling accomplished and intentional about your choices.
As a registered dietitian, I want to emphasize something important: planning dessert as part of your nutrition strategy is not indulgence; it’s wisdom. When you meal prep dessert just like you meal prep lunch, you eliminate the afternoon cravings that lead to impulsive choices. The USDA dietary guidelines support enjoying treats as part of a balanced diet when they’re intentional and portion-controlled. This recipe does exactly that. You’re not depriving yourself; you’re taking control.
What to Pair With Brownie Ice Cream Sundae Recipe Throughout the Week
Pairing doesn’t just mean toppings—it means timing and context. Here’s how I structure my week so these sundaes feel like special events, not repetitive desserts:
- Monday dessert after a salad dinner—Serve your brownie sundae after a light, vegetable-forward meal so the contrast feels luxurious and earned.
- Wednesday mid-week pick-me-up—Enjoy after something comforting like Baked Mac N Cheese Recipe so the sweetness feels like celebration, not excess.
- Friday night dessert ritual—This is the moment to go all out with extra toppings, extra ice cream, and extra appreciation for the week’s work.
Expert’s Nutritional Tip
Here’s something I’ve noticed working with hundreds of clients: the cocoa powder in these brownies is doing serious work. Unsweetened cocoa powder is packed with polyphenols and flavonoids—powerful antioxidants that support heart health and reduce inflammation in the body. When you use quality cocoa powder (not cocoa mix with added sugar), you’re getting real phytonutrients alongside the indulgence. I always buy premium cocoa powder because you’re using a full cup, which means you’re getting substantial amounts of these beneficial compounds. It’s not an excuse to eat brownies guilt-free, but it’s a genuine nutritional benefit worth acknowledging.
Common Mistakes to Avoid
Mistake 1: Opening the oven door too early. Brownies are still setting in that middle phase, and temperature drops cause them to sink in the center. Trust the timer and resist peeking until at least 25 minutes have passed.
Mistake 2: Using imitation vanilla extract. With a chocolate dessert, vanilla should complement, not compete. Real vanilla extract has depth that imitation simply can’t replicate. This is non-negotiable in my kitchen.
Mistake 3: Cutting brownies while warm. I know you’re excited, but warm brownies crumble. Cool completely, then cut. Your plating will look professional, and your meal prep containers will stay organized instead of filled with brownie crumbles.
Mistake 4: Overmixing the batter after adding flour. Dense, cake-like brownies are the result of overworking the batter. Once flour is barely incorporated, stop mixing. It feels wrong because you’re still seeing streaks, but trust the process.
Make-Ahead Guide
This recipe was literally designed for make-ahead success. Here’s my complete timeline for maximum convenience:
Two days ahead: Gather all dry ingredients in one bowl and all wet ingredients in another (keep separate). Cover both bowls loosely with plastic wrap. Everything stays fresh and you’ve eliminated the most time-consuming setup on baking day.
One day ahead: Bake the brownies completely and let them cool overnight in an airtight container. Overnight resting actually improves fudginess—the structure sets fully and the chocolate flavor develops more depth. This is why my brownies taste even better on Monday than they do on Sunday.
Baking day morning: Portion ice cream into individual serving cups and freeze. This takes literally 10 minutes and eliminates evening effort completely. Arrange toppings (chocolate sauce, chips, nuts) in small prep bowls, cover, and refrigerate.
Sunday evening setup: Do a complete organization check. Count your brownie portions, confirm ice cream is portioned, and verify all toppings are accessible. This takes 5 minutes and prevents Tuesday panic when you realize you’re out of chocolate chips.
Seasonal Variations
Spring: Add a tablespoon of fresh lemon zest to the brownie batter and serve with raspberry ice cream instead of coffee. The brightness is perfect as the weather warms.
Summer: Make brownie sundae parfaits by crumbling the brownies and layering with whipped cream, fresh berries, and vanilla ice cream. Serve chilled, not warm.
Fall: Dust finished sundaes with cinnamon and nutmeg instead of plain cocoa powder. Pair with cinnamon ice cream or add a drizzle of salted caramel sauce for harvest vibes.
Winter: Serve warm with peppermint ice cream and crushed candy canes on top. The warm-cold contrast is especially comforting during holiday season.
Brownie Ice Cream Sundae Recipe
Ingredients
For the Brownies
- 2½ cup granulated sugar about 500 grams by weight for precision
- ½ teaspoon fine sea salt balances sweetness and brings out chocolate flavor
- 1½ cup all-purpose flour about 195 grams, spooned and leveled, not packed
- ½ teaspoon baking powder creates a subtle rise without making them cakey
- 4 large eggs room temperature helps them incorporate smoothly into the batter
- 1 cup unsalted butter melted and cooled slightly, easier to mix with eggs
- 1 tablespoon pure vanilla extract imitation won't give you the depth you want
- 1 cup unsweetened cocoa powder about 80 grams, sifted to remove lumps
For the Sundaes
- Optional toppings as desired: whipped cream , maraschino cherries , rainbow sprinkles , chopped roasted peanuts , extra cocoa powder fresh, not canned, for better flavor
- ½ cup premium coffee-flavored ice cream Chapman's Original or your favorite brand, portioned into individual cups for grab-and-go ease
- 1 tablespoon mini chocolate chips adds textural contrast without overwhelming
- 2 tablespoon thick, quality chocolate sauce room temperature for easier drizzling on warm brownies
Instructions
Step 1: Prepare Your Pan and Preheat Your Oven
- Start by preheating your oven to 350°F (175°C). While it heats, line a 9x13-inch baking pan with parchment paper, letting the edges overlap slightly so you can lift the finished brownies out easily. This saves cleanup time and prevents any sticking that would ruin your beautiful brownies. Parchment paper is non-negotiable for meal prep—it lets you remove the entire brownie slab at once, cool it completely flat, and then cut perfect squares without fussing.
Step 2: Melt and Cool Your Butter
- Pour 1 cup of melted unsalted butter into a large mixing bowl and let it cool for 3-5 minutes. You want it warm enough to combine easily with the other ingredients, but cool enough that it won't scramble your eggs. This is a professional detail that makes a real difference in texture. If your butter is too hot, the eggs will cook slightly, and you'll get a less fudgy crumb.
Step 3: Combine Wet Ingredients Efficiently
- To the cooled butter, add 2½ cups of granulated sugar and whisk vigorously for about 2 minutes until the mixture is slightly pale and combined. This whisking step is where you're incorporating air, which gives brownies their structure. Next, add 4 room-temperature eggs one at a time, whisking after each addition. Finish with 1 tablespoon of pure vanilla extract. The mixture should look rich and well-blended.

Step 4: Sift and Fold Dry Ingredients
- In a separate bowl, sift together 1½ cups of all-purpose flour, 1 cup of unsweetened cocoa powder, ½ teaspoon of fine sea salt, and ½ teaspoon of baking powder. Sifting removes lumps in the cocoa and distributes the leavening evenly—you're building structure here. Gently fold the dry mixture into your wet mixture using a rubber spatula, stirring just until you don't see streaks of flour. Overmixing creates dense brownies—stop as soon as it's combined.
Step 5: Pour, Smooth, and Bake
- Pour your batter into the prepared pan and use an offset spatula to smooth the top evenly. This ensures even baking across the entire batch. Bake for 28-32 minutes—they should be set on top but still slightly soft in the center (a toothpick inserted in the middle should have a few moist crumbs, not come out clean). Underbaking slightly is intentional here; you want fudgy, not cake-like.
Step 6: Cool Completely Before Cutting
- Let the brownies cool in the pan for 15 minutes, then use the parchment paper overhang to lift the entire slab onto a wire cooling rack. This prevents the bottom from steaming and becoming soggy. Let them cool completely—at least 2 hours at room temperature. Patience is critical for meal prep; cutting warm brownies creates crumbles and uneven pieces.
Step 7: Cut Into Uniform Squares and Portion
- Using a sharp chef's knife (wiped clean between cuts if the blade gets sticky), cut the cooled brownie slab into 12 equal squares. A 9x13 pan cuts beautifully into a 4x3 grid. Place each brownie in a parchment-lined storage container or wrap individually in plastic wrap for portioning throughout the week.

FAQs
How long do these brownies actually stay fresh?
Properly stored in an airtight container, these brownies stay fresh and fudgy for five full days. By day six, they’re still edible but will have firmed up slightly. If you want to extend beyond five days, freeze them. The parchment-lined storage method I described keeps them from drying out—it’s the difference between enjoyable brownies on Friday and disappointing ones.
Can I make the batter ahead and bake it later?
Yes, but with limitations. Once you’ve combined all wet and dry ingredients, the batter is best baked within 2-3 hours. If you want to prep further ahead, keep your wet and dry ingredients separate (as I mentioned in the make-ahead section) and combine them right before baking. Keeping them separate, they stay fresh for two full days.
What if I don’t have a 9×13 pan?
This batter will work in two 8×8 pans or even a 10×10 pan—adjust baking time by 2-3 minutes depending on depth. The key is that your brownies should be roughly half an inch to three-quarters inch thick for proper fudginess. Too thin and they become cake; too thick and the center won’t set properly.
Can I substitute the ice cream flavor?
Absolutely. The beauty of this recipe is that it pairs beautifully with any ice cream flavor. I love coffee because it echoes the chocolate and adds sophistication, but vanilla, salted caramel, mint chip, or even cookie dough are all wonderful. The brownie is your constant; the ice cream is your variable for keeping the week interesting.
Is there a way to make these less sweet?
Yes. You can reduce the sugar to 2 cups instead of 2½ cups and increase the cocoa powder to 1¼ cups. The brownies will be less sweet but still delicious. You’re shifting the balance toward chocolate flavor and away from pure sweetness. However, if you go this route, skip adding too much chocolate sauce on top, or you’ll overpower the more subtle chocolate notes.
More Meal Prep Recipes
- Apple Pie Recipe Fuji Apples—Another make-ahead dessert perfect for portioning throughout the week
- Apple Crumble Pie With Oats Recipe—Wholesome baked dessert that holds beautifully in the refrigerator
- Baked Lemon Donut Recipe—Another batch-baking project for satisfying sweet cravings all week long
Here’s what I want you to remember: taking back control of your week doesn’t mean restriction or deprivation. It means making one thoughtful decision on Sunday that ripples into better choices, less stress, and genuine enjoyment throughout your entire week. When you make this brownie ice cream sundae recipe and portion it intentionally, you’re not just meal prepping dessert—you’re reclaiming your evenings. You’re saying “I deserve something beautiful and delicious” and then actually following through instead of letting life happen to you.
This is nutrition that makes sense for real humans living real lives. You’re not giving up ice cream sundaes; you’re organizing them so they fit into your week without chaos. You’re not eating brownies less; you’re eating them more intentionally and enjoyably. That’s the difference between deprivation and wisdom.
Make this recipe this Sunday. Cut the brownies perfectly. Portion your ice cream. Arrange your toppings. Then tomorrow, when you come home tired, you won’t reach for whatever’s convenient. You’ll reach for something you made with intention, something you love, something that tastes like self-care. That’s what meal prep is really about.
More Recipes You Will Love
- This Homemade Butter Recipe – Worth adding to your recipe collection.
- My Favorite No-Fuss Cheesecake – Worth adding to your recipe collection.
- This Indulgent Cheesecake Dessert – Worth adding to your recipe collection.
Happy Cooking!