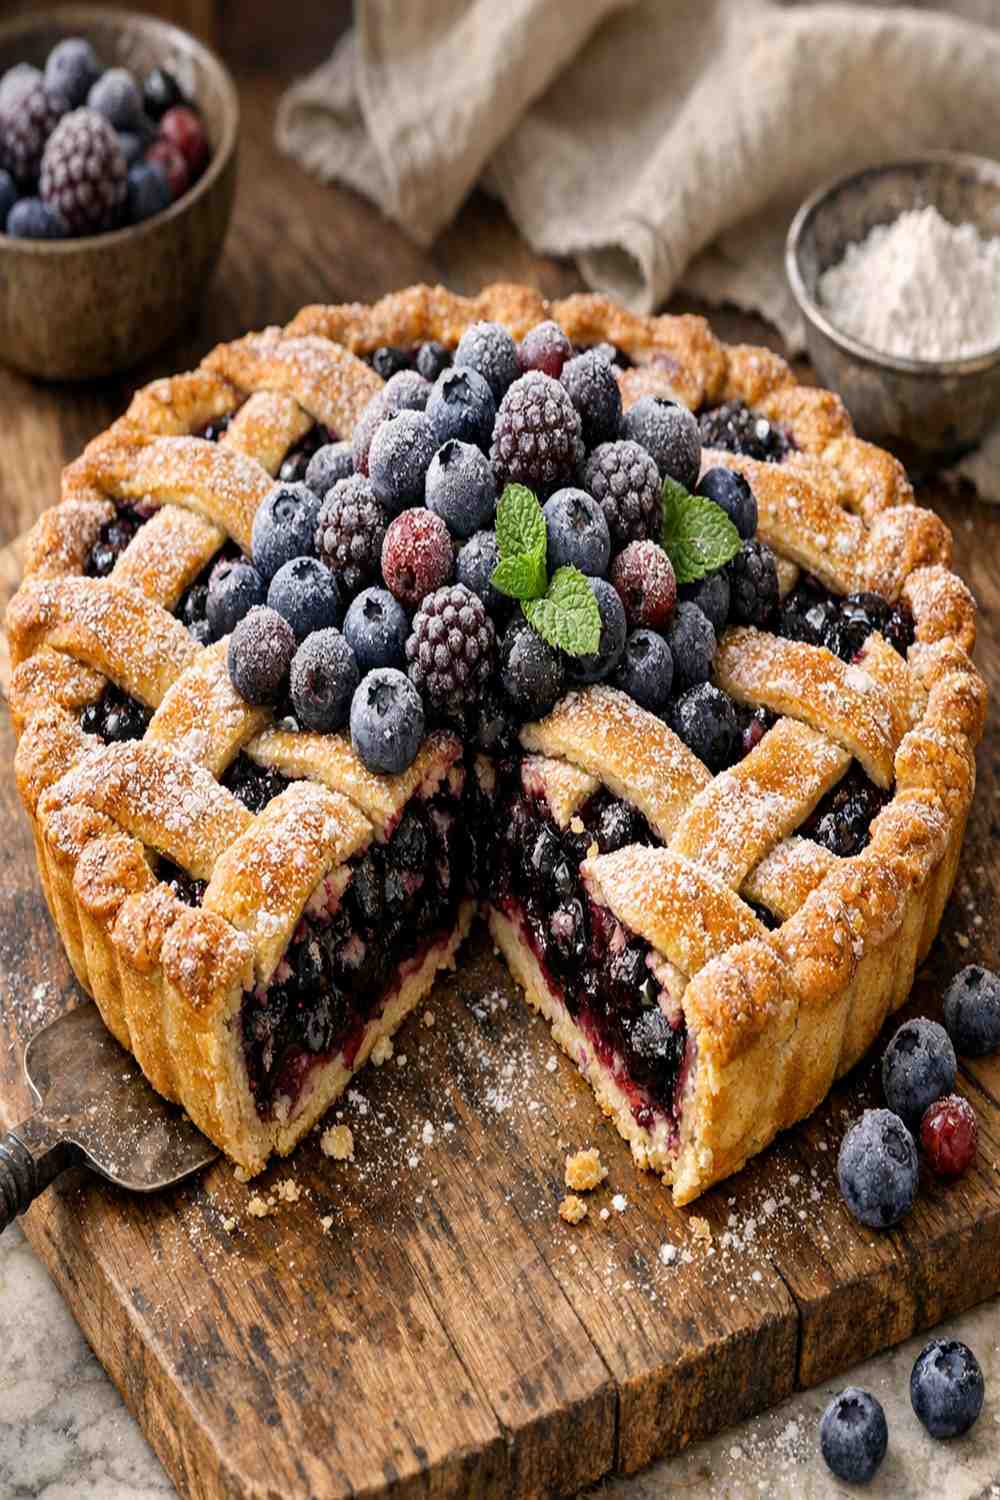
Every time I tried making pie at home, I’d end up with a watery mess in the bottom of the crust. The filling would be runny, the crust would turn soggy, and I’d feel defeated before I even sliced into it. Sound familiar? I grew up watching my mother make magic in her kitchen, but pie seemed like the one thing I just couldn’t master. Then I learned the secret: it’s not about the berries themselves—it’s about how you prepare the filling before it meets your crust. This blueberry pie recipe changed everything for me, and I’m so excited to share it with you. If you love berry desserts, you’ll also enjoy my this simple cake, which uses a similar philosophy of letting fruit shine through proper technique.
Why Your Blueberry Pie Turns Out Soggy (And How to Fix It)
I’ve been a registered dietitian for years, and I’ve heard this complaint from countless home cooks: “My pie filling leaked everywhere” or “The bottom crust was mushy.” The problem isn’t you—it’s the method. Most recipes dump frozen berries straight into a crust and hope for the best. But frozen berries release massive amounts of liquid as they thaw, and that liquid has nowhere to go but down through your crust. The fix? Cook your filling on the stovetop first, allowing the cornstarch to thicken the berry juices before they ever touch your crust. This simple step transforms your entire pie-making experience. You’ll have a filling that’s glossy, thick, and stays exactly where it should be.
What Makes This Blueberry Pie With Frozen Berries Recipe Different?
The magic here lives in the stovetop preparation method. Instead of relying on cornstarch to thicken liquid inside the oven (where heat distribution is uneven and timing is uncertain), we cook the filling on your stovetop where you can see, stir, and control exactly what’s happening. This approach gives you several advantages that matter deeply. The cornstarch thickens properly under direct, consistent heat. The berries release their full flavor through gentle warming. The filling cools completely before meeting your crust, eliminating steam and sogginess. This is the difference between a pie you’re proud to serve and one you apologize for.
Before You Start: What You Need to Know
There are two critical pieces of knowledge that separate successful pie bakers from frustrated ones. Most recipes skip over these details, but they’re absolutely essential to your success.
- Frozen berries are your best friend, not your enemy—they have more consistent moisture content than fresh berries and are picked at peak ripeness, making them more flavorful and reliable for pie baking
- Cornstarch requires continuous stirring during cooking—if you stop stirring, it settles to the bottom of your pan and cooks unevenly, creating lumps and inconsistent texture instead of that beautiful, glossy filling
The Ingredients
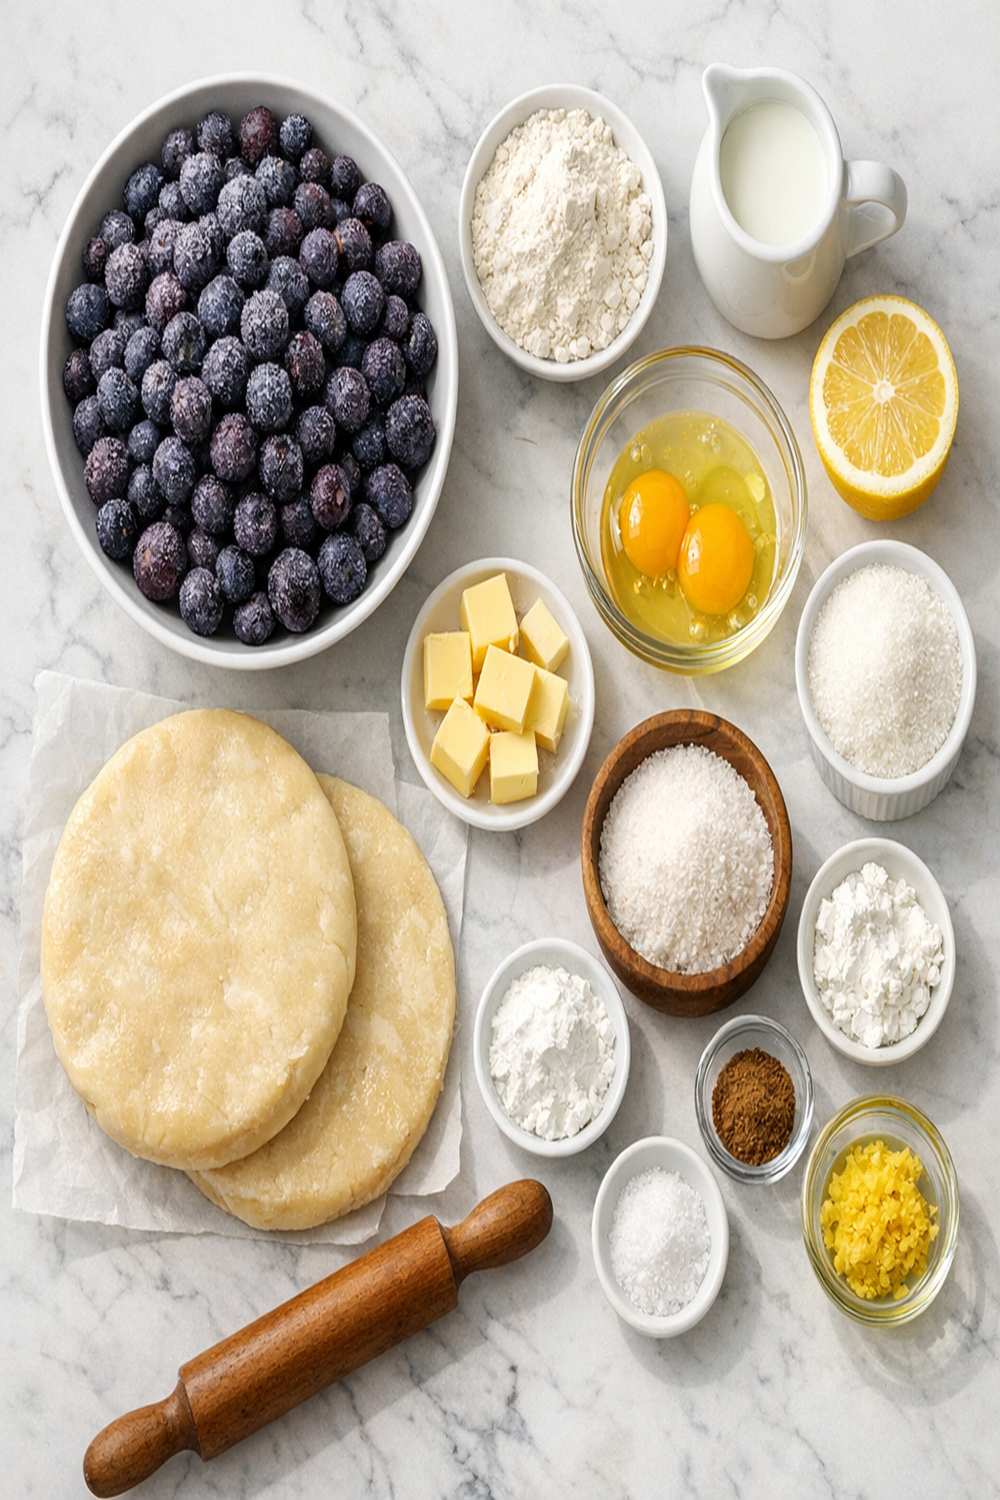
I’ve chosen each ingredient in this recipe for a specific reason. The frozen blueberries provide consistent moisture and deep flavor. The cornstarch is your thickening agent—it’s more stable than flour and creates that gorgeous, glossy filling. Lemon juice and zest brighten the berry flavor and prevent the filling from tasting one-dimensional. The cinnamon is optional, but it adds warmth and complexity without overpowering. The butter enriches the filling with a touch of luxury. And the pie crusts give you a wholesome foundation—whether you make them from scratch or use quality store-bought ones.
- 1 kilogram frozen blueberries (no need to thaw—they release juice better when frozen)
- 1 large egg plus 1 tablespoon water (for an egg wash that creates a beautiful golden top)
- ½ teaspoon sea salt (enhances all the berry flavors)
- 100 grams granulated sugar (adjust based on berry sweetness; less if berries are already sweet, more if they’re tart)
- 1 tablespoon coarse sugar for sprinkling (optional, adds textural contrast)
- 2 pre-made pie crusts or homemade double pie crust (enough for bottom and top)
- 1 tablespoon unsalted butter (optional, but creates a silky mouthfeel)
- 2 tablespoons fresh lemon juice (brightens the berry flavor beautifully)
- ½ tablespoon lemon zest (adds citrus aromatics without extra liquid)
- 30 grams cornstarch (this is your thickening powerhouse)
- ¼ teaspoon ground cinnamon (optional, but adds lovely warmth)
Step-by-Step: How to Make Blueberry Pie With Frozen Berries Recipe Without Fail
This process is straightforward when you understand the “why” behind each step. Let’s walk through this together—you’re going to do beautifully.
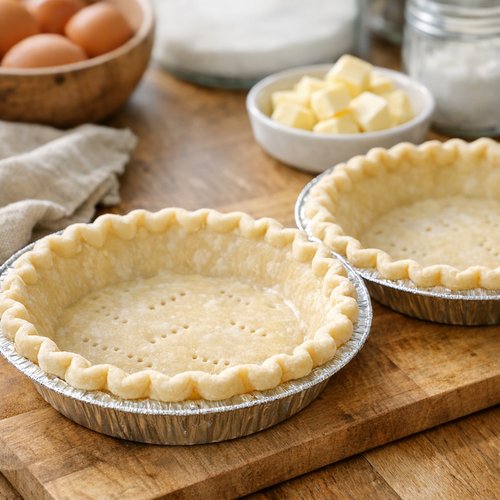
Step 1: Prepare Your Pie Crusts
Remove your pie crusts from the refrigerator about 15 minutes before you need them. If you’re using store-bought crusts, let them sit at room temperature. If you’ve made your own (which I always encourage), they should be properly chilled. Cold dough is essential—it prevents your crust from shrinking during baking and helps create those flaky layers we all love. While your dough comes to temperature, preheat your oven to 375°F (190°C). Place one crust into a 9-inch pie dish, letting it settle naturally without stretching. You want it to fit comfortably without stress.
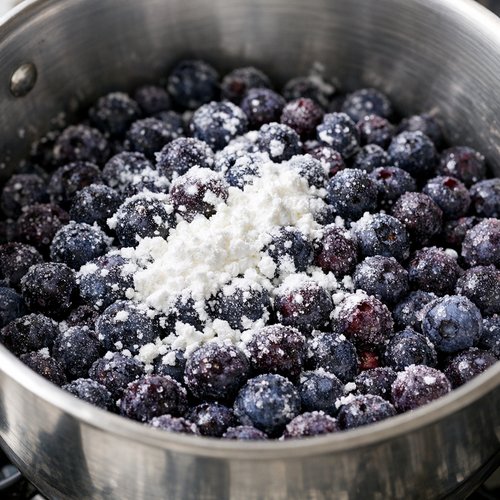
Step 2: Combine Your Dry Ingredients and Aromatics
In a small bowl, whisk together your cornstarch, sugar, salt, and cinnamon (if using). This step is important because it distributes the cornstarch evenly throughout your sugar mixture, preventing lumps when you add it to your berries. Take your time here—clumpy cornstarch will create lumps in your filling. You can also do this step directly in your cooking pan, but I prefer mixing it separately so I know everything is properly combined before heat comes into play.
Step 3: Begin Cooking Your Filling on Low Heat
Pour your frozen blueberries into a large saucepan. Don’t add the butter yet—we’ll do that at the end. Sprinkle your cornstarch mixture over the berries, then add the lemon juice and lemon zest. Now here’s the critical part: place this pan over very low heat and stir gently and consistently for about 3 to 5 minutes. You’re not trying to cook the berries—you’re just beginning to wake them up. As the temperature slowly rises, the berries will start releasing their beautiful juices. This gentle start prevents the cornstarch from cooking too quickly at the bottom of the pan. Stir often, reaching into the bottom corners where heat collects.
Step 4: Increase Heat and Stir Continuously
Once you can see that the berries have released some liquid and the mixture is starting to warm (after about 5 minutes on low), turn your heat up to medium. Continue stirring regularly—and I mean regularly. This is not the time to check your phone or step away. The cornstarch needs constant attention to dissolve properly and thicken evenly. You’re looking for the mixture to begin bubbling around the edges, which usually takes 5 to 7 minutes depending on your stove. Keep your wooden spoon moving through the mixture, scraping the bottom and sides.

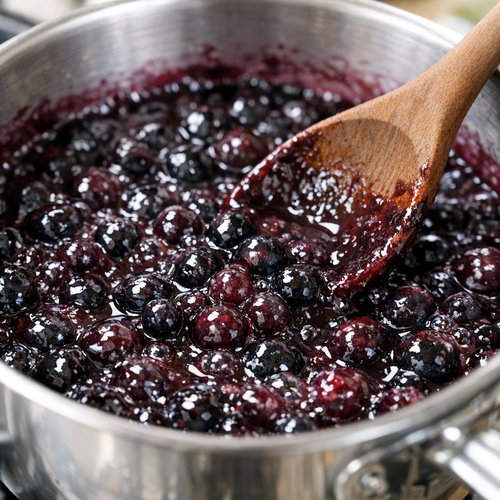
Step 5: Boil and Achieve Glossy Perfection
Once you see small bubbles beginning to form, let the mixture bubble gently while you continue stirring for exactly 1 full minute. This is where the magic happens. The cornstarch is now fully activated by heat, and it’s thickening your berry liquid. You’ll notice the mixture transforms from cloudy to clear and glossy—this is your visual cue that the cornstarch has done its job. The filling will look almost jewel-like when you lift your spoon. If it still looks cloudy and thin, give it another 30 seconds of boiling, but usually 1 minute is perfect.
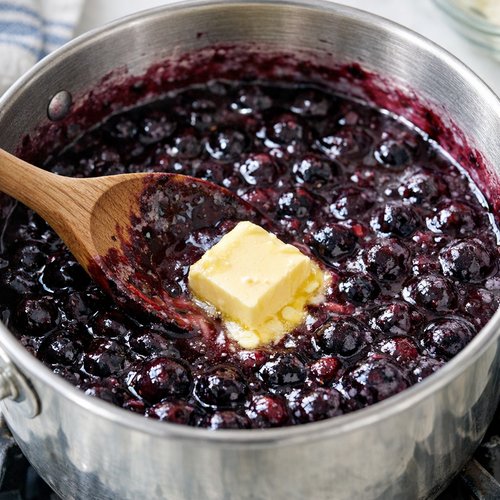
Step 6: Add Richness and Cool Your Filling
Remove your pan from the heat immediately after that final minute of boiling. Stir in your tablespoon of butter if you’re using it. The residual heat will melt it perfectly, and it adds a subtle richness that makes people ask what your secret ingredient is. Pour this gorgeous filling into a large bowl or shallow dish. Let it cool completely to room temperature—this is non-negotiable. If you pour hot filling into your pie crust, the bottom will turn soggy and the eggs in your crust won’t set properly. I usually give it 45 minutes to an hour. If you’re short on time, you can make this filling 1 or 2 days ahead and refrigerate it in an airtight container. Cold filling is actually easier to work with when you’re assembling your pie.
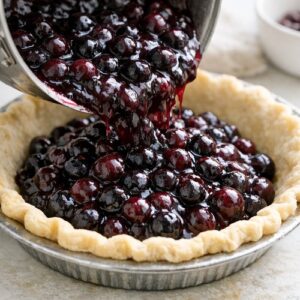
Step 7: Assemble Your Pie
Once your filling is completely cool, pour it into your waiting bottom crust. Don’t overfill—leave about ¼ inch of space at the top. Any excess filling can be gently warmed and served alongside your pie. Place your second pie crust on top, either as a traditional full crust or cut into strips for a lattice pattern if you’re feeling creative. Trim the edges so they’re even, then crimp them firmly between your thumb and forefinger. This seals the crusts together and creates that beautiful finished look.

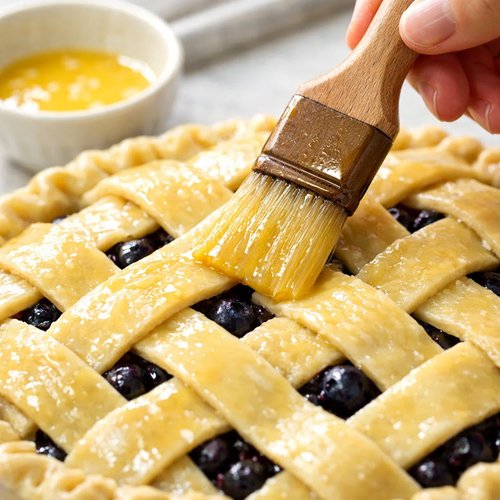
Step 8: Create a Golden Top
In a small bowl, whisk together your egg and 1 tablespoon of water to create an egg wash. Brush this all over your top crust with a pastry brush, being generous but not sloppy. This creates that beautiful golden-brown finish everyone loves. If you have coarse sugar, sprinkle a little over the top now. Make 4 small slits in the top crust with a sharp knife to allow steam to escape during baking—this helps prevent your crust from puffing up unevenly.
Step 9: Bake Until Perfect
Place your pie on a baking sheet (this catches any drips and makes cleanup easier) and bake at 375°F (190°C) for 40 to 50 minutes. You’re looking for a crust that’s deep golden brown, not pale or dark. Halfway through baking, if the crust is browning faster than the filling is cooking (you’ll see it browning too quickly), tent it loosely with aluminum foil. Let the pie cool on a wire rack for at least 2 hours before slicing. This allows the filling to set completely and makes cutting clean, beautiful slices possible.
The Most Common Mistakes (And How to Avoid Them)
- Skipping the stovetop preparation and baking the filling in the crust—this is the #1 reason pies turn out soggy or watery. The frozen berries release more liquid than your oven can handle, and the cornstarch can’t thicken it efficiently. Always precook your filling on the stovetop where you have control.
- Not stirring constantly during the cooking process—if you walk away, cornstarch settles to the bottom and cooks unevenly, creating lumps instead of smooth, glossy filling. Set a timer if you need to, but keep that spoon moving.
- Pouring hot filling into your crust—this is the fastest way to get a soggy bottom crust. The heat transfers directly to your crust, and the moisture from the steam weakens it. Always cool your filling completely first.
How Do I Know When It’s Done?
There are several signals that tell you your pie is perfectly baked. The crust should be a deep golden brown, not just light tan. The color indicates that the starches in the flour have caramelized and the butter has browned, which creates flavor and structure. The filling should bubble gently around the edges where you can see it—not rapidly boiling, but definitely bubbling. This tells you the filling has reached the temperature needed to fully set. When you gently shake the pie, the center should move slightly but not slosh like liquid. There should be a slight firmness to it. Finally, when you insert a knife into the filling through one of the steam vents, it should flow slowly, not pour out. Your pie will continue to set as it cools, so don’t worry if it seems slightly soft when it comes out of the oven.
Troubleshooting: When Things Go Wrong
- Filling is still runny after cooking on the stovetop—your cornstarch didn’t fully activate, usually because you didn’t boil it long enough or didn’t stir consistently. Solution: return it to the heat, bring it to a proper boil (not just a simmer), and stir constantly for another minute. You should see it transform to glossy and thick.
- Crust is browning too quickly while filling isn’t done—your oven temperature might be slightly high, or your crust is on a lower rack where it gets more direct heat. Solution: tent the top with aluminum foil halfway through baking to slow the browning while the filling continues to set. This is totally normal and easily fixed mid-bake.
- Bottom crust is soggy even though I cooked the filling first—you likely poured warm or hot filling into the crust, or your pie didn’t bake long enough. Solution: always use completely cooled filling, and bake until you see gentle bubbling around the edges. The longer baking time helps evaporate excess moisture from the bottom crust.
Can I Store Blueberry Pie With Frozen Berries Recipe?
This pie stores beautifully, and I love having it on hand for unexpected guests or when you need a quick dessert. Keep your cooled pie covered with plastic wrap at room temperature for up to 2 days. It actually tastes wonderful at room temperature, which is my favorite way to enjoy it. For longer storage, cover it tightly and refrigerate for up to 5 days. The crust will firm up in the cold, but you can gently warm slices in a 275°F oven for 10 minutes before serving if you prefer. You can also freeze the baked pie for up to 3 months—wrap it extremely well in plastic wrap, then foil, to prevent freezer burn. Thaw overnight in the refrigerator before serving. From a nutrition standpoint, this pie is a wonderful way to include antioxidant-rich berries in your diet, and the whole-grain crust (if you make it that way) adds fiber that supports digestive health and keeps you satisfied longer.
Nutrition Information
One slice of this blueberry pie (assuming 8 slices per pie) provides approximately 280 calories, with 3 grams of fiber, 2 grams of protein, and about 32 grams of carbohydrates. According to USDA data, blueberries are exceptional sources of anthocyanins—powerful antioxidants that support heart health and cognitive function. The pie crust contributes healthy fats (depending on your crust choice), which help with nutrient absorption and satiety. If you use butter in your crust, you’re also getting fat-soluble vitamins like vitamin A. This isn’t a low-calorie dessert, but it’s a nutrient-dense one that actually nourishes your body while bringing joy to your table. I always say that food is about more than just calories—it’s about how it makes you feel and the memories you create around it.
What Can I Serve With Blueberry Pie With Frozen Berries Recipe?
This pie is perfect on its own, but here are some beautiful serving options that complement it wonderfully. A scoop of vanilla ice cream melting into warm pie is pure comfort. Freshly whipped cream with a touch of vanilla adds elegance and richness. A simple Greek yogurt drizzle provides tang that balances the sweetness. Even a hot cup of strong coffee or tea makes this dessert feel like a complete experience. If you’re looking for other berry-forward desserts, consider pairing your pie with my this simple cake, which uses a completely different technique but celebrates berries in the same way. You could also serve this pie alongside my this simple cake for a berry-themed breakfast or brunch.
- Vanilla ice cream—the cold creaminess contrasts beautifully with warm pie, and the vanilla lets the berry flavor shine through
- Freshly whipped cream with a pinch of lemon zest—adds luxury and echoes the lemon notes in your filling
- Greek yogurt with a drizzle of honey—provides tang and creaminess with less heaviness than ice cream
- A simple dusting of powdered sugar—adds visual elegance and a touch of sweetness if your berries were particularly tart

Blueberry Pie With Frozen Berries Recipe
Ingredients
- 1 kilogram frozen blueberries (no need to thaw
- 1 large egg plus 1 tablespoon water for an egg wash that creates a beautiful golden top
- ½ teaspoon sea salt enhances all the berry flavors
- 100 gram granulated sugar adjust based on berry sweetness; less if berries are already sweet, more if they're tart
- 1 tablespoon coarse sugar for sprinkling optional, adds textural contrast
- 2 pre-made pie crusts or homemade double pie crust enough for bottom and top
- 1 tablespoon unsalted butter optional, but creates a silky mouthfeel
- 2 tablespoon fresh lemon juice brightens the berry flavor beautifully
- ½ tablespoon lemon zest adds citrus aromatics without extra liquid
- 30 gram cornstarch this is your thickening powerhouse
- ¼ teaspoon ground cinnamon optional, but adds lovely warmth
Instructions
Step 1: Prepare Your Pie Crusts
- Remove your pie crusts from the refrigerator about 15 minutes before you need them. If you're using store-bought crusts, let them sit at room temperature. If you've made your own (which I always encourage), they should be properly chilled. Cold dough is essential—it prevents your crust from shrinking during baking and helps create those flaky layers we all love. While your dough comes to temperature, preheat your oven to 375°F (190°C). Place one crust into a 9-inch pie dish, letting it settle naturally without stretching. You want it to fit comfortably without stress.
Step 2: Combine Your Dry Ingredients and Aromatics
- In a small bowl, whisk together your cornstarch, sugar, salt, and cinnamon (if using). This step is important because it distributes the cornstarch evenly throughout your sugar mixture, preventing lumps when you add it to your berries. Take your time here—clumpy cornstarch will create lumps in your filling. You can also do this step directly in your cooking pan, but I prefer mixing it separately so I know everything is properly combined before heat comes into play.

Step 3: Begin Cooking Your Filling on Low Heat
- Pour your frozen blueberries into a large saucepan. Don't add the butter yet—we'll do that at the end. Sprinkle your cornstarch mixture over the berries, then add the lemon juice and lemon zest. Now here's the critical part: place this pan over very low heat and stir gently and consistently for about 3 to 5 minutes. You're not trying to cook the berries—you're just beginning to wake them up. As the temperature slowly rises, the berries will start releasing their beautiful juices. This gentle start prevents the cornstarch from cooking too quickly at the bottom of the pan. Stir often, reaching into the bottom corners where heat collects.

Step 4: Increase Heat and Stir Continuously
- Once you can see that the berries have released some liquid and the mixture is starting to warm (after about 5 minutes on low), turn your heat up to medium. Continue stirring regularly—and I mean regularly. This is not the time to check your phone or step away. The cornstarch needs constant attention to dissolve properly and thicken evenly. You're looking for the mixture to begin bubbling around the edges, which usually takes 5 to 7 minutes depending on your stove. Keep your wooden spoon moving through the mixture, scraping the bottom and sides.
Step 5: Boil and Achieve Glossy Perfection
- Once you see small bubbles beginning to form, let the mixture bubble gently while you continue stirring for exactly 1 full minute. This is where the magic happens. The cornstarch is now fully activated by heat, and it's thickening your berry liquid. You'll notice the mixture transforms from cloudy to clear and glossy—this is your visual cue that the cornstarch has done its job. The filling will look almost jewel-like when you lift your spoon. If it still looks cloudy and thin, give it another 30 seconds of boiling, but usually 1 minute is perfect.

Step 6: Add Richness and Cool Your Filling
- Remove your pan from the heat immediately after that final minute of boiling. Stir in your tablespoon of butter if you're using it. The residual heat will melt it perfectly, and it adds a subtle richness that makes people ask what your secret ingredient is. Pour this gorgeous filling into a large bowl or shallow dish. Let it cool completely to room temperature—this is non-negotiable. If you pour hot filling into your pie crust, the bottom will turn soggy and the eggs in your crust won't set properly. I usually give it 45 minutes to an hour. If you're short on time, you can make this filling 1 or 2 days ahead and refrigerate it in an airtight container. Cold filling is actually easier to work with when you're assembling your pie.

Step 7: Assemble Your Pie
- Once your filling is completely cool, pour it into your waiting bottom crust. Don't overfill—leave about ¼ inch of space at the top. Any excess filling can be gently warmed and served alongside your pie. Place your second pie crust on top, either as a traditional full crust or cut into strips for a lattice pattern if you're feeling creative. Trim the edges so they're even, then crimp them firmly between your thumb and forefinger. This seals the crusts together and creates that beautiful finished look.
Step 8: Create a Golden Top
- In a small bowl, whisk together your egg and 1 tablespoon of water to create an egg wash. Brush this all over your top crust with a pastry brush, being generous but not sloppy. This creates that beautiful golden-brown finish everyone loves. If you have coarse sugar, sprinkle a little over the top now. Make 4 small slits in the top crust with a sharp knife to allow steam to escape during baking—this helps prevent your crust from puffing up unevenly.
Step 9: Bake Until Perfect
- Place your pie on a baking sheet (this catches any drips and makes cleanup easier) and bake at 375°F (190°C) for 40 to 50 minutes. You're looking for a crust that's deep golden brown, not pale or dark. Halfway through baking, if the crust is browning faster than the filling is cooking (you'll see it browning too quickly), tent it loosely with aluminum foil. Let the pie cool on a wire rack for at least 2 hours before slicing. This allows the filling to set completely and makes cutting clean, beautiful slices possible.

FAQs
Can I use fresh blueberries instead of frozen?
You can, but I don’t recommend it—and I say this as someone who loves fresh berries. Fresh blueberries contain less water at harvest, but as they sit before baking, they release more liquid than frozen ones. This unpredictability makes it harder to achieve consistent results. Frozen blueberries are picked at peak ripeness and flash-frozen immediately, preserving their flavor and giving you consistent moisture content. If you absolutely want to use fresh, reduce your sugar slightly and use the exact same cooking method. Just know that your filling might be slightly softer or have more liquid.
What if my filling boils over while I’m cooking it on the stovetop?
This happens sometimes, and it’s not a failure. If your filling starts bubbling up and threatening to overflow, simply reduce the heat slightly and continue stirring. The mixture has likely reached full thickness anyway. If it’s already overflowed, wipe the stovetop clean immediately so you don’t have burnt fruit stuck on, then continue. Your filling is still perfectly fine to use—a little of it just took a detour. In future bakes, use a slightly larger pan or place a wooden spoon across the top of the pan before it boils—this breaks the surface tension and prevents boiling over.
Do I need to blind-bake my bottom crust before adding filling?
No, and that’s one of the beautiful things about this method. Because your filling is completely cooled before it meets your crust, you don’t need to pre-bake. The cooled filling doesn’t transfer enough heat to compromise the bottom crust. The long baking time (40-50 minutes) ensures your bottom crust gets fully cooked underneath the filling. Just make sure your filling is truly room temperature or even slightly chilled before assembly.
Can I make the filling ahead of time?
Absolutely—this is one of my favorite make-ahead tricks. You can prepare your filling 1 to 2 days in advance and store it in an airtight container in the refrigerator. This actually makes pie assembly easier because the filling is cold and stable, so it doesn’t shift when you place your top crust. Just let it come to room temperature (or use it chilled, it doesn’t matter) before pouring it into your crust. This makes pie baking much more manageable if you’re doing it for a gathering.
Why does my pie crust crack when I’m crimping the edges?
Your crust is likely too cold or too warm, or you’re crimping too aggressively. If it’s very cold from the refrigerator, let it sit at room temperature for 5 minutes before crimping. If it’s too warm, it becomes fragile. Crimp gently but firmly—you’re sealing the two crusts together, not testing their strength. Use the side of your thumb and forefinger in a gentle pinching motion rather than pressing hard. If cracks do happen, don’t worry—a little egg wash smoothed over the cracks will hide them and help them seal during baking.
Expert’s Nutritional Tip from a Registered Dietitian
Here’s what I always tell clients: blueberries aren’t just delicious; they’re one of the most nutrient-dense foods you can eat. They’re among the highest in antioxidants of all berries, and cooking them doesn’t destroy these compounds the way many people fear. In fact, the heat from cooking can make some antioxidants more bioavailable, meaning your body can absorb them more easily. This pie, made with frozen blueberries, delivers anthocyanins and other phytonutrients that support cardiovascular health and protect your brain cells. When you enjoy a slice of this pie, you’re not indulging despite your health—you’re actively nourishing yourself.
Make-Ahead Guide
Up to 2 days before baking: Prepare your filling using the stovetop method. Cool it completely, then store it in an airtight container in the refrigerator. This is my favorite way to prepare pie when I’m hosting—it removes so much stress from the day of.
Up to 1 day before baking: Prepare your pie crusts if making them from scratch, wrap them tightly, and refrigerate. Store-bought crusts can come straight from the freezer.
Morning of baking: About 1 hour before you want to bake, remove your pie crust and filling from the refrigerator. Assemble your pie about 30 minutes before baking so everything is at optimal temperature. This helps your crust bake evenly.
Baked pie storage: After your pie is completely cooled, cover it with plastic wrap and store at room temperature for up to 2 days, or refrigerate for up to 5 days. Freeze for up to 3 months if you want even more flexibility.
More Recipes You’ll Love
- Baked Berry Cheesecake Recipe—another elegant way to celebrate blueberries and other berries with creamy richness
- Strawberry Chamomile Naked Cake—showcases the same philosophy of letting fruit flavor shine through proper technique
- Blueberry Lemon Ricotta Pancakes Recipe—brings that blueberry-lemon magic to your breakfast table
- Basic Bun Recipe—master the art of pie crusts and other baked goods with this foundational recipe
- These Fudgy Homemade Brownies – Worth adding to your recipe collection.
You now have everything you need to make a beautiful, delicious blueberry pie with frozen berries—one that impresses people and makes you proud. This isn’t just a recipe; it’s a skill you can return to again and again, adjusting the amount of sugar based on your berries, experimenting with lattice patterns, making it your own. Every time you pull this pie from the oven, you’re creating a moment that will stay with people. That’s what my mother taught me in her kitchen, and that’s what I’m passing along to you. The secret was never about complicated techniques or fancy ingredients—it was about understanding the why behind each step, so you could troubleshoot confidently and cook with joy. Happy Cooking!