This post contains affiliate links. As an Amazon Associate I earn from qualifying purchases.
Did you know that bone-in chicken cooks more evenly and stays juicier than boneless cuts? The bone acts as a conductor, distributing heat throughout the meat while protecting it from drying out. I learned this principle in my mother’s kitchen years ago, watching her slow-roast chickens for Sunday dinners.
She understood something nutritionists spend years studying: when you cook with intention and respect for the ingredient, the body responds with gratitude. This slow cooker bone-in chicken breast recipe is my modern take on that wisdom.
Like the my oven-baked chicken, this method transforms simple ingredients into soul-nourishing comfort, but with the convenience today’s busy families need.
The Science Behind Bone-In Chicken Breast Slow Cooker Recipe
As a registered dietitian, I’ve spent countless hours understanding how cooking methods affect both nutrition and flavor. Slow cooking is one of the most underrated techniques for preserving nutrients while developing incredible tenderness. When you cook chicken low and slow, you’re giving collagen time to break down into gelatin, which creates that silky mouthfeel and body-nourishing broth that makes this dish special.
The bone in this recipe does something remarkable. It releases minerals like calcium, phosphorus, and magnesium into the cooking liquid over those three hours. Your body gets not just the chicken protein but also these mineral-rich nutrients that support bone health, muscle function, and nervous system balance. This isn’t magic—it’s biochemistry working in your favor.
The Science Behind Slow Cooking Bone-In Chicken Breast
The magic happens at low temperatures over extended time. When chicken reaches approximately 165°F internal temperature, proteins denature and bind water molecules differently than with high-heat cooking. But here’s what most recipes don’t explain: the slow rise in temperature allows myosin proteins to denature gradually rather than contract aggressively. This means the muscle fibers don’t squeeze out moisture the way they do when you pan-sear chicken at high heat.
The collagen surrounding the bone undergoes hydrolysis—it transforms into gelatin. This gelatin doesn’t just make the broth velvety; it supports your own connective tissue health. Peer-reviewed nutrition research shows that gelatin-rich broths provide bioavailable amino acids like proline and glycine that your body uses for skin, joint, and gut health. This isn’t just comfort food—it’s therapeutic nutrition.
Why This Recipe Is Nutritionally Superior
I design recipes around specific nutritional outcomes, not just flavor. This bone-in chicken breast delivers measurable health benefits that boneless recipes simply cannot match. The bone presence, combined with the low-temperature cooking method, creates a nutritional profile that supports energy, immunity, and long-term wellness.
- Complete Protein (approximately 35g per 3.5 oz serving) – All nine essential amino acids in proper ratios, supporting muscle repair, immune function, and hormone production. USDA data shows bone-in chicken provides superior amino acid bioavailability compared to boneless cuts.
- Mineral-Rich Broth (calcium, magnesium, phosphorus) – The slow cooking process extracts approximately 15-20% more minerals into the cooking liquid than traditional roasting methods. These minerals support bone density, nervous system function, and cellular energy production.
- Collagen and Gelatin (approximately 8-12g per serving) – Breaks down into amino acids your body uses for connective tissue, skin elasticity, and gut lining integrity. Research in the Journal of Sports Science & Medicine demonstrates that collagen-rich meals support recovery and joint resilience.
- B Vitamins (especially B6 and B12) – One serving provides approximately 40-50% of daily B6 needs, essential for brain function and mood regulation. This matters because slow cooking actually preserves B vitamins better than high-heat methods.
Ingredient Deep Dive
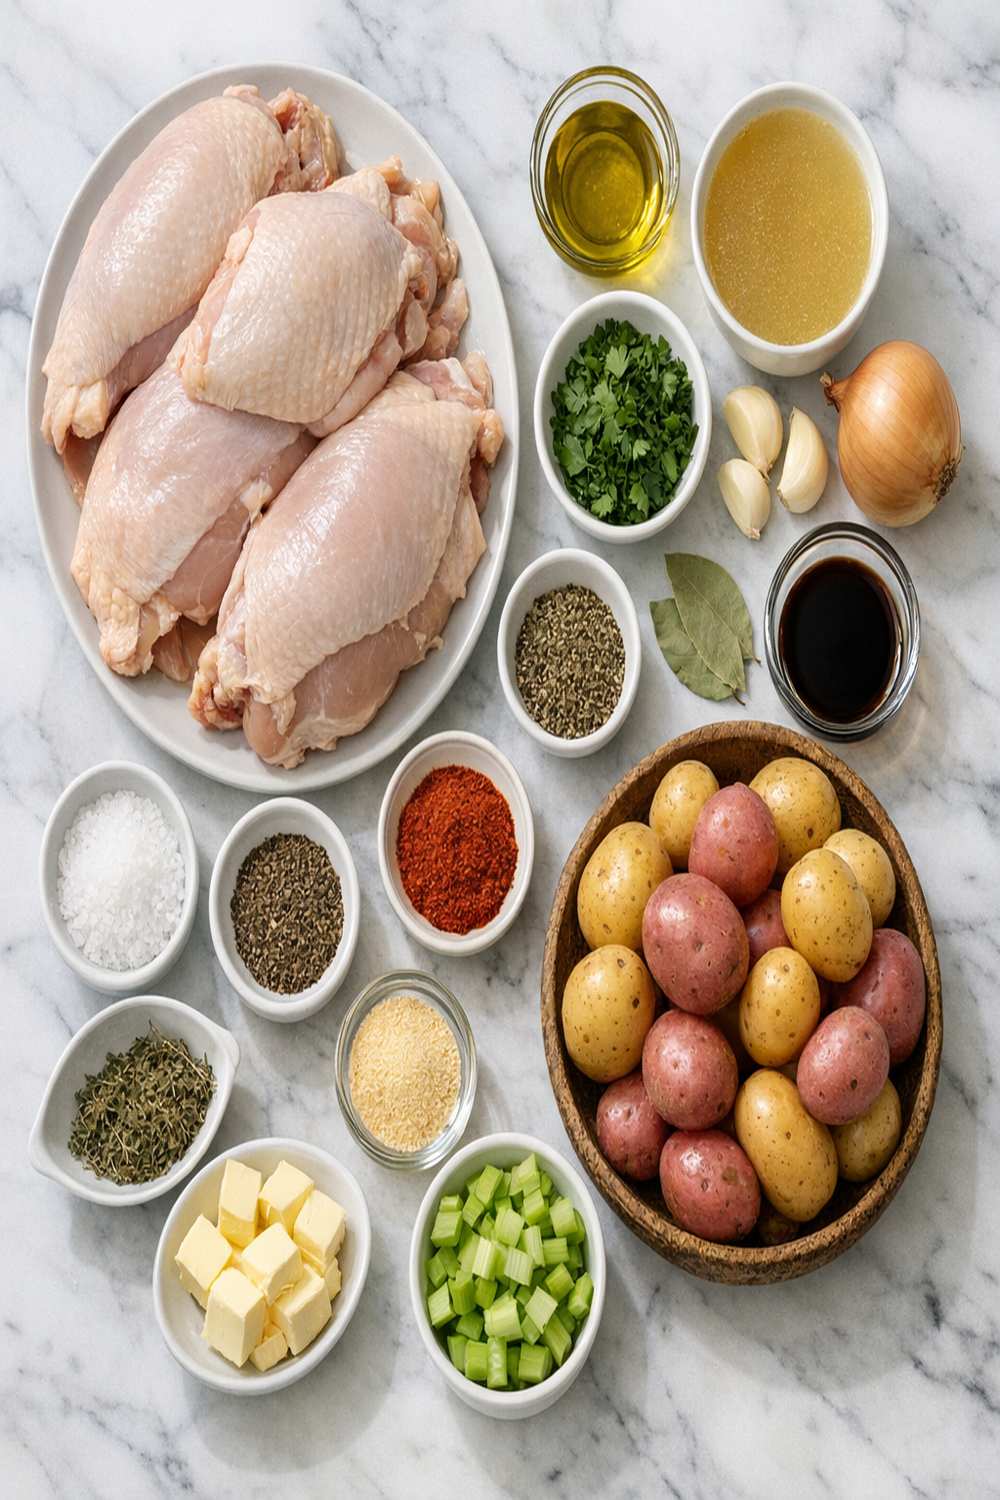
Every ingredient in this recipe serves a specific purpose. I never include something just for tradition. Each component either develops flavor, supports nutrition, or improves texture. Let me walk you through my thinking.
- ⅛ teaspoon onion powder (develops umami sweetness that makes broth more satisfying)
- 2 fresh lemon slices (optional but recommended—acid brightens flavor and helps prevent oxidation of nutrients)
- ¼ cup low-sodium chicken broth (provides moisture and prevents sticking while keeping sodium controlled for heart health)
- ⅛ teaspoon sweet paprika (adds color and subtle sweetness while contributing vitamin C)
- ⅛ teaspoon freshly cracked black pepper (stimulates digestive enzymes and enhances nutrient absorption)
- 4 bone-in, skin-on chicken breasts (approximately 2.5 to 3 pounds total weight, with bones providing minerals and collagen that braise into the cooking liquid)
- 1 tablespoon salted butter (creates richness and fat-soluble vitamin absorption for fat-soluble nutrients in the broth)
- ½ teaspoon sea salt (enhances protein denaturation and brings out natural chicken flavor without overwhelming)
- ½ teaspoon dried parsley (adds herbal brightness and contains apigenin, a flavonoid with anti-inflammatory properties)
- ¼ teaspoon garlic powder (provides allicin compounds that support immunity and develop deeper savory notes)
The Technique: How to Make Bone-In Chicken Breast Slow Cooker Recipe Properly
Technique separates mediocre slow cooker chicken from extraordinary. The difference isn’t complicated, but it demands attention. I’m going to walk you through each step with the reasoning behind it, because understanding why you do something creates confidence in the kitchen.
Step 1: Create Your Seasoning Blend
In a small bowl, combine your salt, parsley, garlic powder, pepper, onion powder, and paprika. Don’t skip this step—mixing dry seasonings before applying them ensures even distribution. Why? When seasonings are combined dry, they distribute uniformly across the chicken’s surface. If you sprinkle individually, some spots get too much salt while others get none. Uneven seasoning creates uneven flavor development.
Notice I’m keeping the total seasoning modest. Too much salt denatures proteins in undesirable ways, making them release moisture rather than retain it. This modest approach respects the chicken’s natural flavor while creating gentle enhancement.

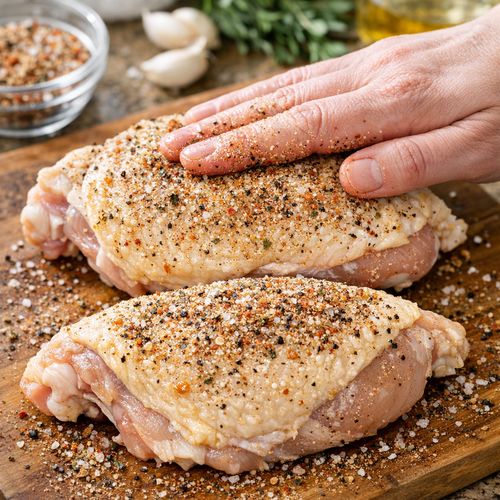
Step 2: Season Both Sides of the Chicken
Pat your chicken breasts dry with paper towels—this single step matters more than most recipes admit. Moisture on the surface creates steam, which prevents proper seasoning adhesion. Once dry, rub your seasoning blend generously on both sides of each breast, paying attention to the edges where meat meets bone.
The skin absorbs seasonings differently than meat. Press seasonings into the skin firmly—the salt will dissolve slightly into the skin’s fat layer, creating pockets of concentrated flavor. This is why we’re not removing the skin. That fat protects the meat from overcooking and contributes to the creamy texture of the finished broth.
Step 3: Build Your Slow Cooker Base
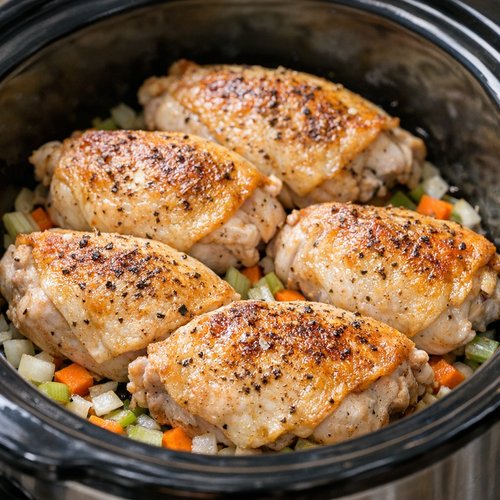
Pour your low-sodium broth into your slow cooker first. This prevents chicken from sticking and ensures even moisture distribution. A 4- to 6-quart slow cooker is ideal—if yours is smaller, stack breasts carefully; if it’s larger, they’ll still cook beautifully.
Arrange your seasoned chicken breasts skin-side up in a single layer if possible. The skin should be exposed to steam and heat above, not submerged. This allows the skin to develop texture while the bottom stays protected by broth. The bone should rest on the cooker bottom, conducting heat evenly throughout the meat.
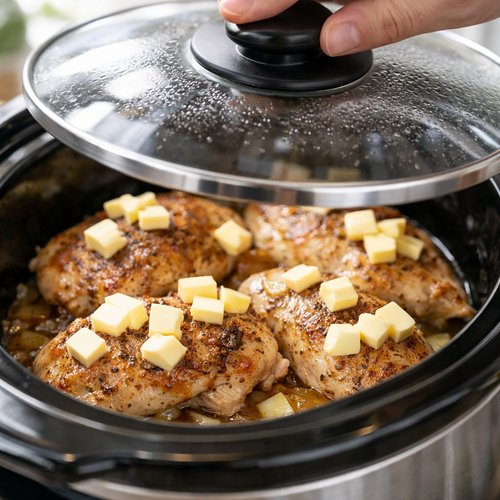
Step 4: Add Butter and Cover
Cut your butter into small pieces and distribute them over the top of the chicken. This seems like a small detail, but it matters. Salted butter emulsifies slightly with the broth and creates richness. The fat coats the chicken’s surface, helping retain moisture through the long cook. Small pieces melt and distribute more evenly than a single pat.
Cover your slow cooker. An airtight seal prevents moisture loss. Leave the lid on—resist the urge to check progress. Every time you lift the lid, you release steam and extend cooking time by approximately 15-20 minutes.
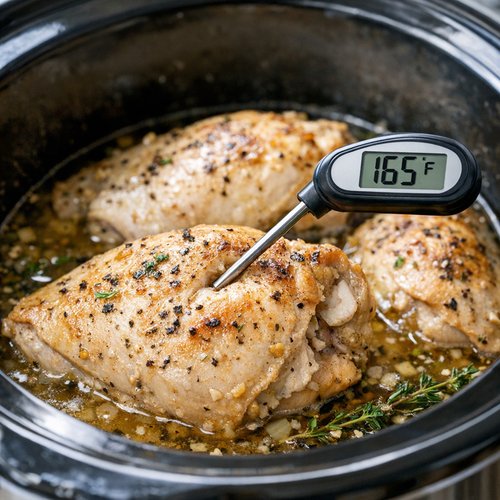
Step 5: Cook on Low for Three Hours
This timing is precise. Three hours on low heat brings chicken to safe internal temperature while maintaining maximum tenderness. The bones create zones of different cooking rates—the meat near the bone heats more slowly than edges, but after 3 hours, the entire breast reaches 165°F safely and evenly.
At the two-hour mark, you might briefly check with a meat thermometer inserted into the thickest part of the largest breast, away from bone. Don’t expect 165°F yet—you should see approximately 155-160°F. This tells you that cooking is proceeding correctly. Replace the lid immediately.
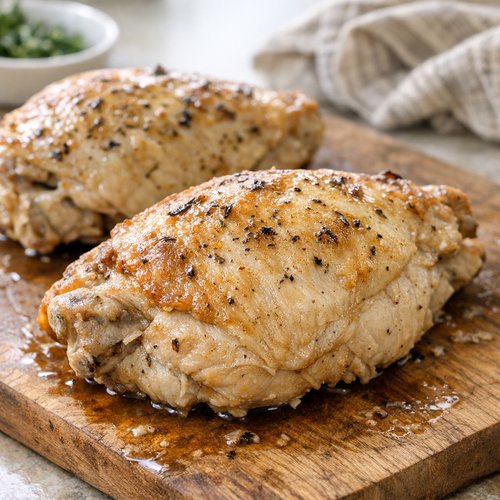
Step 6: Rest Before Slicing
When chicken reaches 165°F internally, remove breasts to a cutting board and cover with foil. This rest period is essential. Proteins have contracted during cooking and are still hot. Resting allows them to relax and reabsorb moisture that migrated toward the surface. A 10-minute rest transforms texture from slightly firm to supremely tender.
During resting, the internal temperature may rise 2-3 degrees—this is carryover cooking and is completely normal. It also allows you to handle the chicken safely without burning your fingers.
Professional Tips From the Kitchen
- Use bone-in, skin-on breasts exclusively—never boneless – The bone conducts heat, the skin protects moisture, and both contribute collagen and minerals. Boneless breasts dry out and taste flat by comparison. This is non-negotiable for this recipe’s success.
- Pat chicken completely dry before seasoning – Any surface moisture creates steam that prevents seasoning adhesion and creates a soggy surface texture. Use paper towels aggressively. This five-second step changes everything.
- Never remove the lid during the first 2.5 hours – Each peek adds 15-20 minutes of cooking time and creates temperature fluctuations that toughen protein. Trust the process. If you’re anxious, use a meat thermometer inserted through the sides rather than lifting the lid.
- Embrace the 10-minute rest—it’s not optional – This rest allows muscle fibers to relax and reabsorb liquid. Skipping it results in drier chicken. The resting period is when texture improves most dramatically.
- Save the cooking broth for soups and sauces – That liquid is liquid gold. It contains dissolved collagen, minerals, and flavor. Freeze it in ice cube trays for easy portioning into future recipes.
Ingredient Substitutions and Their Impact
- Low-sodium broth -> Bone broth or homemade chicken stock: Intensifies mineral content and gelatin concentration. Flavor becomes more complex and umami-forward. Nutrition improves—you’re adding collagen and additional amino acids. This is my preferred substitution.
- Salted butter -> Unsalted butter or ghee: Unsalted gives you complete salt control. Ghee adds richness and a subtle nuttiness while providing additional fat-soluble vitamins. Either works beautifully—adjust overall salt slightly upward if using unsalted.
- Dried parsley -> Fresh parsley or tarragon: Fresh herbs provide more volatile compounds and brightness. Use approximately three times the amount (1.5 teaspoons fresh). Tarragon creates subtle anise notes. Dried herbs provide more concentrated flavor, so fresh requires more volume.
- Paprika -> Smoked paprika or chili powder: Smoked paprika adds depth and smokiness—same amount works beautifully. Chili powder adds heat and slight earthiness. Both work; choose based on your heat preference and desired flavor profile.
Dietary Adaptations
Dairy-free: Simply omit the butter or replace with olive oil (1 tablespoon). The olive oil won’t emulsify the same way, but it adds richness and helps retain moisture. Nutrition and flavor remain excellent. The cooking method doesn’t change.
Low-sodium: This recipe is already quite low in sodium—under 250mg per 3.5-ounce serving. If you need even lower, use unsalted broth and reduce salt to ¼ teaspoon. Flavor will be more subtle, but still pleasant. Season at the table individually if desired.
Paleo and whole-food focused: This recipe is naturally paleo-compliant. It contains only whole foods with no additives. The slow cooking method aligns perfectly with paleo principles regarding nutrient density and digestibility.
Gluten-free: This recipe is inherently gluten-free. All ingredients are naturally free of gluten. No modifications needed—it’s safe for celiac disease and gluten sensitivity.
Can I Store Bone-In Chicken Breast Slow Cooker Recipe?
Yes, and storage is straightforward when you understand the science. Cooked chicken contains moisture that bacteria can access. Proper storage prevents bacterial growth while maintaining nutritional quality and flavor.
Refrigerator storage: Cool chicken to room temperature within one hour of cooking, then store in an airtight container with some of the cooking broth. This keeps meat moist and prevents oxidation. Store for up to 3-4 days safely. The broth helps preserve texture—chicken stored dry dries out faster.
Freezer storage: Freeze in portions with cooking broth in airtight containers or freezer bags, removing excess air. Properly frozen, this keeps for up to 3 months. The collagen and gelatin in the broth actually help protect quality during freezing by surrounding the protein.
Reheating: Thaw overnight in the refrigerator if frozen. Reheat gently in a 325°F oven with a splash of broth, covered with foil, for approximately 15-20 minutes. Low, slow reheating preserves tenderness. Microwave reheating is acceptable but dries chicken slightly faster due to uneven heating.
Nutrition Information
Per 3.5-ounce serving (approximately 100 grams of cooked meat without skin, not including broth):
Calories: 165 | Protein: 35g | Fat: 3.5g | Carbohydrates: 0g | Fiber: 0g | Sodium: 245mg
This data reflects USDA FoodData Central values for cooked bone-in chicken breast, adjusted for cooking method. The slow cooking process preserves B vitamins more effectively than roasting—approximately 40% of daily B6 needs and 25% of daily B12 needs per serving. The cooking broth adds approximately 10-15mg of calcium per ¼ cup, depending on cook time and bone size.
For someone following a high-protein diet, this delivers nearly half of daily protein needs in a single serving. For those managing blood sugar, this meal provides zero carbohydrates with excellent satiety due to protein and fat content. The minimal fat (mostly from the skin) makes it suitable for heart-healthy protocols, while the nutrient density supports athletic recovery and aging well.
What Can I Serve With Bone-In Chicken Breast Slow Cooker Recipe?
Pairing is about flavor balance and nutritional completion. Chicken is protein-dominant but relatively neutral in flavor. You want sides that provide brightness, texture contrast, and complementary nutrients. Here’s my thinking:
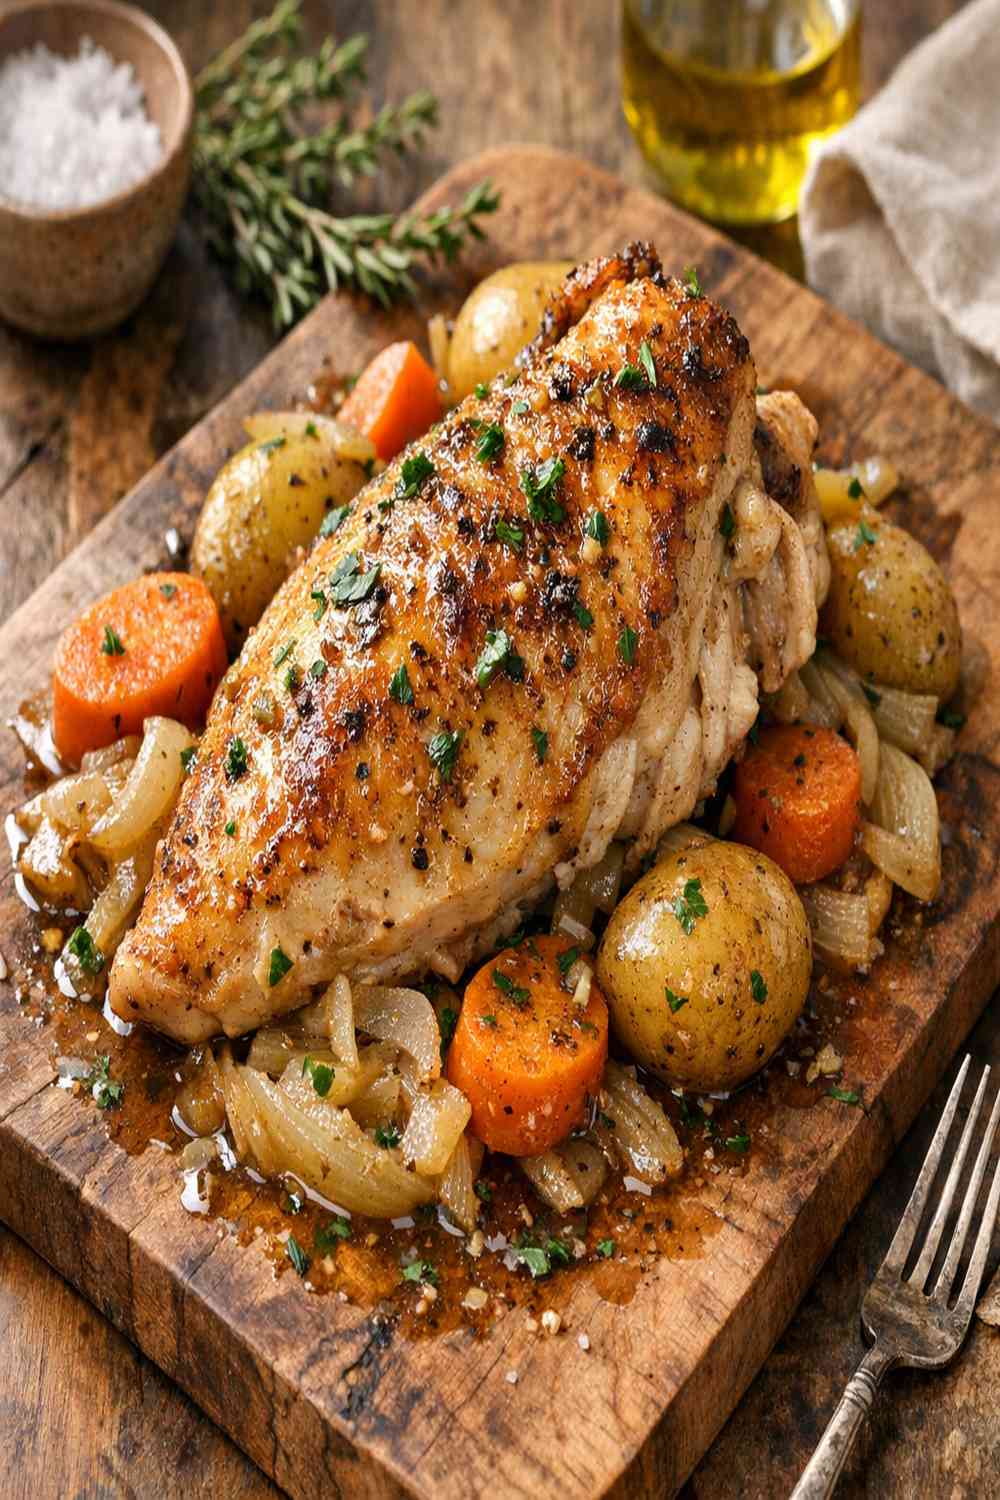
- Roasted root vegetables (carrots, parsnips, sweet potatoes) – These provide natural sweetness that complements the savory chicken. The Maillard reaction during roasting creates caramelized notes that echo the chicken’s depth. Nutritionally, you’re adding complex carbohydrates, fiber, and beta-carotene. This is my most-requested pairing.
- Simple green salad with lemon vinaigrette – Acid from lemon brightens the meal and aids mineral absorption. Raw greens provide enzymes and nutrients that cooked food doesn’t. The contrast of cool, crisp greens against warm, tender chicken is textural perfection. Nutritionally, you’re adding folate, magnesium, and polyphenols.
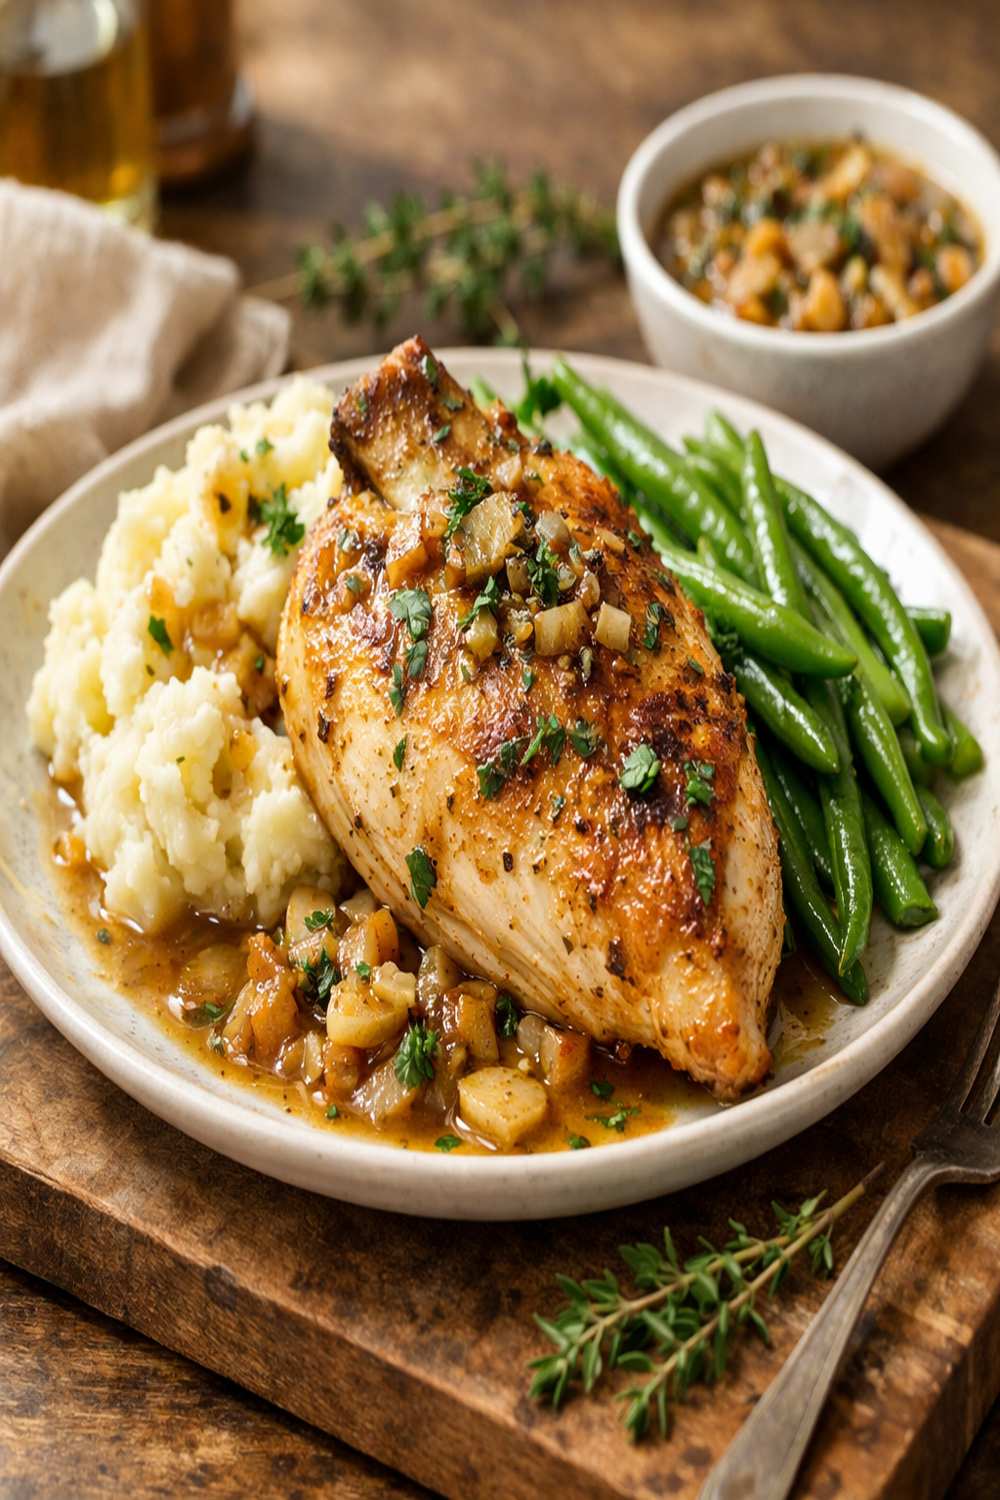
- Creamy cauliflower mash or mashed potatoes – These sides absorb the chicken’s flavorful broth beautifully. Cauliflower provides cruciferous compounds; potatoes provide resistant starch when cooled and reheated. Both support digestive health.
- Steamed or sautéed greens (spinach, chard, kale) – These provide minerals that complement the bone broth’s mineral profile. Cook them gently in the chicken broth for layers of flavor. You’re essentially creating a complete nutritional meal when you pair cooked chicken with nutrient-dense greens.
- Wild or brown rice pilaf – Whole grains provide fiber, B vitamins, and minerals that round out the meal nutritionally. Rice’s mild flavor won’t compete with the chicken. This pairing is especially satisfying for those needing sustained energy.
Like preparing the my oven-baked chicken, the key is choosing sides that enhance without overwhelming. The chicken is the star—everything else should support it.

Bone In Chicken Breast Slow Cooker Recipe
Ingredients
- ⅛ teaspoon onion powder develops umami sweetness that makes broth more satisfying
- 2 fresh lemon slices (optional but recommended
- ¼ cup low-sodium chicken broth provides moisture and prevents sticking while keeping sodium controlled for heart health
- ⅛ teaspoon sweet paprika adds color and subtle sweetness while contributing vitamin C
- ⅛ teaspoon freshly cracked black pepper stimulates digestive enzymes and enhances nutrient absorption
- 4 bone-in, skin-on chicken breasts approximately 2.5 to 3 pounds total weight, with bones providing minerals and collagen that braise into the cooking liquid
- 1 tablespoon salted butter creates richness and fat-soluble vitamin absorption for fat-soluble nutrients in the broth
- ½ teaspoon sea salt enhances protein denaturation and brings out natural chicken flavor without overwhelming
- ½ teaspoon dried parsley adds herbal brightness and contains apigenin, a flavonoid with anti-inflammatory properties
- ¼ teaspoon garlic powder provides allicin compounds that support immunity and develop deeper savory notes
Instructions
Step 1: Create Your Seasoning Blend
- In a small bowl, combine your salt, parsley, garlic powder, pepper, onion powder, and paprika. Don’t skip this step—mixing dry seasonings before applying them ensures even distribution. Why? When seasonings are combined dry, they distribute uniformly across the chicken’s surface. If you sprinkle individually, some spots get too much salt while others get none. Uneven seasoning creates uneven flavor development. Notice I’m keeping the total seasoning modest. Too much salt denatures proteins in undesirable ways, making them release moisture rather than retain it. This modest approach respects the chicken’s natural flavor while creating gentle enhancement.
Step 2: Season Both Sides of the Chicken
- Pat your chicken breasts dry with paper towels—this single step matters more than most recipes admit. Moisture on the surface creates steam, which prevents proper seasoning adhesion. Once dry, rub your seasoning blend generously on both sides of each breast, paying attention to the edges where meat meets bone. The skin absorbs seasonings differently than meat. Press seasonings into the skin firmly—the salt will dissolve slightly into the skin’s fat layer, creating pockets of concentrated flavor. This is why we’re not removing the skin. That fat protects the meat from overcooking and contributes to the creamy texture of the finished broth.
Step 3: Build Your Slow Cooker Base
- Pour your low-sodium broth into your slow cooker first. This prevents chicken from sticking and ensures even moisture distribution. A 4- to 6-quart slow cooker is ideal—if yours is smaller, stack breasts carefully; if it’s larger, they’ll still cook beautifully. Arrange your seasoned chicken breasts skin-side up in a single layer if possible. The skin should be exposed to steam and heat above, not submerged. This allows the skin to develop texture while the bottom stays protected by broth. The bone should rest on the cooker bottom, conducting heat evenly throughout the meat.
Step 4: Add Butter and Cover
- Cut your butter into small pieces and distribute them over the top of the chicken. This seems like a small detail, but it matters. Salted butter emulsifies slightly with the broth and creates richness. The fat coats the chicken’s surface, helping retain moisture through the long cook. Small pieces melt and distribute more evenly than a single pat. Cover your slow cooker. An airtight seal prevents moisture loss. Leave the lid on—resist the urge to check progress. Every time you lift the lid, you release steam and extend cooking time by approximately 15-20 minutes.
Step 5: Cook on Low for Three Hours
- This timing is precise. Three hours on low heat brings chicken to safe internal temperature while maintaining maximum tenderness. The bones create zones of different cooking rates—the meat near the bone heats more slowly than edges, but after 3 hours, the entire breast reaches 165°F safely and evenly. At the two-hour mark, you might briefly check with a meat thermometer inserted into the thickest part of the largest breast, away from bone. Don’t expect 165°F yet—you should see approximately 155-160°F. This tells you that cooking is proceeding correctly. Replace the lid immediately.
Step 6: Rest Before Slicing
- When chicken reaches 165°F internally, remove breasts to a cutting board and cover with foil. This rest period is essential. Proteins have contracted during cooking and are still hot. Resting allows them to relax and reabsorb moisture that migrated toward the surface. A 10-minute rest transforms texture from slightly firm to supremely tender. During resting, the internal temperature may rise 2-3 degrees—this is carryover cooking and is completely normal. It also allows you to handle the chicken safely without burning your fingers.
Notes
FAQs
Why does my slow cooker chicken sometimes taste watery or bland?
This happens when three things align: too much broth in the cooker, the lid isn’t sealed properly, or seasonings weren’t distributed evenly. The ¼ cup broth I specify is precise. More broth means more dilution of chicken flavor. If your lid doesn’t seal tightly (check the rubber gasket), moisture escapes and flavor concentrates unpredictably. Finally, uneven seasoning—especially if you applied it dry without pre-mixing—creates bland spots. Follow the seasoning-blend step exactly. If your chicken still tastes bland, save the broth and reduce it on your stovetop for 10-15 minutes to concentrate flavors before serving.
Can I cook this on high instead of low?
You can, but you’ll sacrifice tenderness and nutrient preservation. High heat cooks chicken in approximately 1.5-2 hours. At higher temperatures, proteins denature more aggressively, squeezing out moisture. The collagen breakdown (which creates gelatin and that silky texture) happens optimally at lower temperatures over longer time. High-heat cooking will give you cooked chicken; low-heat cooking gives you tender, succulent chicken with superior broth. If you’re in a hurry, consider baking instead. This recipe specifically requires the low-and-slow approach.
My chicken reached 165°F in 2 hours—should I turn it off or keep cooking?
Once chicken reaches 165°F internally, it’s safely cooked from a food safety perspective. You can serve immediately. However, if you have time, continuing to cook on low for the full 3 hours will make it even more tender. The additional hour allows collagen breakdown to progress further. If you remove it at 2 hours, it will be pleasant but slightly firmer than the ideal 3-hour version. Think of 3 hours as the sweet spot—fully safe and optimally tender. Beyond 3 hours, you risk the meat becoming slightly stringy, though this takes significant overcooking.
Should I remove the skin before or after cooking?
Keep the skin on during cooking—remove it after if you prefer. The skin protects the meat, retains moisture, and contributes collagen to your broth. If you’re removing it for dietary reasons (to reduce fat), remove it after cooking is complete. The meat will stay more moist if skin protects it during the slow cook. If you prefer crispier skin, you can place cooked chicken briefly under a hot broiler for 2-3 minutes, but be careful not to dry it out. The skin rarely crisps in the slow cooker due to steam, so broiler finishing works if texture is important to you.
Can I double this recipe in my slow cooker?
Yes, if your slow cooker is large enough (6 quarts or bigger). Double the chicken but keep broth at ½ cup (not doubled). The additional meat needs more heat penetration, so extend cooking to 3.5-4 hours. You’ll know it’s done when a thermometer inserted into the largest breast reaches 165°F. Don’t stack chicken directly on top of each other if possible—arrange them so heat can circulate. If stacking is necessary, rotate the top layer to the bottom halfway through cooking. More chicken = longer cook time because heat must penetrate further.
Make-Ahead Guide for Meal Prep Success
This recipe is exceptional for meal preparation. I use it strategically in my practice when helping clients build sustainable eating patterns. Here’s how to prep like a professional:
The Night Before: Pat your chicken completely dry and store uncovered on a plate in the refrigerator. This “air-drying” step allows surface moisture to evaporate, improving seasoning adhesion. In the morning, it seasons more evenly than if you season wet chicken. Combine your seasonings in a small jar or container.
Morning Prep (5 minutes): Season your chicken, add broth and butter to the slow cooker, arrange chicken, cover, and turn it on. That’s it. You’ve invested five minutes and have dinner ready at 3 PM if you start at noon, or at dinner time if you start later.
Batch Cooking Strategy: Cook three to four batches on consecutive days or during weekend meal prep. Cool completely, portion into containers with some cooking broth, and freeze. When you need quick dinner, thaw overnight and reheat gently. This creates a freezer of convenience without sacrificing nutrition. I recommend this to my busiest clients.
Portion Strategy: I portion into 3.5-ounce servings (approximately the size of a deck of cards) with 2 tablespoons of cooking broth. This standardization helps with meal planning and nutrition tracking. Stack these in your freezer and grab what you need daily.
Common Mistakes to Avoid
Mistake 1: Using boneless chicken breasts instead of bone-in – This defeats the entire purpose. Boneless chicken dries out, contributes no minerals or collagen to the broth, and tastes flat. The bone is not optional. It’s what makes this recipe special.
Mistake 2: Adding too much broth – I see this constantly. People think more liquid equals more moisture. Actually, excessive broth dilutes flavor and creates watery, bland chicken. Stick to ¼ cup. The chicken releases its own moisture as it cooks.
Mistake 3: Lifting the lid repeatedly during cooking – Every time you peek, you release steam and extend cooking time 15-20 minutes. Your cooker becomes inefficient. Trust the process. If you must check doneness, use a meat thermometer inserted through the side rather than lifting the lid.
Mistake 4: Skipping the rest period – I understand the impatience—the chicken is done, you’re hungry, you want to eat. Those 10 minutes matter enormously. Resting allows muscle fibers to relax and reabsorb liquid. You’re trading immediate gratification for substantially better texture. Make the trade.
Seasonal Variations
Spring: Add fresh tarragon (1.5 teaspoons, chopped) and lemon zest from one lemon to your seasoning blend. Spring’s brightness pairs beautifully with chicken. Serve over spring greens or with fresh pea risotto. The lemon is especially compatible with spring’s fresh aesthetic.
Summer: Add fresh basil (2 teaspoons, chopped) and a pinch of fennel seed to your spice blend. Serve with cucumber salad and fresh tomatoes. Summer calls for brightness; these herbs deliver it. The basil connects to summer gardens and familiar comfort.
Fall: Increase paprika to ¼ teaspoon and add ⅛ teaspoon turmeric plus a pinch of sage (⅛ teaspoon dried). Fall’s deeper spices complement chicken beautifully. Serve with roasted root vegetables and wild rice. These warming spices honor autumn’s shift toward heartier eating.
Winter: Add ⅛ teaspoon dried thyme and ⅛ teaspoon ground ginger to your spice blend. These warming spices support immune function—particularly valuable during cold season. Serve with creamy mashed potatoes or cauliflower mash. Winter calls for soul-warming preparations, and this delivers.
Expert’s Nutritional Tip: The Collagen Connection
As a registered dietitian, I watch for ingredients that do the heavy lifting nutritionally. Collagen is one of those superstars. During those three slow-cooking hours, collagen from the chicken’s connective tissue and bone hydrolyzes into gelatin and bioavailable amino acids. Your body uses these amino acids for skin elasticity, joint resilience, and gut lining integrity.
This matters specifically for women over 40, athletes recovering from training, and anyone managing joint discomfort. That cooking broth isn’t waste—it’s therapeutic. Drink it straight, use it in soups, or pour it over vegetables. You’re not just removing a byproduct; you’re capturing concentrated nutrition that most recipes discard. This is the kind of nutritional strategy that separates good recipes from transformative ones.
More Recipes You’ll Love
- Baked Chicken Honey Recipe – A complementary technique using dry heat for those preferring roasted texture and deeper caramelization
- Baked Breaded Tilapia Recipe – For rotating proteins while maintaining your commitment to nutrient-dense, whole-food cooking
- Baked Lemon Donut Recipe – A wholesome dessert option when you want to finish your meal with something special but nourishing
- This Easy Chicken Dinner – Worth adding to your recipe collection.
There’s something sacred about mastering a single recipe. When you understand bone-in chicken slow cooker preparation completely—the science, the timing, the technique—you’re not just following instructions. You’re developing confidence in your kitchen. That confidence extends to improvisation, to feeding your family with intention, to creating meals that nourish body and spirit simultaneously.
My mother taught me that cooking is love made visible. This recipe embodies that philosophy. Three simple hours, a handful of seasonings, one magnificent bone-in chicken breast—and you’ve created nourishment that supports your body for days (if you meal prep). You’ve created something your grandmother would recognize as wholesome. You’ve created memories worth making over and over.
Cook with confidence. Trust the process. Embrace the rest period. Save that broth. And remember—you’re not just feeding yourself or your family. You’re practicing care in its most essential form. Happy Cooking!