
This post contains affiliate links. As an Amazon Associate I earn from qualifying purchases.

This Corn Chowder With Bacon And Potato Recipe doesn’t just taste incredible—it stops people in their tracks. The moment that creamy golden bowl arrives at the table, with those crispy bacon bits catching the light and fresh green onions scattered across the top, I watch faces soften. This is the kind of dish that feeds more than just hungry bellies. It feeds memory, comfort, and the soul-deep satisfaction of knowing someone cared enough to cook. If you’re looking for that same magic, I have exactly what you need.
The Most Beautiful Corn Chowder With Bacon And Potato Recipe You’ll Ever Make (And It’s Easier Than It Looks)
I learned early in my career as a registered dietitian that the most nourishing meals are often the simplest ones—the ones that honor whole foods without unnecessary complexity. But I learned even earlier, in my mother’s kitchen, that a beautiful dish tells its own story before anyone takes the first spoonful.
I remember watching my mom ladle soup into mismatched bowls on a cold Saturday morning. She’d made something that looked almost humble until you saw how the cream ribboned through the golden broth, how the bacon shards caught the kitchen light like little jewels, and how the bright corn kernels and tender potatoes created this perfect visual rhythm. My father looked at that bowl and smiled before he even tasted it. That’s when I understood: we eat with our eyes first. This recipe carries that same philosophy. It’s nutritionally sound, it’s stress-free to prepare, and it’s absolutely stunning in the bowl.
The Visual Elements That Make This Dish Stunning
When I sit down to create a recipe, I’m thinking about three things: how it tastes, how it nourishes, and how it looks. This chowder excels in all three areas, but let’s talk about what makes it visually remarkable.
- That Golden-Cream Color—The base is a beautiful pale gold, created by the natural starch from potatoes and thickened with just a touch of cornstarch. It’s warm, inviting, and signals richness without being heavy. The cream swirls through the broth and catches whatever light you have in your kitchen.
- Textural Contrast—You’ve got silky broth, tender potato chunks, sweet corn kernels that pop slightly between your teeth, and crispy bacon pieces that add visual interest and that satisfying crunch. Each element has its own presence on the spoon.
- Bright Garnish Impact—Fresh green onions scattered across the top add a vibrant pop of color that makes the whole bowl come alive. It transforms this from “nice comfort food” to “I want to photograph this and share it.”
Choosing Ingredients for Maximum Visual Impact

I’m particular about my ingredients, and not just because of my nutrition background—though that matters. I choose them because each one plays a role in both flavor and appearance. Here’s what you’ll need to create this masterpiece, and why each ingredient earns its place in the pot.
- ½ teaspoon dried thyme (adds subtle herbal notes that make people wonder what your secret ingredient is)
- 3 cups fresh corn kernels, or high-quality frozen or canned (fresh provides the sweetest flavor and brightest color, but frozen works beautifully year-round)
- 1 medium onion, finely chopped (creates a flavorful base and virtually disappears into the broth)
- 1 celery rib, finely chopped (adds authentic chowder depth without overpowering the corn)
- 2 cloves fresh garlic, minced (provides aromatic complexity that elevates simple ingredients)
- Shredded sharp cheddar cheese, for serving (adds color and richness to each bowl)
- 4 medium red potatoes, chopped into bite-sized pieces (their natural ruby-red skin adds color that stays vibrant even after cooking)
- 2 tablespoons cornstarch (thickens gently without creating a flour-based paste that can look dull)
- ¾ cup whole milk or heavy cream (full-fat dairy creates that silky mouthfeel and beautiful cream color)
- ¼ teaspoon black pepper (just enough to remind the palate this is intentional seasoning)
- 1 teaspoon sea salt (enhances natural flavors without harshness)
- 3 cups low-sodium chicken broth, preferably homemade (the foundation for a clean, balanced flavor profile)
- Fresh green onions, sliced thin, for garnish (the final visual and flavor flourish)
- 3 strips thick-cut bacon, chopped, plus extra for serving (thick-cut pieces maintain their structural integrity and visual impact better than thin bacon)
Serves 6 generously as a main course, or 8 as a starter.
How to Make Picture-Perfect Corn Chowder With Bacon And Potato Recipe
I’m going to walk you through this step-by-step, and I’m going to be honest about the small moments that matter. This isn’t complicated cooking, but it’s intentional cooking. There’s a difference.
Step 1: Start With the Bacon Foundation
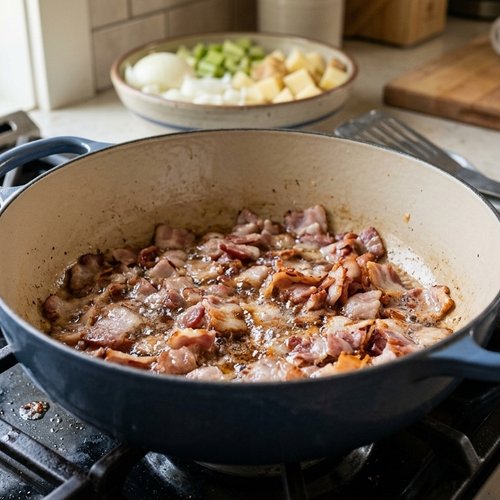
In a large Dutch oven or heavy-bottomed soup pot, place your chopped bacon over medium-high heat. You’re not rushing this. Let it cook for about 3 to 4 minutes until the edges turn deep golden-brown and the fat begins rendering. This is where your flavor begins. The rendered bacon fat is liquid gold—it carries flavor to every other ingredient. When the bacon is perfectly cooked, it should be crispy enough to have structural integrity in the bowl, not so cooked that it shatters into dust.
Step 2: Build Your Aromatic Layer
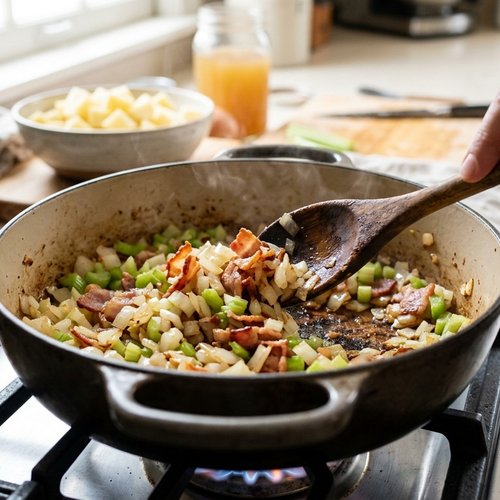
Once the bacon is just right, add your finely chopped onion and celery to the same pot. Stir everything together and let it cook, stirring occasionally, for about 4 to 5 minutes. You’re looking for the onion to become translucent and just barely starting to brown at the edges. This browning is called the Maillard reaction, and it’s where deep, complex flavor develops. Don’t skip this by rushing.
When you’ve reached that point, add your minced garlic and cook for just 1 minute more. Your kitchen should smell incredible right now—that’s your signal you’re on the right track.
Step 3: Season and Deglaze
Now add your dried thyme, salt, and black pepper directly to the pan. Give everything a good stir to distribute the seasonings evenly. This is the moment to taste the aromatics—they should smell warm and intentional, not acrid or burnt.
Pour in your low-sodium chicken broth. Using a wooden spoon, gently scrape the bottom of the pot to release all those browned bits stuck there. These flavorful bits dissolving into your broth are essential—they’re concentrated flavor that makes homemade broth taste like homemade broth.

Step 4: Add Potatoes and Corn
Add your chopped red potatoes and your corn kernels directly to the broth. Stir to distribute everything evenly. At this point, your pot should look like it’s full of promise. Bring everything to a gentle simmer over medium heat, then reduce the temperature to medium-low and cover the pot.
Let this simmer undisturbed for 12 to 15 minutes. You’re waiting for the potatoes to become tender enough that a fork pierces them easily, but not so soft that they fall apart. The red potato skin should remain visible and vibrant—this is part of your visual story.

Step 5: Create the Creamy Finish
While the soup simmers, combine your whole milk or cream with cornstarch in a small bowl. Whisk them together until the cornstarch is completely dissolved and you have a smooth slurry. This prevents lumps from forming when you add it to the hot broth.
When the potatoes are tender, slowly pour this milk mixture into your simmering soup, stirring constantly. Add it gradually—don’t dump it all in at once. You’ll watch the broth transform from translucent to beautifully creamy as the cornstarch gelatinizes and thickens everything. The whole process takes about 2 to 3 minutes of stirring.

Step 6: Taste and Adjust
Remove the pot from heat and taste your creation. Does it need more salt? More pepper? This is your moment to adjust. I typically add just a pinch more salt—enough to make people say “wow, this is flavorful” without being able to identify salt as the reason.

The Plating Masterclass
Here’s where everything comes together. The way you plate this soup matters because it signals to the person eating it that they’re about to experience something thoughtfully prepared. I’m going to share my professional technique, the same one I’ve learned from years of understanding that nutrition isn’t just about what goes into the body—it’s about the entire eating experience.
- Warm Your Bowls—Place your serving bowls in a warm oven (about 200°F) for 5 minutes before plating. Hot bowls keep the soup at the perfect temperature longer and signal care to the person eating. It’s a small detail that makes an enormous difference.
- Ladle With Purpose—Fill each bowl about three-quarters full, ensuring an even distribution of potatoes, corn, and broth. Leave room at the top for garnish—this creates negative space and makes the dish look intentional rather than overstuffed.
- Garnish Strategically—Sprinkle fresh green onions across the top in a scattered but not-random pattern. Add a small handful of extra crispy bacon pieces. If using cheese, add just a modest amount—you want color contrast, not a pile that obscures what’s beneath.
Photography Tips for This Dish
If you’re planning to share this beauty on social media or simply want to capture the memory, here’s how to photograph it at its absolute best:
- Natural Light Is Your Friend—Photograph this soup in natural window light, ideally from a window to the side of your setup. The cream color photographs beautifully in soft, diffused light. Harsh overhead light can make it look flat.
- Shoot From a Slight Angle—Rather than shooting straight down, position your camera at about a 45-degree angle to the bowl. This shows off the depth of the soup, the scatter of garnishes, and the visual layers that make it appealing.
Seasonal Color Variations
One of the joys of this recipe is its flexibility. While I’ve given you the classic version, you can adapt it seasonally to keep it fresh and visually interesting year-round.
Summer Version: Use fresh corn at peak season and add a handful of fresh basil at the very end (off heat, so it stays bright green). The vibrant herbal note and green color feel perfect when it’s warm outside.
Fall Version: Keep everything the same but roast your bacon in the oven instead of stovetop—it stays flatter and looks more elegant. Add crispy sage leaves as garnish instead of green onions. The earthier color palette feels right for cooler months.
Winter Version: This is when frozen corn shines. Add a pinch of smoked paprika to deepen the color slightly, and garnish with fresh thyme sprigs and crispy bacon. The visual warmth helps during cold months.
Can I Store Corn Chowder With Bacon And Potato Recipe?
Yes, and I’ll tell you exactly how to maintain its beauty through storage. As a dietitian, I’m concerned with food safety, but as someone who cares about presentation, I’m also concerned with maintaining that appeal when you reheat it.
Store cooled soup in an airtight container in the refrigerator for up to 4 days. The soup actually tastes better on day two or three—flavors have time to meld and deepen.
You can also freeze this soup for up to 3 months, though I recommend storing it without the cream finish. Freeze the broth with potatoes and corn, then add the milk and cornstarch mixture fresh when you reheat. This prevents the cream from separating during freezing and thawing, and your reheated version will look as silky and beautiful as the original.
To reheat, thaw overnight in the refrigerator, then warm gently over medium-low heat, stirring occasionally. If the soup seems too thick after storage, add a splash of additional broth or milk to restore the creamy consistency. Top with fresh bacon, green onions, and cheese just before serving—this ensures those garnishes have maximum visual impact.
Nutrition Information
Let me give you the numbers, because transparency matters to me as a registered dietitian. Based on USDA food composition data, each serving (approximately 1.5 cups) of this chowder contains roughly 285 calories, 16 grams of protein, 28 grams of carbohydrates, and 12 grams of fat, with about 3 grams of dietary fiber.
Here’s what excites me nutritionally: this isn’t a light soup, but it’s not indulgent either. The protein from bacon, milk, and potatoes keeps you satisfied. The fiber from corn and potatoes supports digestive health. The potatoes provide resistant starch when cooled and reheated, which acts like fiber in your body. The colorful ingredients—red potatoes, golden corn, green onions—signal nutritional diversity. You’re getting B vitamins from potatoes and corn, selenium and phosphorus from dairy, and beneficial compounds from the fresh thyme.
Expert’s Nutritional Tip: The combination of corn and potatoes in this recipe creates what we call “complementary proteins.” Neither is a complete protein on its own, but together they provide a more complete amino acid profile than either would alone. Add the protein from bacon and dairy, and you’ve created a nutritionally balanced meal that doesn’t taste like nutrition at all—it tastes like comfort.
What to Serve Alongside for a Complete Visual Spread
This soup is satisfying enough to serve as a main course, but if you’re creating a full meal, here’s what creates a visually cohesive and delicious spread:
- Crusty Bread for Texture Contrast—A warm, crusty baguette or sourdough adds textural contrast and extends the meal. The earthy tones complement the golden soup perfectly.
- Butter Tart Recipe—If you’re serving this as part of a comfort food feast, a classic butter tart makes an elegant finish that feels homemade and special.
- Simple Green Salad—A crisp salad with light vinaigrette provides a bright counterpoint to the creamy soup and cleanses the palate between bites.
- Carrots And Potatoes Recipe—If you want another side, this roasted version adds visual warmth and earthiness that complements the soup’s creaminess.
Common Mistakes to Avoid
I’ve been making this recipe for years, and I’ve learned from every mistake. Let me save you from making them:
Mistake 1: Cooking the Bacon Until It’s Too Dark—If you cook bacon until it’s almost black, it becomes bitter. You want it golden-brown and crispy, not burnt. The rendered fat should smell savory and delicious, not acrid.
Mistake 2: Skipping the Deglazing Step—Those browned bits on the bottom of the pot are flavor concentrate. If you skip scraping them up, your soup loses depth. This takes 30 seconds and transforms the final result.
Mistake 3: Adding the Cornstarch Slurry Too Quickly—If you dump the entire cornstarch mixture into the hot soup at once, it clumps. Add it slowly while stirring constantly, and you’ll get that beautiful, silky consistency. Patience here pays off.
Mistake 4: Overcooking the Potatoes—Potatoes that have cooked for 20+ minutes lose their structure and turn to mush. Aim for that sweet spot at 12 to 15 minutes where they’re tender but still hold their shape on the spoon.
Make-Ahead Guide
One of my favorite things about this recipe is how beautifully it accommodates busy schedules. Here’s how I prepare it for weeknight success:
The Night Before: Prep all your ingredients—chop the bacon, onion, celery, and potatoes. Store each in separate containers in the refrigerator. Have your cornstarch measured out and ready. This reduces your cooking time the next day to about 30 minutes from start to finish.
The Morning Of: If you’re serving dinner, you can make the entire soup in the morning and store it in the refrigerator. Reheat gently on the stovetop about 20 minutes before serving. The flavors will be even more developed.
For Freezing: As I mentioned, I freeze the soup base (broth, vegetables, corn, bacon) without the cream mixture. On the day you want to serve it, thaw overnight, reheat, and add the milk-cornstarch mixture fresh for the most beautiful result.

Corn Chowder With Bacon And Potato Recipe
Ingredients
- ½ teaspoon dried thyme adds subtle herbal notes that make people wonder what your secret ingredient is
- 3 cup fresh corn kernels, or high-quality frozen or canned fresh provides the sweetest flavor and brightest color, but frozen works beautifully year-round
- 1 medium onion, finely chopped creates a flavorful base and virtually disappears into the broth
- 1 celery rib, finely chopped adds authentic chowder depth without overpowering the corn
- 2 clove fresh garlic, minced provides aromatic complexity that elevates simple ingredients
- Shredded sharp cheddar cheese, for serving adds color and richness to each bowl
- 4 medium red potatoes, chopped into bite-sized pieces their natural ruby-red skin adds color that stays vibrant even after cooking
- 2 tablespoon cornstarch thickens gently without creating a flour-based paste that can look dull
- ¾ cup whole milk or heavy cream full-fat dairy creates that silky mouthfeel and beautiful cream color
- ¼ teaspoon black pepper just enough to remind the palate this is intentional seasoning
- 1 teaspoon sea salt enhances natural flavors without harshness
- 3 cup low-sodium chicken broth, preferably homemade the foundation for a clean, balanced flavor profile
- Fresh green onions, sliced thin, for garnish the final visual and flavor flourish
- 3 strip thick-cut bacon, chopped, plus extra for serving thick-cut pieces maintain their structural integrity and visual impact better than thin bacon
Instructions
Step 1: Start With the Bacon Foundation
- In a large Dutch oven or heavy-bottomed soup pot, place your chopped bacon over medium-high heat. You're not rushing this. Let it cook for about 3 to 4 minutes until the edges turn deep golden-brown and the fat begins rendering. This is where your flavor begins. The rendered bacon fat is liquid gold—it carries flavor to every other ingredient. When the bacon is perfectly cooked, it should be crispy enough to have structural integrity in the bowl, not so cooked that it shatters into dust.

Step 2: Build Your Aromatic Layer
- Once the bacon is just right, add your finely chopped onion and celery to the same pot. Stir everything together and let it cook, stirring occasionally, for about 4 to 5 minutes. You're looking for the onion to become translucent and just barely starting to brown at the edges. This browning is called the Maillard reaction, and it's where deep, complex flavor develops. Don't skip this by rushing. When you've reached that point, add your minced garlic and cook for just 1 minute more. Your kitchen should smell incredible right now—that's your signal you're on the right track.

Step 3: Season and Deglaze
- Now add your dried thyme, salt, and black pepper directly to the pan. Give everything a good stir to distribute the seasonings evenly. This is the moment to taste the aromatics—they should smell warm and intentional, not acrid or burnt. Pour in your low-sodium chicken broth. Using a wooden spoon, gently scrape the bottom of the pot to release all those browned bits stuck there. These flavorful bits dissolving into your broth are essential—they're concentrated flavor that makes homemade broth taste like homemade broth.

Step 4: Add Potatoes and Corn
- Add your chopped red potatoes and your corn kernels directly to the broth. Stir to distribute everything evenly. At this point, your pot should look like it's full of promise. Bring everything to a gentle simmer over medium heat, then reduce the temperature to medium-low and cover the pot. Let this simmer undisturbed for 12 to 15 minutes. You're waiting for the potatoes to become tender enough that a fork pierces them easily, but not so soft that they fall apart. The red potato skin should remain visible and vibrant—this is part of your visual story.

Step 5: Create the Creamy Finish
- While the soup simmers, combine your whole milk or cream with cornstarch in a small bowl. Whisk them together until the cornstarch is completely dissolved and you have a smooth slurry. This prevents lumps from forming when you add it to the hot broth. When the potatoes are tender, slowly pour this milk mixture into your simmering soup, stirring constantly. Add it gradually—don't dump it all in at once. You'll watch the broth transform from translucent to beautifully creamy as the cornstarch gelatinizes and thickens everything. The whole process takes about 2 to 3 minutes of stirring.

Step 6: Taste and Adjust
- Remove the pot from heat and taste your creation. Does it need more salt? More pepper? This is your moment to adjust. I typically add just a pinch more salt—enough to make people say "wow, this is flavorful" without being able to identify salt as the reason.

Notes
FAQs
Can I use canned corn instead of fresh, and will it look the same?
Absolutely. Canned corn works beautifully and is often picked and canned at peak ripeness, so the nutritional profile is comparable to fresh. The color will be slightly more muted than fresh—a touch less bright—but it’s still visually appealing and tastes wonderful. Frozen corn is actually my second choice and photographs nearly as well as fresh. Drain canned corn well before adding to remove excess liquid.
What if I don’t have whole milk? Can I use half-and-half or something lighter?
You can use half-and-half (which will create a slightly richer soup) or even 2% milk (which will be slightly less creamy). Heavy cream works too if you want to splurge. What you’re looking for is fat content to create that silky mouthfeel. Skim milk won’t give you the same luxurious result. If using cream, reduce the amount slightly—start with ½ cup instead of ¾ cup.
Can I make this in a slow cooker?
Yes, with modifications. Cook your bacon first on the stovetop, then add all other ingredients (except the cornstarch slurry and milk) to the slow cooker. Cook on low for 6-8 hours or high for 3-4 hours. About 30 minutes before serving, prepare your cornstarch slurry and stir it in while the soup is still hot. Let it simmer to thicken, then serve. The slow cooker version won’t have the same gorgeous caramelization on the aromatics, but the flavor will still be wonderful.
How can I make this vegetarian without losing the flavor depth?
Omit the bacon and instead sauté the onion and celery in 2 tablespoons of good butter until they’re deeply caramelized—this takes about 8-10 minutes but creates the same depth. Use vegetable broth instead of chicken broth. Add a teaspoon of smoked paprika to give that smoky richness you’re missing from bacon. Consider garnishing with crispy breadcrumbs or toasted nuts instead of bacon—this maintains that textural contrast that makes the soup special.
The soup looks too thin. Should I add more cornstarch?
Before adding more, let it simmer uncovered for 5 minutes. Sometimes the soup continues to thicken slightly as it cooks. If it’s still thinner than you like, make another slurry (1 tablespoon cornstarch mixed with 2 tablespoons milk), stir it in, and simmer for 2-3 minutes. Add gradually—you can always add more, but you can’t take it out.
More Visually Stunning Recipes
- this cozy soup—Another beautiful, hearty soup that photographs wonderfully and feels like a warm hug
- Bone In Chicken Breast Slow Cooker Recipe—A simple main that looks elegant on the plate
- Baked Mac N Cheese Recipe—Comfort food with that gorgeous golden crust that catches every light
I hope this recipe finds its way into your kitchen and onto your table. I hope it becomes one of those dishes you make when you want to say “I love you” without using words. That’s really what cooking is—it’s care in edible form, nutrition wrapped in memory, and nourishment delivered with intention.
This corn chowder with bacon and potato will feed your body exactly what it needs: protein, fiber, vitamins, minerals, and satisfaction. It will feed your eyes with its golden creaminess and vibrant garnishes. And if you’re lucky, it will feed your soul with the knowledge that you made something beautiful from simple ingredients and a little bit of patience.
That’s the magic I learned in my mother’s kitchen, and it’s the magic I share with every person I work with as a dietitian. Real nourishment doesn’t come from complexity. It comes from care. Let’s make some delicious memories together. Happy Cooking!